Following up on my recent post about making a minimal VPN routing virtual machine to isolate obnoxious VPN clients, another problem you’ll run into if you have the need to connect to a whole lot of client networks is that the networks of different companies tend to overlap, either with your own or with eachother. Most companies I deal with use the 10.0.0.0/8 or the 172.16.0.0/12 networks, as specified in RFC1918, or some combination thereof. 192.168.0.0/16 seems to be really unpopular for some reason, even in small networks.
The problems arise when one client’s network fully or partially overlaps that of another client, or that of the company you’re at. If there’s a 10.10.1.50 host in your network, and 10.10.1.50 is also inside the client’s 10.10.0.0/16 network, pfSense would have no idea where to route you. We could make a rule to route single computers to the remote site, but then they could never access the local machine with that IP. What we need is remapping, translation, dirty outbound NAT hacks and a bit of black magic.
A picture says a thousand words
This diagram attempts to show the address translation accomplished by pfSense and the reflector VM. The idea is to map the machines we’re trying to access at the remote site to an address range that is unused in the local network. Currently, we do this on an IP by IP basis, but it could easily be extended to translate entire address ranges if desired.
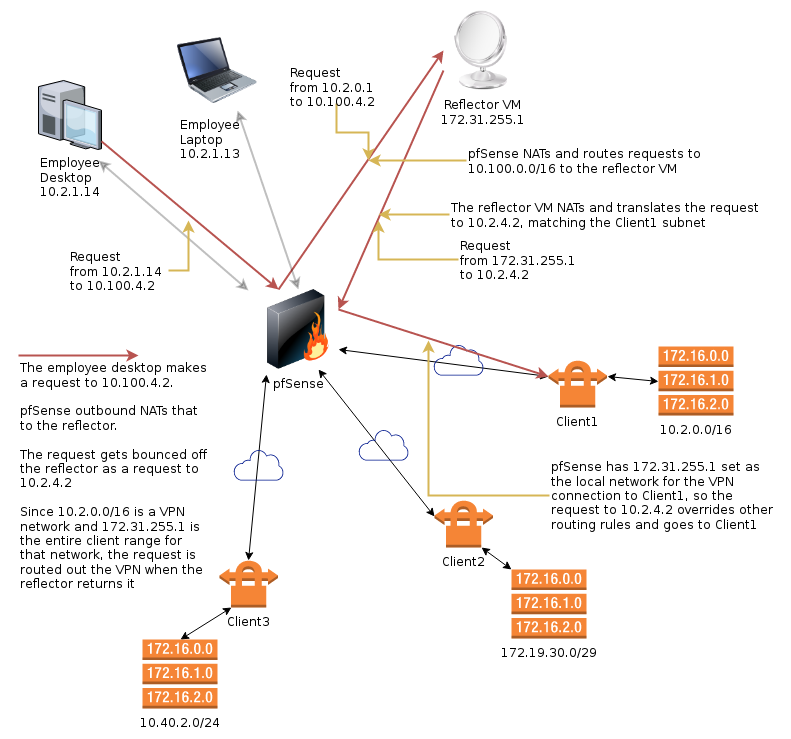
Image created with draw.io (XML).
Actually, that image didn’t explain a thing…
The idea here is that we have a client network that overlaps our own. We use an internally unused network, 10.100.0.0/16 and connect to that instead. We exploit the fact that the routing table of an IPSec connection trumps the internal routing table in pfSense. A connection proceeds as such:
- The PC at 10.2.1.14 attempts to connect to 10.100.4.2
- pfSense will outbound NAT this request and route it to the reflector VM at 172.31.255.1
The reflector VM didn’t need an IP address this odd, but it has yet to collide with a client, so that’s nice. - The request is now coming from the pfSense box, and arrives at the reflector as a connection attempt from pfSense to 10.100.4.2
- The reflector will also reverse NAT the request and route it back to pfSense as if it was making the request itself, but it will additionally translate the target IP from 10.100.4.2 to 10.2.4.2
- pfSense receives the connection request from 172.31.255.1 to 10.2.4.2, knows that 172.31.255.1/32 is the local IP range for the VPN connection to Client1 and routes the connection over there.
Here are a few facts about this setup, to answer questions you may have at this point:
- 172.31.255.1/32 is set as the local IP range for the VPN connection, 10.2.0.0/16 is set as the remote range
- Computers in the local network, even those in other VLAN’s, such as the 10.3.0.0 network, can thus not connect directly through the VPN, as their requests to 10.2.0.0/16 IP’s would be routed as usual to the local 10.2 subnet. They all have to use 10.100.0.0/16 to traverse the VPN’s
- Computers at Client1 can’t possibly get back through this insane setup to reach local machines by IP
However, they could make requests to the IP address we expose as the local part of our network in the NAT/BINAT configuration of IPSec, which is actually set up in a few cases, and the reflector can distribute those based on the port number and remote IP - The reflector VM can’t actually connect to internal machines with IP adresses overlapping the VPN networks, as its requests would be routed to clients
..but why would you want to use the reflector to connect to anything local? - If client networks overlap each other, you need more than one reflector
That’s completely insane!
I agree.
So how do we do it?
Glad you asked. Keep reading.
pfSense configuration
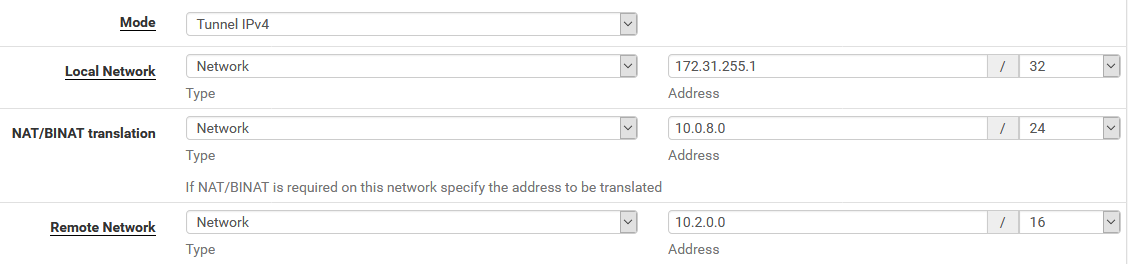
Firstly, we configure the VPN connection in pfSense as usual. Let’s assume it’s IPsec to make it easy. We set the local network to 172.31.255.1/32, and use NAT/BINAT translation to set the address to anything not in the client’s network, which will work just fine. The screenshot shows the IPSec Phase 2 configuration.
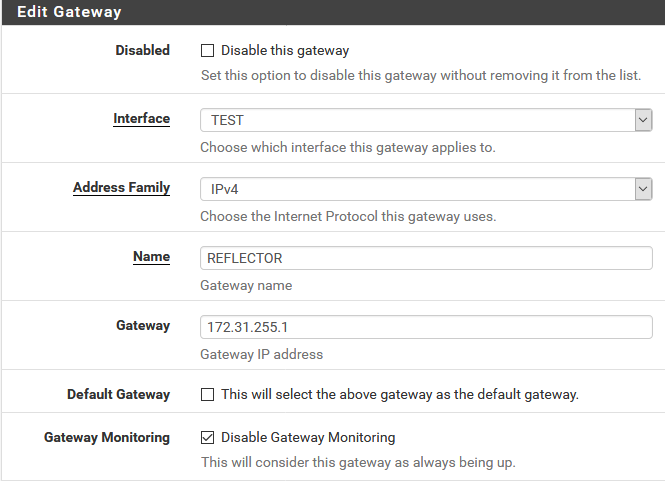
Next, we add the Reflector VM as a router on our internal network.
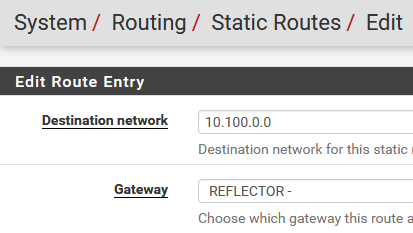
We also need to add a static route to send everything going to the 10.100.0.0/16 network to the router we just created.
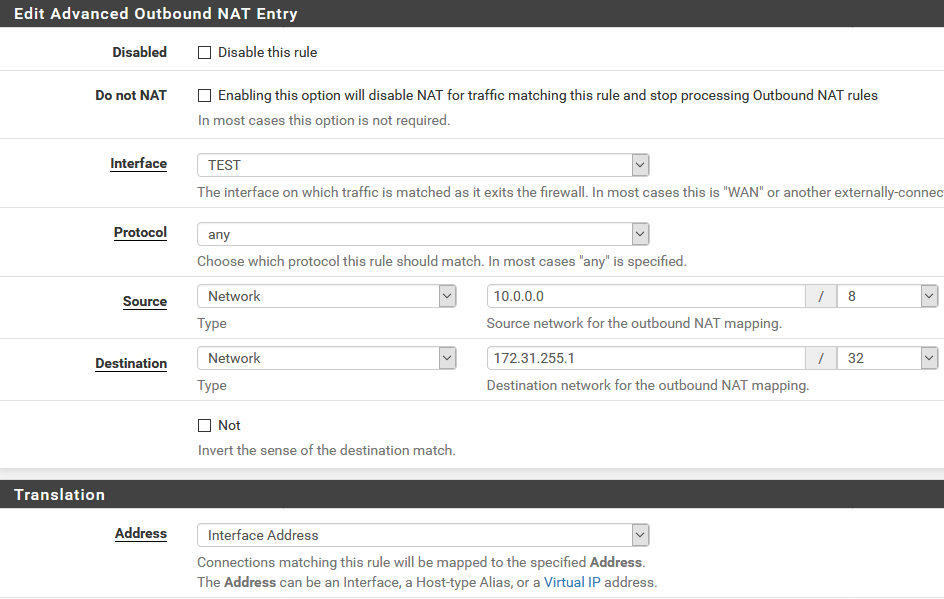
Then there’s the outbound NAT that translates requests going to the reflector as coming from pfSense. What we’re saying here is that connection requests going out of the TEST interface from any internal IP (I made this /8 just so I don’t have to touch it again) and heading to 172.31.255.1 should be NAT’ed to the interface IP of pfSense.
Then we add the firewall rules. We need two of these. The first one allows the Reflector VM to connect to all networks, which includes all the remote clients. The second (not shown, but you’ll figure it out) allows the local machines to connect to the 10.100.0.0/16 network.


This concludes the pfSense side of things.
Reflector VM
The reflector is a minimal install of Debian Linux with Shorewall installed. I’m familiar with both, so that makes it an obvious and time saving choice for me.
First, there’s the interfaces file. Just the single network interfaces in here. Not much to see, but the routeback option is needed to allow traffic to ingress and egress the same interface.
# ZONE INTERFACE BROADCAST OPTIONS
net eth0 detect dhcp,logmartians=1,nosmurfs,routefilter,tcpflags,routeback
The zones file is equally dull.
# ZONE TYPE
fw firewall
net ipv4
At the policy file, it gets a bit more interesting, as we allow any traffic to bounce off of us, going from net to net.
# SOURCE DEST POLICY LOG_LEVEL
$FW net ACCEPT
net net ACCEPT
all all REJECT info
As we want to NAT any traffic that bounces off us, we’ll need a masq file:
#INTERFACE:DEST SOURCE ADDRESS PROTO PORT(S) IPSEC MARK USER/ SWITCH ORIGINAL
#                                                       GROUP        DEST
eth0           10.0.0.0/8,172.16.0.0/12,192.168.0.0/16
In shorewall.conf, I change a single line to ensure IP_FORWARDING is enabled
IP_FORWARDING=Yes
Then come the rules. This is where we do the mapping. These are mock entries to preserve company privacy. Note the single reverse connection too, which allows companies at the remote end to reach a local webserver.
#ACTION SOURCE DEST PROTO DEST    SOURCE ORIGINAL RATE  USER/ MARK CONNLIMIT TIME HEADERS SWITCH HELPER
#                   PORT  PORT(S)        DEST     LIMIT GROUP
#?SECTION ALL
#?SECTION ESTABLISHED
#?SECTION RELATED
#?SECTION INVALID
#?SECTION UNTRACKED
?SECTION NEW

# we want to SSH in here
SSH(ACCEPT+) net $FW

# client1
DNAT any+ net:10.2.4.2 - - - 10.100.4.2
DNAT any+ net:10.2.4.6 - - - 10.100.4.6
DNAT any+ net:10.2.4.7 - - - 10.100.4.7

# client2
DNAT any+ net:172.19.30.4 - - - 10.100.30.4
DNAT any+ net:172.19.30.5 - - - 10.100.30.5
DNAT any+ net:172.19.30.6 - - - 10.100.30.6

# client3
DNAT any+ net:10.40.2.60 - - - 10.100.19.60
DNAT any+ net:10.40.2.61 - - - 10.100.19.61
DNAT any+ net:10.40.2.68 - - - 10.100.19.68

# reverse connections
DNAT any+ net:10.5.3.30:80 TCP 80

# PING
ACCEPT $FW net icmp
ACCEPT net $FW icmp
With our IP addresses re-mapped for the clients, everything should, amazingly, work. It’s not pretty. Far from it. But it does the job, it’s stable, and all I need to change to accommodate a new client is adding the map in the rules file after setting up the VPN.
The addresses in the 10.100.0.0/16 range are completely arbitrary. I usually make the last 8 bits match the client’s machines, but you don’t have to do that.
DNS
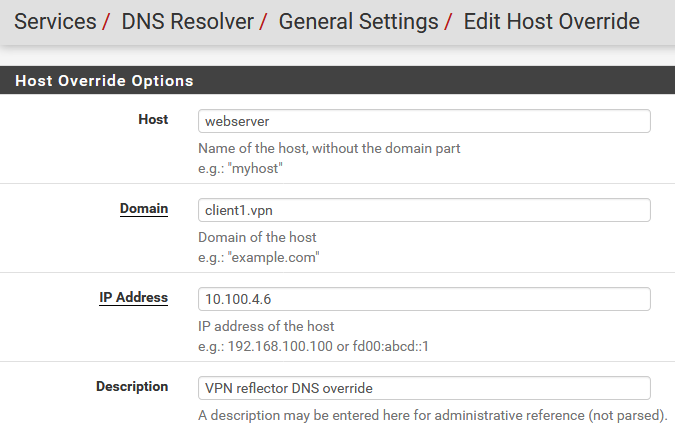
Finally back to pfSense again, I also have some DNS host overrides so employees don’t have to remember the remapped, or the original, IP addresses. Note that if you’re dealing with HTTPS and want certificates to function correctly, the host.domain names need to match the certificates on the remote servers. These overrides are trivial to set up, but here’s an example anyway.
So what happens when two clients overlap with each other?
The above solution applies when clients partially or fully overlap your internal network. However, if they overlap with each other, pfSense would again not know where to route a given connection from the reflector. The solution then is another reflector VM. They’re very cheap to run anyway, so it’s not a big issue.
Final words
If you ever attempt to do this, you will no doubt have questions. Feel free to leave them here, and I’ll try to get back to you. Make sure you enter your e-mail correctly. It will not be published, but I need it if you want me to reply 🙂
1 Comment
Hello,
Could you please explain how this is possible with pfSense?
“We could make a rule to route single computers to the remote site, but then they could never access the local machine with that IP”
Thanks,
G