Repurposing an old developer machine to run some light VM’s, I was tasked with getting Hyper-V Server running on the Asus Maximus V GENE motherboard. Simple enough. Download Hyper-V for free from Microsoft, format a USB stick with FAT32, put all the files from the .ISO on the stick, install.
Diskpart Cheat Sheet
 1) Open the command prompt as Administrator
 2) "diskpart"
 3) "list disk"
 4) Enter the number of the USB drive
 5) "clean"
 6) "create partition primary"
 7) "active"
 8) "format fs=fat32 quick"
 9) "assign"
10) "exit"
But hey, no network! 🙁

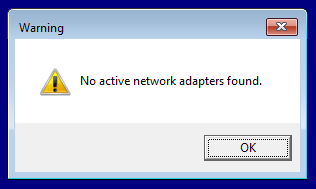
“No active network adapters found.” eh?
Tuns out Intel isn’t a particularly big fan of people running servers on their consumer gaming boards, but not wanting to wait for a new NIC to be delivered, it was time to hit Google.
I came up with these links:
https://www.iarp.ca/blog/8-hyper-v-and-the-intel-82579
https://jayrbarrios.com/2014/11/19/intel-nuc-d54250wykh-installing-lan-driver-on-windows-hyper-v-server-2012-r2/
So I followed the instructions, but switched out the drivers for the latest ones and the OS for Hyper-V 2016.
NDIS reference
A short reference to Intel’s Windows driver naming scheme
| Directory | Desktop OS | Server OS |
|---|---|---|
| NDIS62 | Windows 7 | Server 2008 |
| NDIS63 | Windows 8 | Server 2012 |
| NDIS64 | Windows 8.1 | Server 2012 R2 |
| NDIS65 | Windows 10 | Server 2016 |
Driver Installation
1 => The latest Intel networking drivers, intended for Windows Server 2016, are available here (local archive). Downloaded and extracted with 7-Zip.
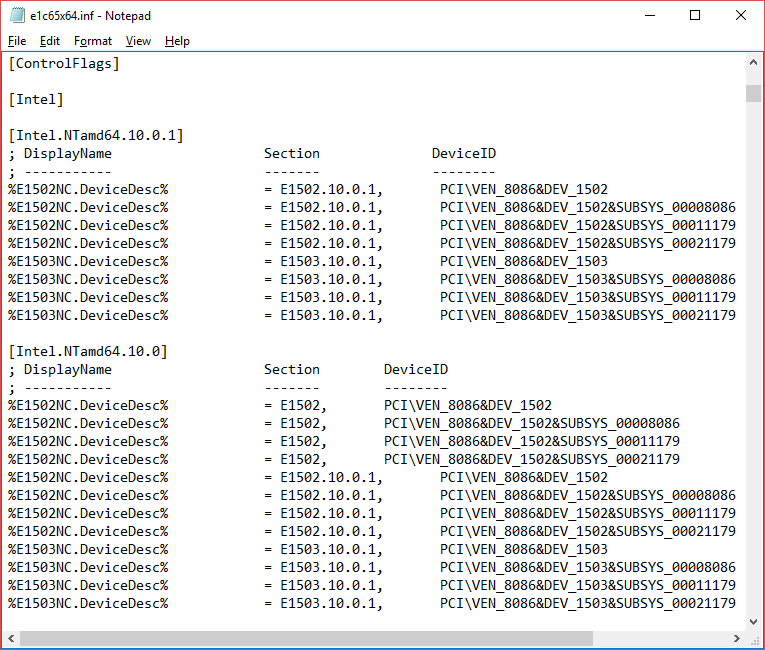
2 => Edited the file PROWinx64\PRO1000\Winx64\NDIS65\e1c65x64.inf, removing the lines under [ControlFlags] and copying the E1502NC lines to the next section as described in the links I found. It ended up looking like this:

3 => Disabled the driver signing, as the signature will now be invalid
bcdedit /set LOADOPTIONS DISABLE_INTEGRITY_CHECKS
bcdedit /set TESTSIGNING ON
bcdedit /set NOINTEGRITYCHECKS ON
4 => Rebooted (IMPORTANT)
5 => Put the driver folder on a USB stick, and installed it from the shell
X:
cd \PROWinx64\PRO1000\Winx64\NDIS65
pnputil -i -a e1c65x64.inf
6 => Agreed to the popup warning about installation of unsigned drivers
7 => Rebooted (IMPORTANT)
8 => Considered restoring the driver signing options with bcdedit, and then ignored it as I had better things to do
That’s it. If you’re uncomfortable modifying the .inf file yourself, you can download my already “unlocked” copy here: PROWinx64.zip
33 Comments
Got a Maximus V Formula, but same network controller, and so far been unable to get it to work.
I’ve tried both changing the driver INF by myself, and trying your patched driver, but for some reason I always get the hash mismatch error when running pnputil.
Yes, I’ve disabled driver signing with bcdedit, so not sure what’s up with this.
Any ideas?
Did you reboot after disabling the driver signing? That the hash doesn’t match is not a problem with the modifications you made, it’s simply the driver signing still being active.
That was indeed it, thank you!
My NIC is also the Intel 82579V –
MOBO is Intel DH67BL.
Repurposing this box from Server 2K12 R2 w/Hyper-V role, to Hyper-V Server 2K16.
I did this same process (successfully) with earlier driver when I originally installed 2K12, but no joy this time.
Tried both: 1) your ‘unlocked’ copy and 2) downloaded correct driver and altered elc65x64.inf myself.
Still emits the original “No active network adapters found” error after reboot.
Unsure what to try next. Perhaps install Server 2K16 GUI and see if I can get it working there first. . . Ideas?
Remember that you need to modify (and install) the NDIS64 version for Server 2012 R2 (see “NDIS reference” above)
Thanks for the reply.
Just to be clear, the OS that this box is receiving is Hyper-V Server 2016.
That should be NDIS65 (Windows 10 / Server 2016) correct?
Ah. Sorry. Yes, it should be.
Hm. Do you have any previous attempts at installing the drivers on the system already? If so, you could try using pnputil to remove those first.
Correct on the previous driver install artifacts … pnputil -e showed entries for my last 3 attempts.
Ran pnputil -d (against all 3) and then repeated the whole install process. Unfortunately, no luck.
I wiped the drive and installed Server 2K16 Datacenter and then applied the modified driver. Works as advertised!
For now, I will use this environment to get what I need done. Later, I’ll test the whole process from scratch again with Hyper-V Server 2K16.
Thanks again for your help and the work you put into this post!
No problem. Would be interesting to know what was up with your previous install though…
Ran another test:
Purchased SSD (wanted another one anyway).
Deployed Hyper-V 2016 from scratch.
Ran through same (successful) procedure as I used on the 2016 GUI install (used same modified .inf, etc.).
No joy.
For now I need to get on with other things, but I will return to this and update this blog with what I discover.
That is very peculiar. It has worked flawlessly every time I’ve tried it. ..which is only a total of 3 times, but still.
Please share your findings should you figure out what’s going on. I’m sure it will be helpful to others in your situation.
Are you using secure boot? Not sure if that’s relevant…
OK, I was able to resolve this using the CoreFig tool.
https://corefig.codeplex.com/
NOTE: This CoreFig documentation indicates it is for Windows Server 2012 Core and Hyper-V Server 2012,
but, at least for the functions I used here, it works for Hyper-V 2016.
On an internet connected machine:
Download corefig to a USB drive
-I downloaded CoreFig.iso rather than the CoreFig.zip for this usage.
On the Hyper-V machine:
Insert the USB Drive
-D: in my case
Mount CoreFig.iso
e.g., PowerShell:
PS> $ImagePath = ‘D:\CoreFig.iso’
PS> Mount-DiskImage -ImagePath $ImagePath
PS> Get-DiskImage -ImagePath $ImagePath | Get-Volume
-Returns the Volume assigned to the .iso
-E: in my case
Install (copy locally) the CoreFig files:
C:> mkdir CoreFig
C:> copy E:\** C:\CoreFig
Launch CoreFig:
C:> cd CoreFig
C:> Start_Corefig.wsf
Configure the adapter:
CoreFig Main Window:
-> Network Settings -> Network Interface Cards
-> Adapter Status -> Disconnected Adapters:
Select the adapter -> Enable -> Apply
-> IP Settings:
Configure IP and DNS values -> Apply
-> DNS Options:
Configure other settings -> Apply
So your adapter was somehow set as disabled, then? That’s very strange. Thanks a lot for sharing your solution!
I looked around a bit for PowerShell commandlets to manage devices, and found this from 2012:
https://blogs.technet.microsoft.com/wincat/2012/09/06/device-management-powershell-cmdlets-sample-an-introduction/
Unfortunately, no “Get-Device” commands seem to have made it into actual core releases of PowerShell.
Would this also work for the Intel Pro/1000 PT Dual Port Server Adapter? The drivers that are installed with Server 2016 are from 2011.
My VM’s do work but i have High CPU usage ONLY when copying something over the network or download something.
The same method applies to any driver that’s artificially restricted from installation on certain systems.
If the driver is actually incompatible with that version of the OS, it obviously will not work, but in most cases what works on the desktop OS works on the servers.
I’ve used this method with, for instance, graphics drivers for GPU assisted processing, successfully.
Your mileage may vary, as they say.
Well the network adapter is not restricted.
About 2 weeks ago i had server 2012 r2 and all was fine. I upgraded the mainboard, cpu and mem but used the same dual port nic.
Mainboard ia a ASUS P9X79 with 82579V onbaord nic which actually is not installed due to the restrictions. That is why i stumbled on this website.
But if i could use the Intel Pro/1000 PT dual port that would be better.
I am just not sure why you picked the E1502NC when editting the inf file for the 82579V NIC.
What would be the pick for the Pro/1000 PT?
Thanks for the super fast reply btw.
The answer is further out on the same line, where it lists the Vendor and Device ID’s, “VEN_8086&DEV_1503” in this case. These are the required lines.
The Vendor and Device ID’s for your particular hardware can be found in the Device Manager, under “Properties => Details => Hardware Ids”
You can also list them with PowerShell if you don’t have access to a GUI.
Get-WmiObject -Class “Win32_PnpEntity” -Namespace “root\CIMV2” | Where-Object { $_.Caption -match “network connection” }
You could add “| Select -ExpandProperty DeviceID” if you desire 🙂
Now i get how the ControlFlags bit works.
That said i doubt i will find newer drivers for the Pro/1000 PT.
Hardware ID is VEN_8086&DEV_105E
This is no where to be found in all the infs i went through.
I downloaded the Server 2016 drivers as stated here and also the Intel® Ethernet Adapter Connections CD https://downloadcenter.intel.com/download/22283/Intel-Ethernet-Adapter-Connections-CD?product=36773&_ga=1.250120964.308058174.1492674634
I am afraid i will have to use the 82579V or buy a new supported card.
MY HERO!!! OMG I can’t believe how ridiculous this is. No wait, I can. My whole week has been one instance of this after another.
I copied your inf wholesale and it works, but unfortunately my speed is a fraction of what it should be (in Kbps, yikes).
I thought you had a Rampage IV Extreme (what I searched on), but it looks like you don’t. I am wondering if there is a difference in all of the NDIS6*? I will look further.
In any case, thank you for posting this. 🙂
Nevermind… looks like it’s due to MB drivers not being installed correctly with Windows Server. I’ve got a gigabit hub that I connect to my wireless router via an iogear adapter (https://www.iogear.com/product/GWU627/). For some reason it doesn’t like it with the default install. Daisychaining ethernet cable directly into the router works with the speeds I am expecting/looking for. Hopefully once everything is installed things will be back to normal.
Best of luck 🙂
YOU! You are a legend! Saved my fucking ass!
Couldn’t understand why every driver worked fine under Windows 10, but not on Windows Server 2016. Tried everything, even extracting all drivers from Windows 10, didn’t work. I was pulling my hair out!
Can confirm this solution works with:
– Windows Server 2016 Standard
– Intel 82579V Gigabit Network Adapter
– Intel DH67CF (B3) motherboard
Your file worked for my Asus X79-Deluxe Motherboard! Thank you!
To say thanks for the download file, worked fisrt time on my Asus RIVE 🙂
Has anyone been able to get this to work with an Asus P8Z68-V Mobo? I’ve tried everything in this thread to no avail.
The driver appears to install but I still get the “no active network adapters found” error. I ran corconfig and it doesn’t show any adapters.
You my friend are too awesome! I have spent so much time trying to install this network card! Just saved me a migration to another server hosting company!
Michal
You are very welcome 🙂
Works like a charm!
Even on the latest HV Core 2019 today.
Thank you.
Also works on Windows 2016 Server Standard
Thanks a lot!
thank a looooooooooooooooooooooooot 🙂
it’s work…..
FYI, your zip works for Server 2019 Datacenter as well! 🙂
Thank you very much!!!!!!!
good man
FYI, your zip works for Server 2022 Standard / Datacenter as well! Thanks a lot man!