UPDATE: See the automated script at https://blog.dhampir.no/content/script-for-creating-a-compressed-image-file-from-a-raspbian-sd-card
Raspbian, by default, expands to fill the SD card it finds itself on, the first time it boots. After having customized an image to your liking it would be favourable to avoid copying 16 gigabytes of data, or however large your chosen SD card is, each time you want to duplicate your setup. So let’s go through some simple steps to reduce the size of the resulting image file.
The Works
- Prepare the Raspbian image by re-enabling auto expanding
- Edit /boot/cmdline.txt and append init=/usr/lib/raspi-config/init_resize.sh
In my case, this meant replacingdwc_otg.lpm_enable=0 console=serial0,115200 console=tty1 root=PARTUUID=1ba1cea3-02 rootfstype=ext4 elevator=deadline fsck.repair=yes rootwait logo.nologo net.ifnames=0
With
dwc_otg.lpm_enable=0 console=serial0,115200 console=tty1 root=PARTUUID=1ba1cea3-02 rootfstype=ext4 elevator=deadline fsck.repair=yes rootwait logo.nologo net.ifnames=0 init=/usr/lib/raspi-config/init_resize.sh
This takes care of resizing the partition, but not the file system.
- Grab the resize2fs_once script from git (or from my archive copy here) and enable it
$ sudo wget -O /etc/init.d/resize2fs_once https://github.com/RPi-Distro/pi-gen/raw/dev/stage2/01-sys-tweaks/files/resize2fs_once
$ sudo chmod +x /etc/init.d/resize2fs_once
$ sudo systemctl enable resize2fs_once
This will expand the file system to match the resized partition on the first boot.
- Edit /boot/cmdline.txt and append init=/usr/lib/raspi-config/init_resize.sh
- Cleanly shut down the Raspberry Pi
- Put the SD card in a card reader on a Linux machine. The machine can be your Raspberry Pi, as long as you’re booting from another SD card.
The following steps assume you are not currently booting from the SD card you want to modify.
- Confirm the device name with dmesg
$ dmesg
...
[1314286.573659] mmc0: new ultra high speed SDR50 SDHC card at address 59b4
[1314286.574319] mmcblk0: mmc0:59b4 USDU1 14.7 GiB
[1314286.575783] mmcblk0: p1 p2
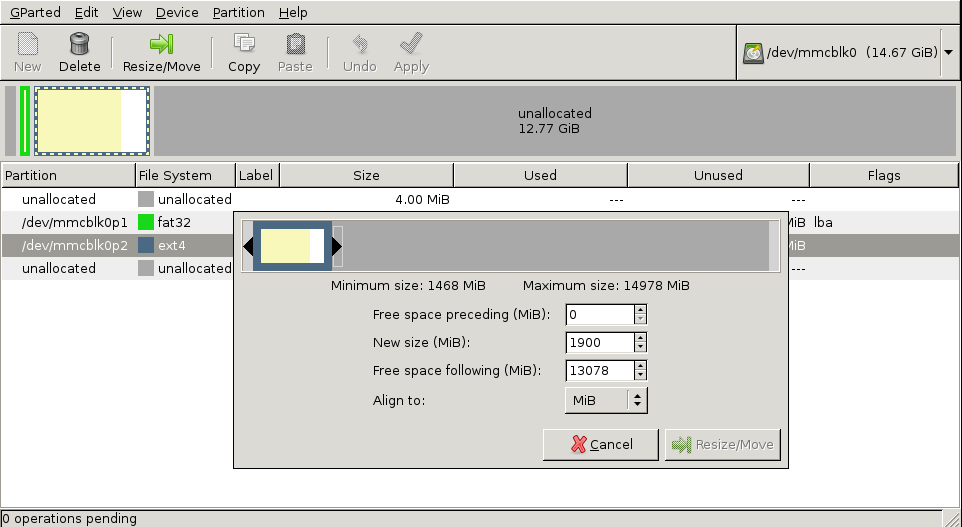
- Launch gparted, or a CLI tool if you prefer, and shrink the EXT4 file system and partition. I usually leave a hundred megs or so of free space to avoid issues with programs that write stuff on the first boot.
Close gparted. - Optional extra #1: You don’t have to do this step. Skip ahead if you want.
If you want, this would be the time to defragment the file system, as any fragmentation will be written as is to the next card.$ mkdir /tmp/sd_root $ sudo mount /dev/mmcblk0p2 /tmp/sd_root $ sudo e4defrag /dev/mmcblk0p2 ext4 defragmentation for device(/dev/mmcblk0p2) [7/51184]/tmp/sd_root/etc/dhcp/debug: 100% [OK] [14/51184]/tmp/sd_root/sbin/mntctl: 100% [OK] [310/51184]/tmp/sd_root/sbin/killall5: 100% [OK] ............ Success: [ 40336/51184 ] Failure: [ 10848/51184 ] $ sudo umount /tmp/sd_root $ sudo rmdir /tmp/sd_rootNote that some failures are expected. This is normal.
- Optional extra #2: You don’t have to do this step. Skip ahead if you want.
If you want your image to compress extremely well, you can at this point mount the image and zero fill the free space you left. Large chunks of zeros are exceptionally easy to compress.$ mkdir /tmp/sd_root $ sudo mount /dev/mmcblk0p2 /tmp/sd_root $ sudo dd if=/dev/zero of=/tmp/sd_root/delete.me dd: writing to '/tmp/sd_root/delete.me': No space left on device 41110+0 records in 41109+0 records out 21047808 bytes (21 MB, 20 MiB) copied, 0.437186 s, 48.1 MB/s $ sudo rm /tmp/sd_root/delete.me $ sudo umount /tmp/sd_root $ sudo rmdir /tmp/sd_root
- Use fdisk -l or a similar command to find the end of the resized partition
$ sudo fdisk -l /dev/mmcblk0
Disk /dev/mmcblk0: 14.7 GiB, 15753805824 bytes, 30769152 sectors
Units: sectors of 1 * 512 = 512 bytes
Sector size (logical/physical): 512 bytes / 512 bytes
I/O size (minimum/optimal): 512 bytes / 512 bytes
Disklabel type: dos
Disk identifier: 0x44b1ee6a

Device Boot Start End Sectors Size Id Type
/dev/mmcblk0p1 8192 93486 85295 41.7M c W95 FAT32 (LBA)
/dev/mmcblk0p2 94208 3985407 3891200 1.9G 83 Linux
This partition ends at block 3985407, and the block size is 512 bytes. We’ll need these numbers.
- Use dd to copy the image to where you want it. Here we use the values from the previous step, but add 1 to the number of blocks, as blocks are 0-indexed. To clarify, the first block is block 0, so if the last partition ended at block 5, the full image would be 6 blocks long.
$ sudo dd if=/dev/mmcblk0 of=/tmp/my_raspbian.img bs=512 count=3985408
- Compress the image with gzip, zip, 7z, or whatever tool you fancy, put it somewhere and tell your friends 🙂
2 Comments
Hi!
After filling free space with zeroes, you need to run ‘sync’ to make sure it is all actually written to the SD card.
This is not needed. As per the spec, unmounting the file system will first complete all pending write operations. Also, since we’re reading the image back, whether we’re reading from cache or the disk itself doesn’t really matter, so even if the data wasn’t on disk for some reason, it would still compress well.