xorg.conf for KVM

Found this somewhere.
Works for me.

Section "ServerLayout"
	Identifier     "BodhiZazen's KVM xorg.conf"
	Screen      0  "Screen0" 0 0
	InputDevice    "Mouse0" "CorePointer"
	InputDevice    "Keyboard0" "CoreKeyboard"
EndSection

Section "Module"
	Load  "record"
	Load  "dri"
	Load  "extmod"
	Load  "glx"
	Load  "dbe"
	Load  "dri2"
EndSection

Section "InputDevice"
	Identifier  "Keyboard0"
	Driver      "kbd"
EndSection

Section "InputDevice"
	Identifier  "Mouse0"
	Driver      "vmmouse"
	Option	    "Protocol" "SysMouse"
	Option	    "Device" "/dev/sysmouse"
	Option	    "ZAxisMapping" "4 5 6 7"
EndSection

Section "Monitor"
	Identifier   "Monitor0"
	VendorName   "Monitor Vendor"
	ModelName    "Monitor Model"
	HorizSync       20.0 - 50.0
	VertRefresh     40.0 - 80.0
	Option          "DPMS"

EndSection

Section "Device"
	Identifier  "Card0"
	Driver      "vesa"
	VendorName  "KVM - std"
	BoardName   "GD 5446"
	BusID       "PCI:0:2:0"
EndSection

Section "Screen"
	Identifier "Screen0"
	Device     "Card0"
	Monitor    "Monitor0"
	SubSection "Display"
		Viewport   0 0
		Modes "800x600"
	EndSubSection
EndSection

bash time limit on commands

Several programs, like “timelimit” and “timeout”, exist to prevent a process from running for too long.
However, if you want to do this on a box where neither is installed, there’s a way to do so with bash alone.

Based on the original script I found at pixelbeat.org…

#!/bin/sh

# Execute a command with a timeout

# Author:
# http://www.pixelbeat.org/
# Notes:
# If the timeout occurs the exit status is 128.
# There is an asynchronous (and buggy) equivalent of this
# script packaged with bash (under /usr/share/doc/ in my distro),
# which I only noticed after writing this.
# I noticed later again that there is a C equivalent of this packaged
# with satan by Wietse Venema, and copied to forensics by Dan Farmer.
# Changes:
# V1.0, Nov 3 2006, Initial release
# V1.1, Nov 20 2007, Brad Greenlee
# Make more portable by using the 'CHLD'
# signal spec rather than 17.

if [ "$#" -lt "2" ]; then
echo "Usage: `basename $0` timeout_in_seconds command" >&2
echo "Example: `basename $0` 2 sleep 3 || echo timeout" >&2
exit 1
fi

cleanup() {
{ kill %1 2>/dev/null; }& # kill sleep $timeout if running
kill %2 2>/dev/null && exit 128 # kill monitored job if running
}

set -m # enable job control
trap "cleanup" CHLD # cleanup after timeout or command
timeout=$1 && shift # first param is timeout in seconds
sleep $timeout& # start the timeout
"$@" # start the job

I made a new script in bash, which also returns the correct exit status if the command completed before the timeout: timeout.bash

Works well for me, at least 🙂

Debian APT Pinning properly explained

Accidentally stumbled across the “Debian Cheat Sheet” at http://carlo17.home.xs4all.nl/howto/debian.html (now dead – see pdf below)

Finally some documentation on why the heck pinning with “Package: *” and “Package: mypackage” doesn’t mix well, and other useful knowledge.

In case the link goes dead, here’s a PDF: debian_cheat_sheet.pdf

Using LD_PRELOAD to override a function

This was blatantly stolen from technovelty, kept here because I hate it when my bookmarks die.

For some reason, people seem to get this quite wrong a lot of the time. Certainly one should not be playing with symbols that start with __ unless you really know what you’re doing with them.

ianw@lime:~/tmp/override$ cat override.c
#define _GNU_SOURCE 1
#include <stdio.h>
#include <stdlib.h>
#include <unistd.h>
#include <sys/types.h>
#include <dlfcn.h>

pid_t getpid(void)
{
        pid_t (*orig_getpid)(void) = dlsym(RTLD_NEXT, "getpid");
        printf("Calling GETPID\n");

        return orig_getpid();
}

ianw@lime:~/tmp/override$ cat test.c
#include <stdio.h>
#include <stdlib.h>
#include <unistd.h>

int main(void)
{
        printf("%d\n", getpid());
}

ianw@lime:~/tmp/override$ gcc -shared -fPIC -o liboverride.so override.c -ldl
ianw@lime:~/tmp/override$ gcc -o test test.c
ianw@lime:~/tmp/override$ LD_PRELOAD=./liboverride.so ./test
Calling GETPID
15187

How difficult is it to misuse the code you write?

I found these “misuse levels” over at technovelty, which they originally ripped from Rusty Russel’s Bleeding Edge Page, which is a page you should definitely check out if you haven’t.

Anyway, I found these “misuse levels” both hilarious to read and at the same time somewhat concerning, as I started thinking “Where does my code really go on this list?”

  1. Impossible to get wrong
  2. Compiler/linker won’t let you get it wrong
  3. Compiler/linker warns if you get it wrong
  4. Simplest use is correct
  5. The name tells you how to use it
  6. Do it right or breaks at runtime
  7. Follow the convention and you will get it right
  8. Read the documentation and you will get it right
  9. Read the implementation and you will get it right
  10. Read the correct mailing list and you will get it right
  11. Read the documentation and you will get it wrong
  12. Follow the convention and you will get it wrong
  13. Do it right and it will break at runtime
  14. The name tells you how not to use it
  15. The obvious use is wrong
  16. Compiler/linker will warn you if you get it right
  17. Compiler/linker won’t let you get it right
  18. Impossible to get right

Debian and Ubuntu auto-login and Xorg without a display manager

If you have a harddrive password (most laptops do this) or full disk encryption, you might not feel the need for an additional login after your system boots.

On most Debian-based systems, TTY’s 1 through 6 are available after boot, while TTY 7 is used for Xorg. Therefore, I like to put my auto-login TTY on TTY 8, so it’s out of the way and leaves TTY 1 available for troubleshooting and similar.

Auto-login to Xorg requires two things: The actual auto-login and a script which loads Xorg.

First things first. The autologin.
In the olden days on a Debian system, this was done by adding a line similar to this one in /etc/inittab:

8:23:respawn:/bin/login -f bolt tty8 /dev/tty8 2>&1

This spawns a TTY 8 and logs in as “bolt” (change to suit your needs). It will do so on runlevels 2 and 3.

Now, however, the tool “rungetty” is generally used for this, as it’s more flexible and performs the same functions with a cleaner syntax. First, “apt-get install rungetty” to make sure it’s there, then add a line similar to the following:

8:3:respawn:/sbin/rungetty tty8 --autologin bolt

Note that on Debian Lenny and older, the version of rungetty has a specific check in code which only allows –autologin to work on tty1. If asked to autologin on another tty, rungetty would silently fail and spawn a normal login tty. This restriction has been removed from Squeeze and onwards.

On Ubuntu 10.10, the tty configuration is not in /etc/inittab. There, you have to add a file called “/etc/init.d/tty8.conf” with the following contents:

# tty8 - getty
#
# This service maintains a getty on tty8 from the point the system is
# started until it is shut down again.

start on runlevel [23]
stop on runlevel [!23]

respawn
exec /sbin/rungetty tty8 --autologin bolt

I basically copied tty6.conf and modified it to make that.

Autostarting Xorg
So by default when you login, both Debian and Ubuntu will leave you with a bash prompt, and very little graphical goodness. Thus, you want your login script to start Xorg, but only if Xorg is not already running, and we’re on tty8. Otherwise, switching from Xorg to a console with, for example, ctrl+alt+f1, would cause another attempt to launch Xorg.

Thus I made this script, named “.bash_login”, and put it in my home directory.

# ~/.bash_login: executed by bash(1) for login shells.

# include .profile if it exists
if [ -f "${HOME}/.profile" ] && [ -r "${HOME}/.profile" ]; then
    source "${HOME}/.profile"
fi

# if we're not root and we're logged in on tty8, we assume a rungetty autologin and start xorg
if [ ! -z "${UID:-}" ] && [ "$UID" != "0" ] && [ -z "${DISPLAY}" ] && [ ! -z "${SHLVL:-}" ] && [ "$SHLVL" == "1" ]; then
    if [ "$(tty)" == "/dev/tty8" ]; then
        trap "chvt 1; logout" INT TERM EXIT
        chvt 8
        while true; do
            echo "starting xorg"
            startx
            echo "sleeping 2 seconds"
            sleep 2
        done
    fi
fi

This script will do a few sanity checks, then run Xorg. If Xorg exits, it will sleep 2 seconds and run it again. If the script is told to stop, it will change to tty1, then logout of tty8.

Remote desktop does not support colour depth 24; falling back to 16

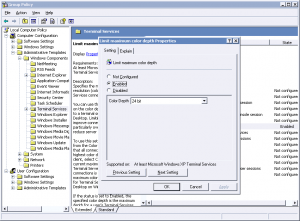
rdesktop on Linux will give this warning message when connecting to a Windows machine which has not been configured for 24-bit color RDP connections. This has, amongst other things, the effect of showing some horrible, jaggy desktop icons. See the pictures on the right for reference.

On Vista, Windows 7 and later (?), the solution is simple: Use 32-bit colors (-a 32)

On XP, which doesn’t support 32-bit colors, it gets a little more complicated. XP does support 24-bit connections, but this mode is disabled by default because of bandwidth concerns and bad choices.

To fix this problem on XP (nothing needs changing on the Linux or Windows client) you need to access the Local Machine Group Policy editor.

If you’re lucky, going to Start -> Run -> “gpedit.msc” will work for you. Type “gpedit.msc” without the quotes (and click “Run”).

If that does not open the group policy editor, this is the long way around:

  • Start -> Run and type in “mmc
  • Add the Group Policy snap-in by going to File -> Add/Remove Snap-in -> Add -> Group Policy Object Editor -> Add -> Finish (Local Machine) -> Close -> Ok

In the Group Policy Editor:

  • Navigate to Local Computer Policy -> Computer Configuration -> Administrative Templates -> Windows Components -> Terminal Services, and double-click on the ‘Limit maximum Color Depth‘ object.
  • Set the item to “Enabled” and set “Color Depth” to “24 bit”
  • Click OK, then log in with the remote client. If the changes haven’t been applied, reboot the server.

NOTE: If the Terminal Services item, or other parts of the path, is missing, you need to restore the missing functionality by right clicking on Administrative Templates, clicking Add/Remove Templates, Add, and then adding system.adm. Details here (credits to Ramesh Srinivasan), archive copy here.


Rejoice with your new, shiny desktop icons and full 24-bit desktop.

How to Hide a User Account from the Welcome Screen

  • Use RegEdit (start->run->”regedit”) to go to:
    HKEY_LOCAL_MACHINE\SOFTWARE\Microsoft\Windows NT\CurrentVersion\Winlogon\
  • Add, if one does not exist, a key called “SpecialAccounts”
  • Under that, add a key called “UserList”
  • Create new DWORD (32-bit) keys for each user you want to hide in your newly formed HKEY_LOCAL_MACHINE\SOFTWARE\Microsoft\Windows NT\CurrentVersion\Winlogon\SpecialAccounts\Userlist

Make the name of each DWORD the EXACT username you want to hide, and set their values to 0 (a value of 1 makes them show)

Save and restore partition tables with sfdisk

In my raid setup, I set up the partitions a certain way for running several mdadm raids on the same drive.

My server currently boots off of two drives, sda and sdb, where sda1 and sdb1 are the root file system in raid 1 (mirror) and sda2 and sdb2 are (encrypted) swap in raid 0 (striped). This is useful to have the redundancy of raid for booting, but none of that redundancy for the volatile swap partition. Instead I get higher write speed, which is always a bonus.

Note: Most Linux distros would actually stripe the swap anyway, given two swap partitions with equal priority, but I chose to do it this way.

Anyway, when one of the drives went for a one-way trip to electronic oblivion, the need arose to configure my new drive exactly as the old ones. Mind you, mdadm can actually handle non-equal partition sizes in a raid, but I’m kind of anal about this.

sfdisk to the rescue!

First, of course, I replaced the faulty drive (sdb) with one of the same brand and equal size. You don’t necessarily need the same brand, but that’s what I had.

Then, to export and save the partition table from sda (which was still working)

sfdisk -d /dev/sda > sda_partitions

..and save it to the replaced sdb

sfdisk /dev/sdb < sda_partitions

You can also do it all in one go

sfdisk -d /dev/sda | sfdisk /dev/sdb

As usual, RTM for more options 🙂