Quickly generate a 10 year, base64 encoded, self signed, client cert using OpenSSL

Just a bunch of commands I might need later:

#!/usr/bin/env bash
set -eu

certname="MyClient"
pubfile="pub.cer"

tmp="$(mktemp -d)"
trap 'rm -r "$tmp"' EXIT

openssl genrsa -out "${tmp}/private.key" 4096
openssl req -new -key "${tmp}/private.key" -subj "/CN=$certname" -out "${tmp}/request.csr"
openssl x509 -req -days 3650 -in "${tmp}/request.csr" -signkey "${tmp}/private.key" -out "${tmp}/certificate.crt"
openssl pkcs12 -export -out "${tmp}/certificate.pfx" -inkey "${tmp}/private.key" -in "${tmp}/certificate.crt" -passout pass: # No password
pfx="$(base64 -w0 "${tmp}/certificate.pfx")"
cp "${tmp}/certificate.crt" "$pubfile"
echo
echo
echo "PFX: $pfx"
echo
echo "Public key saved to: $pubfile"

PowerShell script to download a certificate and update all IIS sites’ bindings

I just fought through all the various guides and outdated suggestions, and lots of AI generated garbage using non-existent commands, to come up with this script. Now you won’t have to.

If you’re struggling with your own script and don’t want to throw it all away and adapt (adopt?) this one, the key takeaways are to include both the MachineKeySet and PersistKeySet storage flags, and to use $binding.AddSslCertificate rather than other suggestions from the interwebs on how to set a certificate for a given site. The “Exportable” flag is not needed, contrary to what many suggest, and is indeed a security issue in some setups.

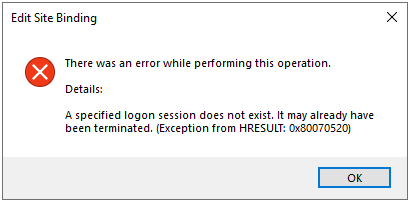
Not using the correct storage flags will give you vague and misleading error messages, in typical Microsoft fashion, such as

A specified logon session does not exist. It may already have been terminated. (Exception from HRESULT: 0x80070520)

Fun, huh? Well, here’s my script:

# Enable strict error handling
$ErrorActionPreference = "Stop"


# Variables
$certUrl = "https://internal.local/api/latest_certificate"
$outputCertPath = "$env:temp\certificate.pfx"
$username = "basicSecretUsername"
$password = "basicSecretPassword"
$certPassword = "Re4llyH4rdCertific4teP4ssword"
$certStoreName = "WebHosting"
$certCN = "*.mydomain.com"


# Download the certificate
Write-Host "Downloading the certificate..."
$authHeader = "Basic " + [Convert]::ToBase64String([Text.Encoding]::ASCII.GetBytes("${username}:${password}"))
Invoke-RestMethod -Uri $certUrl -Headers @{ Authorization = $authHeader } -OutFile $outputCertPath
Write-Host "Certificate downloaded to $outputCertPath."


# Install the certificate in the WebHosting store
Write-Host "Installing the certificate..."
$cert = New-Object System.Security.Cryptography.X509Certificates.X509Certificate2
$cert.Import(
$outputCertPath,
$certPassword,
[System.Security.Cryptography.X509Certificates.X509KeyStorageFlags]::MachineKeySet `
-bor [System.Security.Cryptography.X509Certificates.X509KeyStorageFlags]::PersistKeySet
)
$store = New-Object System.Security.Cryptography.X509Certificates.X509Store $certStoreName, "LocalMachine"
$store.Open([System.Security.Cryptography.X509Certificates.OpenFlags]::ReadWrite)
$store.Add($cert)
$store.Close()
Write-Host "Certificate installed in the $certStoreName store."


# Get the thumbprint of the newly installed certificate
$newCertThumbprint = $cert.Thumbprint
Write-Host "New certificate thumbprint: $newCertThumbprint"


# Update IIS HTTPS bindings
Write-Host "Updating IIS HTTPS bindings..."
Import-Module WebAdministration
Get-WebBinding -Protocol "https" | ForEach-Object {
$binding = $_
$bindingPath = $binding.ItemXPath
if ($bindingPath -match "name='([^']+)'") {
$siteName = $matches[1]
$bindingInfo = $binding.bindingInformation
Write-Host "Updating binding for site '$siteName' with binding info '$bindingInfo'"

# Enable SNI explicitly
Set-WebBinding -Name $siteName -BindingInformation $bindingInfo -PropertyName "sslFlags" -Value 1

# Set the certificate
$binding.AddSslCertificate($newCertThumbprint, $certStoreName)
Write-Host "Binding updated successfully for '$siteName'"
} else {
throw "Failed to extract site name from binding path: $bindingPath"
}
}


# Remove old certificates from the WebHosting store
Write-Host "Removing old certificates..."
$store.Open([System.Security.Cryptography.X509Certificates.OpenFlags]::ReadWrite)
$store.Certificates | Where-Object { $_.Thumbprint -ne $newCertThumbprint -and $_.Subject -like "CN=${certCN}" } | ForEach-Object {
Write-Host "Removing certificate with thumbprint: $($_.Thumbprint)"
$store.Remove($_)
}
$store.Close()


# Clean up temporary file
Remove-Item $outputCertPath -Force
Write-Host "Temporary certificate file removed."


# Done!
Write-Host "Script completed successfully."

What the heck is Windows Antimalware Service scanning all the time?

If the Antimalware Service Executable or the Windows Defender Advanced Threat Protection Service Executable is constantly hogging your CPU while you’re trying to get work done, or draining the battery of your laptop, you’re likely constantly changing files it deems necessary to scan.

On my work machine, I had two culprits: A virtual machine disk image that was being written to when the VM was running, and the cache directory for GitHub copilot and syntax highlighting in my IDE.

The solution is to add the files and/or directories that are constantly being scanned to the exclusions list for Windows Defender. You can access this list easily by going to “Virus & threat protection” => “Virus and threat protection settings (Manage settings)” => Exclusions (Add or remove exclusions)”.

To figure out which files are being scanned, you can use the MpPerformanceRecording tool. The following commands, in an Administrator PowerShell session, while Windows Defender is doing its thing (you may have to use the tools that make it suck up all the CPU cycles, while running this), should help track down the culprit(s). The time spent scanning each file (over and over again) is listed in the output.

> New-MpPerformanceRecording -RecordTo C:\recording.etl
> Get-MpPerformanceReport -Path:C:\recording.etl -TopFiles:100 -TopExtensions:10 -TopProcesses:10 -TopScans:100 | Out-File C:\output.txt

Let it record for quite some time, while the Antimalware Service is acting up, then get the performance report and consider adding exclusions. Keep in mind a few things:

  • Adding exclusions mean the files won’t be scanned. Don’t ever add things you don’t completely trust, like your downloads directory, file servers, mailboxes or anything of the sort.
  • Try to keep your exclusions specific. Don’t add all of AppData just because some program in there has a cache directory inside of its own directory somewhere in there. Premature optimization is a potential hazard here.
  • You will most likely have to reboot for the changes to take effect

Hope this helps.

Forcing an ARRAY() in postgres subqueries

Quick note to self, when making a complicated query, comparing to data in a subquery, the postgres query planner will sometimes decide to perform the entire outer query without the comparison, cache the results, and then run the inner query.

Example:

SELECT DISTINCT
...
FROM ...
INNER JOIN ... ON ...
WHERE
...
AND ...
AND ...id IN (
SELECT user_id
FROM ....
WHERE ...
)

Once this gets complicated enough, with large enough tables, the postgres planner may decide to run the entire outer query without filtering on the id. We can encourage it to do this by forcing the results of the inner query into an array, the equivalent of running it ourselves and simply saying WHERE id = any(array[1335, 1336, 1337]), where postgres will not hesitate to do the comparison on the fly, potentially excluding 99% of the dataset from being stored in cache.

Potentially 50x faster example for this scenario, depending on your data and the mood of the query planner:

SELECT DISTINCT
...
FROM ...
INNER JOIN ... ON ...
WHERE
...
AND ...
AND ...id = ANY ( ARRAY (
SELECT user_id
FROM ....
WHERE ...
) )

Go play with your local query planner.

TIKI-100 Documentation

Archiving some documentation for the Norwegian microcomputer TIKI-100 here, in case anyone needs it. I’ve sold mine, but Tommy Ovesen of Arctic Retro has graciously scanned the manuals I had for them.

They’re here as well, for redundancy:

Enjoy?

Allowing an empty JSON body, or no Content-Type, in a C# ASP.NET Core API

NOTE: In applications targeting net7.0+, Microsoft has fixed this issue, and you can set your Object to be default null (MyClass thingamagic= null), having it work as expected.
Leaving the below hack in here for anyone stuck on net6 or below.

You may be here because you’re getting this:

{"type":"https://tools.ietf.org/html/rfc7231#section-6.5.13","title":"Unsupported Media Type","status":415,"traceId":"00-0d785f3d1cb4fd71bc36ee25561e4b48-6bc5df1f0d070024-00"}

Or this:

{"type":"https://tools.ietf.org/html/rfc7231#section-6.5.1","title":"One or more validation errors occurred.","status":400,"traceId":"00-8ab7d4ff2d97d5ec040c25058b8d6fff-64b7c8e21e11563b-00","errors":{"":["A non-empty request body is required."]}}

Or even this:

{"type":"https://tools.ietf.org/html/rfc7231#section-6.5.1","title":"One or more validation errors occurred.","status":400,"traceId":"00-2fec89d15f0fbc0a7deaf1dd96656e15-e7fabe160575f645-00","errors":{"$":["The input does not contain any JSON tokens. Expected the input to start with a valid JSON token, when isFinalBlock is true. Path: $ | LineNumber: 0 | BytePositionInLine: 0."]}}

You may have tried adding this:

[FromBody(EmptyBodyBehavior = EmptyBodyBehavior.Allow)]

And you’ve been unsuccessful in accepting queries with no Content-Type, Content-Length 0.

What you need is an attribute that will override the missing Content-Type, provide an empty JSON body for the parser, and set an appropriate Content-Length to match, and only do so when the Content-Type is missing or JSON already, so you keep the other validation.

Luckily, I’ve written one. So here you go. Leave a comment if this helps you?

[AttributeUsage(AttributeTargets.Method)]
public class AllowEmptyJsonBodyAttribute : Attribute, IResourceFilter
{
private const string StreamOverride = "StreamOverride";

public void OnResourceExecuting(ResourceExecutingContext context)
{
var request = context.HttpContext.Request;
if (!string.IsNullOrEmpty(request.ContentType) && !request.HasJsonContentType() || (request.ContentLength ?? 0) != 0) return;
request.ContentType = "application/json";
context.HttpContext.Items[StreamOverride] = request.Body; // store the original stream
var emptyPayload = Encoding.UTF8.GetBytes("{}");
request.Body = new MemoryStream(emptyPayload); // replace the stream
request.ContentLength = emptyPayload.Length;
}

public void OnResourceExecuted(ResourceExecutedContext context)
{
if (!context.HttpContext.Items.TryGetValue(StreamOverride, out var o) || o is not Stream s) return;
var request = context.HttpContext.Request;
request.Body.Dispose(); // this disposes our injected stream
request.Body = s; // put the original back, so it can be cleaned up as usual
}
}

Moving columns in PowerQuery without naming every column

If you have pivoted data, you probably don’t want to name all the columns to move one, as a lot of them are going to contain dynamic data. The solution is to use the list of columns, manually moving the one you want into the desired position, as such:

= Table.ReorderColumns(PreviousStepName, List.InsertRange(List.RemoveItems(Table.ColumnNames(PreviousStepName), {"ColumnToMove"}), 4, {"ColumnToMove"}))

This moves the column “ColumnToMove” to position 4, by removing it from the list of columns in the previous step, and then re-inserting it at position 4.

This can also be used directly when merging two tables, putting the other table at a specific position:

= Table.ReorderColumns(Table.NestedJoin(PreviousStepName, {"LookupColumn"}, TargetTable, {"TargetLookupColumn"}, "Table", JoinKind.LeftOuter), List.InsertRange(List.RemoveItems(Table.ColumnNames(PreviousStepName), {"Table"}), 4, {"Table"}))

This joins the PreviousStepName step with the TargetTable (a step or a different query), by looking up the column “LookupColumn” in TargetTable[TargetLookupColumn], saving the join column as “Table” at position 4.

Expanding on this, you can even expand one or more columns from another table, directly into a given position:

= Table.ExpandTableColumn(Table.ReorderColumns(Table.NestedJoin(PreviousStepName, {"LookupColumn"}, TargetTable, {"TargetLookupColumn"}, "Table", JoinKind.LeftOuter), List.InsertRange(List.RemoveItems(Table.ColumnNames(PreviousStepName), {"Table"}), 4, {"Table"})), "Table", {"TargetTableColumnName"}, {"DesiredColumnName"})

The new items here are TargetTableColumnName, which must exist in the table you’re merging with, and the DesiredColumnName, which is the name you’ll end up with. This can, of course, be the same as the TargetTableColumnName if you want.

As a bonus, if the join returns several matches per lookup, you can expand the column as a List like this:

= Table.TransformColumns(PreviousStepName, {"Table", each _[Item]})

This targets the joined “Table” column we created in the previous query, extracting the matching “Item” column entries from TargetTable (see previous query) as a list, instead of multiplying your rows, as Table.ExpandTableColumn() would.

Have fun?

Unpivoting two columns in PostgreSQL

We recently had a need to unpivot two columns with item id’s in them so they’d come out as a single column with distinct values. Some of the entries had <null> as the parent id, and null should not appear in the output.

One could solve this with a simple UNION, but the view we were using was unfortunately rather expensive to run, so iterating it twice for the UNION was not an option.

So here goes:

SELECT DISTINCT
   UNNEST(
        CASE
           WHEN parent_item_id IS NULL THEN array[item_id]
           ELSE array[item_id, parent_item_id]
        END
   ) AS item_id
FROM rather_expensive_view
WHERE
   owner_id = 123456

In short, UNNEST unpivots arrays to rows, and we avoid printing NULL as an item_id when parent_item_id is NULL by not including it in the array in the CASE statement. The result is one iteration of the view, and a pretty list of item_ids.

To visualize the operation:

We go from:
---
item_id item_parent_id
10 NULL
11 4
12 3
---

To:
---
item_id
3
4
10
11
12
---

No NULL in the output :D

Adding additional columns to print, along with the UNNEST is fine. The additional columns will be duplicated for both rows in the case where an item has a parent. The output can, of course, also be joined with something like a sales table, so find sales of each item, including the parents.

Recursive PostgreSQL user manager query for PowerBI path value, with loop handling

Recursive SQL queries. They’re hard to read, and even harder to wrap your head around. They’re handy when you have a self-referencing table (intermediates allowed, but complicates things) that somehow represents a tree, such as the management tree of a corporation, where each user has a manager_id that’s also a user_id in itself.

There’s a complication however. Our data quality isn’t all that, and contains loops, where user 1 is managed by 2, managed by 3, managed by 4, managed by… 1? Yep.

There’s another complication – some managers are missing. Yes, that too.

For the output of this to be compatible with PowerBI, we want to return a pipe separated (id1|id2|id3|etc). This would be fine, except the PowerBI PATH() operator doesn’t support loops, and also doesn’t like the idea of missing managers. So we’ll have to do this ourselves, preferably in SQL.

Enough of my waffling. Here’s the query:

WITH RECURSIVE subordinates AS (
    SELECT
        u.id as user_id,
        u.manager_id,
        u.manager_id::text as "path"
    FROM
        companies c
    INNER JOIN companies_users cu ON c.id = cu.company_id
    INNER JOIN users u ON cu.user_id = u.id
    WHERE
        u.manager_id IS NOT NULL
    UNION
        SELECT
            s.user_id,
            m.manager_id,
            CONCAT(s.path, '|', m.manager_id) as "path"
        FROM
            users m
        INNER JOIN subordinates s ON
            s.manager_id = m.id
            AND m.manager_id IS NOT NULL
            AND m.manager_id != s.user_id
            AND CONCAT('|', s.path, '|') NOT LIKE CONCAT('%|', m.manager_id, '|%')
)
SELECT
    user_id,
    MAX(path) AS "path"
FROM
    subordinates
GROUP BY
    user_id

Long winded explanation:

  1. This query starts out with any user that has a manager_id not equal to null. Any additional constraints, such as limiting the query to a single starting user_id, should go there. This will create a line with this user, and the base path of the manager_id
  2. We union this result with users we find by joining with our own recursive query. This will select the manager(s), and the path is carried. We only do this if we have more to add to the path, i.e. if the manager_id is not null, and we don’t already have this manager in the path. This avoids loops, regardless of how deep they are.
    Note how paths are compared by adding a pipe to each end of each comparand, ensuring that if user 55 is in the path, user 5 will still be added, as we’re looking for, for example, |5| in a string of |40|32|55|2|, instead of 5 in a string of 40|32|55|2, which would yield a positive result.
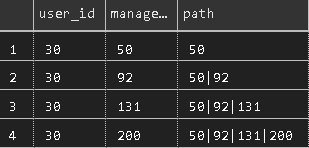
  3. Inside the union query, we concatenate the existing path from the parent user with the manager of the current one, thus building something akin to this, when restricted to a single starting user_id:

    As you can see, the user_id follows throughout this query, as an increasing number of managers get added to the path. Insert reference to Office Space about having too many bosses.
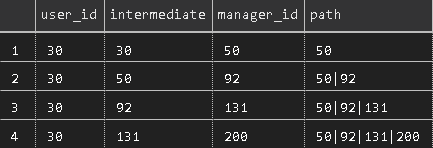
    To make the printout clearer, you can also print intermediate managers here, if you wish, by printing u.id as “intermediate” and m.id as “intermediate” in the source and union queries, respectively, giving you something like this:

    Here we see that user 30 has a manager of 50, 50 has a manager of 92, and so on. User 200 doesn’t have a manager, and thus the join constraints will stop the query at that point. The recursion guard would also make the query stop here if 200 had a manager of, say, 50, which is already in the path, or if it referred to the original user_id.
  4. Finally, we SELECT, from our recursive query, only the user_id and the MAX(path). Since a longer string is considered by PostgreSQL to be greater than a shorter one, this will give you only the line, per user, with the longest path, thus completing our mission assignment, giving us the following for our example user:

    If a restriction is then not put on the starting user_id, as in the full query above, you’d get one line for each user in your database that has a manager. If you want to include users with no manager, with a null or empty value for the path, make your changes as appropriate 🙂

I hope this helps someone.

Copying data from a restored postgres database to the live database

The correct way to copy data is not to extract to a CSV and import with some tool, to manually create INSERT queries, or to try filtering the pg_dump output. You should use the COPY function included in postgres, as such:

psql -c "COPY (SELECT * FROM my_table WHERE created_at > '2012-05-01') TO STDOUT;" source_db | psql -c "COPY my_table FROM STDIN;" target_db

Add psql parameters as necessary.

This does not replace the target table, it simply inserts what you’ve selected. If you want to replace the target, you need to TRUNCATE it first.