Recursive SQL queries. They’re hard to read, and even harder to wrap your head around. They’re handy when you have a self-referencing table (intermediates allowed, but complicates things) that somehow represents a tree, such as the management tree of a corporation, where each user has a manager_id that’s also a user_id in itself.
There’s a complication however. Our data quality isn’t all that, and contains loops, where user 1 is managed by 2, managed by 3, managed by 4, managed by… 1? Yep.
There’s another complication – some managers are missing. Yes, that too.
For the output of this to be compatible with PowerBI, we want to return a pipe separated (id1|id2|id3|etc). This would be fine, except the PowerBI PATH() operator doesn’t support loops, and also doesn’t like the idea of missing managers. So we’ll have to do this ourselves, preferably in SQL.
Enough of my waffling. Here’s the query:
WITH RECURSIVE subordinates AS (
    SELECT
        u.id as user_id,
        u.manager_id,
        u.manager_id::text as "path"
    FROM
        companies c
    INNER JOIN companies_users cu ON c.id = cu.company_id
    INNER JOIN users u ON cu.user_id = u.id
    WHERE
        u.manager_id IS NOT NULL
    UNION
        SELECT
            s.user_id,
            m.manager_id,
            CONCAT(s.path, '|', m.manager_id) as "path"
        FROM
            users m
        INNER JOIN subordinates s ON
            s.manager_id = m.id
            AND m.manager_id IS NOT NULL
            AND m.manager_id != s.user_id
            AND CONCAT('|', s.path, '|') NOT LIKE CONCAT('%|', m.manager_id, '|%')
)
SELECT
    user_id,
    MAX(path) AS "path"
FROM
    subordinates
GROUP BY
    user_id
Long winded explanation:
- This query starts out with any user that has a manager_id not equal to null. Any additional constraints, such as limiting the query to a single starting user_id, should go there. This will create a line with this user, and the base path of the manager_id
- We union this result with users we find by joining with our own recursive query. This will select the manager(s), and the path is carried. We only do this if we have more to add to the path, i.e. if the manager_id is not null, and we don’t already have this manager in the path. This avoids loops, regardless of how deep they are.
Note how paths are compared by adding a pipe to each end of each comparand, ensuring that if user 55 is in the path, user 5 will still be added, as we’re looking for, for example, |5| in a string of |40|32|55|2|, instead of 5 in a string of 40|32|55|2, which would yield a positive result. - Inside the union query, we concatenate the existing path from the parent user with the manager of the current one, thus building something akin to this, when restricted to a single starting user_id:
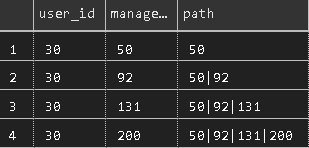
As you can see, the user_id follows throughout this query, as an increasing number of managers get added to the path. Insert reference to Office Space about having too many bosses.
To make the printout clearer, you can also print intermediate managers here, if you wish, by printing u.id as “intermediate” and m.id as “intermediate” in the source and union queries, respectively, giving you something like this: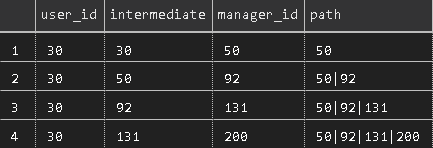
Here we see that user 30 has a manager of 50, 50 has a manager of 92, and so on. User 200 doesn’t have a manager, and thus the join constraints will stop the query at that point. The recursion guard would also make the query stop here if 200 had a manager of, say, 50, which is already in the path, or if it referred to the original user_id. - Finally, we SELECT, from our recursive query, only the user_id and the MAX(path). Since a longer string is considered by PostgreSQL to be greater than a shorter one, this will give you only the line, per user, with the longest path, thus completing our mission assignment, giving us the following for our example user:

If a restriction is then not put on the starting user_id, as in the full query above, you’d get one line for each user in your database that has a manager. If you want to include users with no manager, with a null or empty value for the path, make your changes as appropriate 🙂
I hope this helps someone.