Cygwin for Windows XP – fast mirror

Cygwin stopped being compatible with Windows XP in 2016. Following this post on stackoverflow, you can find the setup files and a (very slow) mirror that’s compatible.

I made my own, considerably faster, mirror of the last Windows XP compatible Cygwin release, at http://cygwinxp.cathedral-networks.org/

The mirror date is 2016-08-30, the 30th of August 2016 AD.

The setup file is available in the cathedral subdirectory, http://cygwinxp.cathedral-networks.org/cathedral/, along with a batch file that contains the command line options required to install from that mirror. I suggest you download both and run the batch file. If you only want the setup file, the essential option is the –no-verify one, which disables the use of package signatures. The signatures were not available in the Cygwin archive mirror, so I don’t have them.

Enjoy.

The Intel 82579V on Hyper-V Server 2016, installing unsupported network adapters

Repurposing an old developer machine to run some light VM’s, I was tasked with getting Hyper-V Server running on the Asus Maximus V GENE motherboard. Simple enough. Download Hyper-V for free from Microsoft, format a USB stick with FAT32, put all the files from the .ISO on the stick, install.

Diskpart Cheat Sheet

 1) Open the command prompt as Administrator
 2) "diskpart"
 3) "list disk"
 4) Enter the number of the USB drive
 5) "clean"
 6) "create partition primary"
 7) "active"
 8) "format fs=fat32 quick"
 9) "assign"
10) "exit"

But hey, no network! 🙁


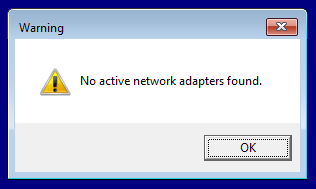
“No active network adapters found.” eh?

Tuns out Intel isn’t a particularly big fan of people running servers on their consumer gaming boards, but not wanting to wait for a new NIC to be delivered, it was time to hit Google.

I came up with these links:
https://www.iarp.ca/blog/8-hyper-v-and-the-intel-82579
https://jayrbarrios.com/2014/11/19/intel-nuc-d54250wykh-installing-lan-driver-on-windows-hyper-v-server-2012-r2/

So I followed the instructions, but switched out the drivers for the latest ones and the OS for Hyper-V 2016.

NDIS reference

A short reference to Intel’s Windows driver naming scheme

Directory Desktop OS Server OS
NDIS62 Windows 7 Server 2008
NDIS63 Windows 8 Server 2012
NDIS64 Windows 8.1 Server 2012 R2
NDIS65 Windows 10 Server 2016

Driver Installation

1 => The latest Intel networking drivers, intended for Windows Server 2016, are available here (local archive). Downloaded and extracted with 7-Zip.

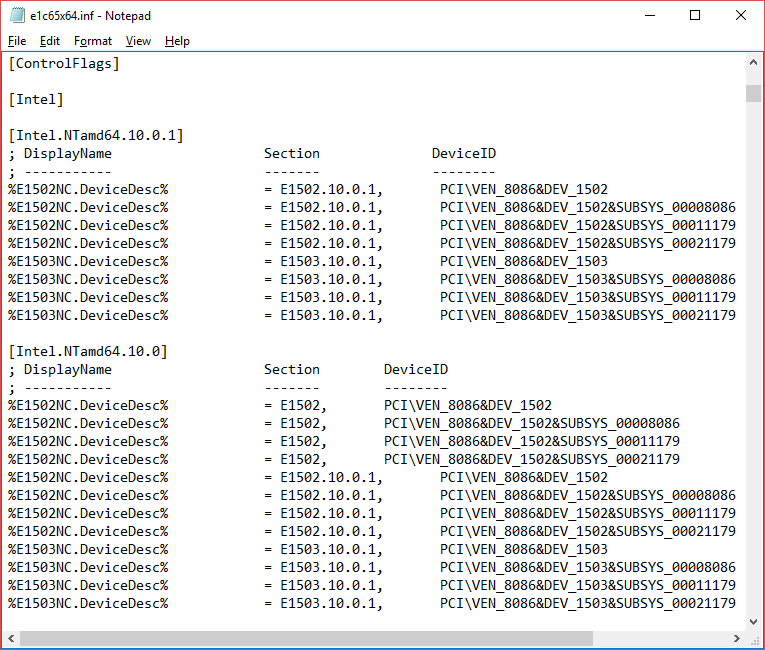
2 => Edited the file PROWinx64\PRO1000\Winx64\NDIS65\e1c65x64.inf, removing the lines under [ControlFlags] and copying the E1502NC lines to the next section as described in the links I found. It ended up looking like this:

3 => Disabled the driver signing, as the signature will now be invalid

bcdedit /set LOADOPTIONS DISABLE_INTEGRITY_CHECKS
bcdedit /set TESTSIGNING ON
bcdedit /set NOINTEGRITYCHECKS ON

4 => Rebooted (IMPORTANT)

5 => Put the driver folder on a USB stick, and installed it from the shell

X:
cd \PROWinx64\PRO1000\Winx64\NDIS65
pnputil -i -a e1c65x64.inf

6 => Agreed to the popup warning about installation of unsigned drivers

7 => Rebooted (IMPORTANT)

8 => Considered restoring the driver signing options with bcdedit, and then ignored it as I had better things to do

That’s it. If you’re uncomfortable modifying the .inf file yourself, you can download my already “unlocked” copy here: PROWinx64.zip

Killing a process tree, killing a PID and all children

Here are a couple of useful functions I wrote to kill a process tree. It’s useful when dealing with tcpserver, which refuses to disconnect a client for as long as a process it started, or a child of that process, still runs. It’s also good for tackling runaway unintentional fork bombs, rogue daemons and other mishaps.

The following script provides two functions:

sf_killtree

sends SIGSTOP to a process, kills all its children recursively, kills the process, sends SIGCONT and waits for it, to avoid “Terminated:” messages

sf_killchildren

kills all children of the current script without killing the script itself


Script:

function sf_killtree
{
    local ppid=$1 sig=${2:-"TERM"}
    if ! kill -0 "$ppid"; then
        builtin echo "killtree: ($ppid) - No such process" >&2
        return 1
    fi
    (( ppid == $$ )) || kill -STOP "$ppid" 2>/dev/null || :
    local pids=( $({ pgrep -P $ppid || ps -o pid= --ppid $ppid || :; } 2>/dev/null ) )
    if [[ -n "${pids[@]:-}" ]]; then
        for pid in "${pids[@]}"; do
            sf_killtree "$pid" "$sig" 2>/dev/null || :
        done
    fi
    kill "-${sig}" "$ppid" 2>/dev/null || :
    (( ppid == $$ )) || kill -CONT "$ppid" 2>/dev/null || :
    wait "$ppid" 2>/dev/null || :
}

function sf_killchildren
{
    local _term=$(builtin trap -p TERM)
    builtin trap : TERM
    sf_killtree $$ TERM;
    builtin trap - TERM
    builtin eval "$_term"
}

Addendum

Please also note the following from the KILL (2) man page:
“If pid equals 0, then sig is sent to every process in the process group of the calling process.”
While this does kill the script itself, unlike sf_killchildren, it can be a useful thing to end a script with, or to put in an EXIT trap.

Making a telnet server with Bash and tcpserver

Telnet servers are everywhere. They are simple, insecure by nature, outdated, and often badly implemented. Let’s do that, shall we? 🙂

TL;DR: Here’s the library.

A simple way to make any command line interface listen to incoming TCP connections is tcpserver, provided as part of the ucspi-tcp or ucspi-tcp-ipv6 package on Debian. Using this, we can make any Bash script available on the network.

Take a look at the following command:

# /usr/bin/tcpserver -c 10 -HR -u 65534 -g 65534 0.0.0.0 2048 /usr/local/bin/script

Here, we’re running tcpserver as root. This is to allow it to later change to a lower privilege level by switching to UID 65534 and GID 65534, nobody:nogroup. We’re also limiting the number of simultaneous connections to 10 and skipping a few reverse lookups. We’re listening on all available interfaces on port 2048.

Each incoming connection will start one instance of the script /usr/local/bin/script, which will be running as the user and group provided. If you do not specify -u and -g, the script will be running as the user that started tcpserver. Be careful with this.

Everything printed by the script to stdout will go to the client, and attempting to read from stdin will read from the client. We can test this with a short script:

#!/usr/bin/env bash
echo -n "Please enter your name: "
read -r name
echo "Hello, $name"
echo

Running this script through tcpserver, I can now connect to it with telnet:

$ telnet localhost 2048
Trying 127.0.0.1...
Connected to localhost.
Escape character is '^]'.
Please enter your name: Testy McTest
Hello, Testy McTest

Connection closed by foreign host.

That was easy. Now for the annoying stuff. RFC 854 specifies all sorts of things we should pay attention to, such as option negotiation and escape sequences. Most of this isn’t important, but we do need to pay attention to some of it if we want our telnet server to be smarter than a bag of hammers. Handling ^C (ctrl+c) would be good, as would proper telnet line endings, as if you try to connect to the above script with telnet on Windows, it won’t be pretty.
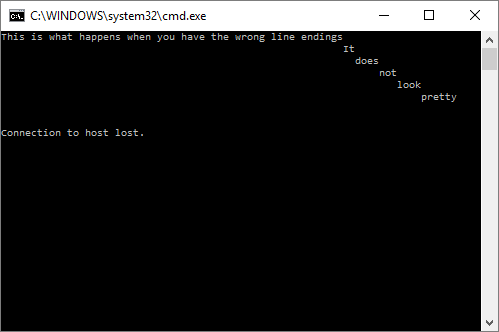
Responding properly to escape sequences requires reading incoming characters one by one – we can’t wait for a line ending. Properly formatting our line endings requires either printing every line like printf “Hello!\r\n”. Alternatively, all output could be run though another command that replaces Linux style newlines (\n) with Telnet style line endings (\r\n).

I wrote a set of functions to handle all of this for me. I included them in the Cathedral ShellFunc library, but they can run on their own if a few supporting functions are exported as well.
You can get shellfunc_telnet here if you’re interested.

With it, our script will work with Windows clients, line editing functions correctly, ctrl+c will disconnect properly, line endings are corrected, and we have login support with characters displayed as asterisks.

Here’s an example script that uses shellfunc_telnet:

#!/usr/bin/env bash
source shellfunc_telnet

echo "$TCPREMOTEIP:$TCPREMOTEPORT ++ ($$)" >&2
trap 'sf_killchildren || :; echo "$TCPREMOTEIP:$TCPREMOTEPORT -- ($$)" >&2' EXIT

# the password is "test"
testhash="9f86d081884c7d659a2feaa0c55ad015a3bf4f1b2b0b822cd15d6c15b0f00a08"

sf_tn_init echo

if ! sf_tn_read -t 120 -P "Please enter your name: " name || [[ -z "$name" ]]; then
    echo -e "\nNo name, no entry"
    exit 0
fi
echo "Hello, $name"

if ! sf_tn_read -t 120 -P "Password: " -p pass; then
    echo
    exit 0
fi
echo "Your pass hash is $pass"

if [[ "$pass" != "$testhash" ]]; then
    echo "Password incorrect. Go away."
    exit 0
fi

echo "Password correct. Welcome."
echo "I will now loop and print your lines back to you."
echo "Press ctrl+c or give me an empty line to quit"

while true; do
    sf_tn_read -t 120 line
    if (( $? == 69 )); then # interrupt
        echo "Interrupted!"
    elif (( $? > 128 )); then # timeout
        echo "Too slow!"
    fi

    [[ -n "$line" ]] || break

    echo "Your line: $line"
done

echo "Bye."
echo
sleep 1

Here’s a sample session:

$ telnet localhost 2048
Trying 127.0.0.1...
Connected to localhost.
Escape character is '^]'.
Please enter your name: Testy McTest
Hello, Testy McTest
Password: ****
Your pass hash is 9f86d081884c7d659a2feaa0c55ad015a3bf4f1b2b0b822cd15d6c15b0f00a08
Password correct. Welcome.
I will now loop and print your lines back to you.
Press ctrl+c or give me an empty line to quit
line 1
Your line: line 1
foo
Your line: foo
Q
Your line: Q
Interrupted!
Bye.

Connection closed by foreign host.

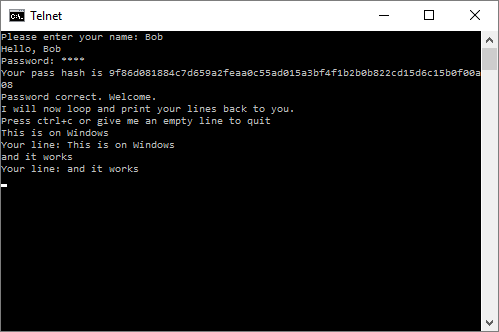
It even works from Windows!
We can make the script run at boot time by adding it to root’s crontab as such:

@reboot /usr/bin/tcpserver -c 10 -HR -u 65534 -g 65534 0.0.0.0 2048 /usr/local/bin/script 2>&1 | logger -t tcp-2048 -p user.notice

Here, we’re running our tcpserver at boot time, we’re taking anything our script prints to standard error, which is currently a log of new connections and disconnects, and putting it in the system log.

If you’re curious about sf_killchildren, you can read more about it here.

Have fun. Drop me a line if you do something cool with this.

Resource used: The Telnet Protocol (archived here)
apt-get reports Packages not found

So.. this shit again.

# apt-get update
Ign http://ftp.debian.org jessie-updates InRelease
Ign http://ftp.debian.org jessie-updates Release.gpg
Ign http://ftp.debian.org jessie-updates Release
Ign http://ftp.debian.org jessie-updates/main Sources/DiffIndex
Ign http://ftp.debian.org jessie-updates/main i386 Packages/DiffIndex
Ign http://ftp.no.debian.org jessie InRelease
Ign http://ftp.no.debian.org jessie Release.gpg
Ign http://ftp.no.debian.org jessie Release
Ign http://ftp.no.debian.org jessie/main Sources/DiffIndex
Ign http://ftp.no.debian.org jessie/main i386 Packages/DiffIndex
Ign http://security.debian.org jessie/updates InRelease
Ign http://security.debian.org jessie/updates Release.gpg
Ign http://security.debian.org jessie/updates Release
Ign http://security.debian.org jessie/updates/main Sources/DiffIndex
Ign http://security.debian.org jessie/updates/main i386 Packages/DiffIndex
Err http://security.debian.org jessie/updates/main Sources 404 Not Found [IP: 212.211.132.250 80]
Err http://security.debian.org jessie/updates/main i386 Packages 404 Not Found [IP: 212.211.132.250 80]
Err http://ftp.debian.org jessie-updates/main Sources 404 Not Found [IP: 130.89.148.12 80]
Err http://ftp.debian.org jessie-updates/main i386 Packages 404 Not Found [IP: 130.89.148.12 80]
Err http://ftp.no.debian.org jessie/main Sources 404 Not Found [IP: 130.239.18.173 80]
Err http://ftp.no.debian.org jessie/main i386 Packages 404 Not Found [IP: 130.239.18.173 80]
W: Failed to fetch http://ftp.debian.org/debian/dists/jessie-updates/main/source/Sources 404 Not Found [IP: 130.89.148.12 80]
W: Failed to fetch http://ftp.debian.org/debian/dists/jessie-updates/main/binary-i386/Packages 404 Not Found [IP: 130.89.148.12 80]
W: Failed to fetch http://ftp.no.debian.org/debian/dists/jessie/main/source/Sources 404 Not Found [IP: 130.239.18.173 80]
W: Failed to fetch http://ftp.no.debian.org/debian/dists/jessie/main/binary-i386/Packages 404 Not Found [IP: 130.239.18.173 80]
W: Failed to fetch http://security.debian.org/dists/jessie/updates/main/source/Sources 404 Not Found [IP: 212.211.132.250 80]
W: Failed to fetch http://security.debian.org/dists/jessie/updates/main/binary-i386/Packages 404 Not Found [IP: 212.211.132.250 80]
E: Some index files failed to download. They have been ignored, or old ones used instead.

If you really want to see what happens here, you can go after it with Wireshark and look at the raw http calls. I won’t go into detail, but the problem is the partially downloaded package lists, which on Debian reside in /var/lib/apt/lists/partial/

# ll /var/lib/apt/lists/partial/*
-rw-r--r-- 1 root root 140K Aug 16 2016 /var/lib/apt/lists/partial/ftp.debian.org_debian_dists_jessie-updates_InRelease.reverify
-rw-r--r-- 1 root root 2.4K Jun 4 2016 /var/lib/apt/lists/partial/ftp.no.debian.org_debian_dists_jessie_Release.gpg.reverify
-rw-r--r-- 1 root root 62K Aug 15 2016 /var/lib/apt/lists/partial/security.debian.org_dists_jessie_updates_InRelease.reverify

(your file listing may, and probably will, differ)

Anyway, remove them by issuing rm /var/lib/apt/lists/partial/* and update again.

Note that this is but one of the errors that can cause this kind of a mess. Another one I’ve experienced is a somewhat overzealous firewall. If the above does not resolve a problem, check if you’re in any way filtering outbound traffic.

Installing Windows XP on the Dell Vostro 1700

This is basically the same procedure as installing Windows XP on the Fujitsu Siemens Esprimo u9200, in that it needs custom SATA drivers to find the harddisk during install, as well as a bunch of other ones.

For this install, I decided to actually create a driver disk, and use a real floppy drive. I use a very capable ESYNIC USB floppy drive, which I’d highly recommend. Mostly because it works, and reads all the disks I’ve tried. This should be something one could take for granted, but I’ve had two other USB floppy drives before this one and they’ve both had problems.

Anyway, here’s the files to stuff onto a floppy drive for the Vostro 1700: f6floppy.zip

Select the ICH8M-E-M drivers during the install:

I couldn’t get the video drivers to install, as the nVidia installer would tell me it found no supported hardware. However, the installer leaves the driver files extracted in C:\dell\drivers\R190066, and pointing the device manager at this directory I was able to install those drivers anyway.


I got 99 updates, but a video driver ain’t one?

As this forum thread reveals, the the Vostro 1700 was designed with Windows Vista in mind, so not all the drivers were released for Windows XP. The drivers for the Vostro 1500 can, however, fill in the gaps. I collected all the drivers I used in my install in this zip file: Vostro 1700 WinXP Drivers.zip

Oh, and finally a small rant…

What the heck did manufacturers at the time have against the Windows XP wireless interface?

They literally had to take this…

..and replace it with this..

..why would I want that?!

And of course they leave the default tool inoperable:

Windows Volume License Keys (VLK)

I keep having to look these up, especially the “Upgrade Key” at the bottom. So I stored them here.

Windows Server 2022

Operating system edition KMS Client Setup Key
Windows Server 2022 Datacenter WX4NM-KYWYW-QJJR4-XV3QB-6VM33
Windows Server 2022 Standard VDYBN-27WPP-V4HQT-9VMD4-VMK7H

Windows Server 2019

Operating system edition KMS Client Setup Key
Windows Server 2019 Datacenter WMDGN-G9PQG-XVVXX-R3X43-63DFG
Windows Server 2019 Standard N69G4-B89J2-4G8F4-WWYCC-J464C
Windows Server 2019 Essentials WVDHN-86M7X-466P6-VHXV7-YY726

Windows Server 2016

Operating system edition KMS Client Setup Key
Windows Server 2016 Datacenter CB7KF-BWN84-R7R2Y-793K2-8XDDG
Windows Server 2016 Standard WC2BQ-8NRM3-FDDYY-2BFGV-KHKQY
Windows Server 2016 Essentials JCKRF-N37P4-C2D82-9YXRT-4M63B

Windows 11

Operating system edition KMS Client Setup Key
Windows 11 Professional W269N-WFGWX-YVC9B-4J6C9-T83GX
Windows 11 Professional N MH37W-N47XK-V7XM9-C7227-GCQG9
Windows 11 Enterprise NPPR9-FWDCX-D2C8J-H872K-2YT43
Windows 11 Enterprise N DPH2V-TTNVB-4X9Q3-TJR4H-KHJW4
Windows 11 Education NW6C2-QMPVW-D7KKK-3GKT6-VCFB2
Windows 11 Education N 2WH4N-8QGBV-H22JP-CT43Q-MDWWJ
Windows 11 Pro for Workstations NRG8B-VKK3Q-CXVCJ-9G2XF-6Q84J
Windows 11 Pro for Workstations N 9FNHH-K3HBT-3W4TD-6383H-6XYWF
Windows 11 Pro Education 6TP4R-GNPTD-KYYHQ-7B7DP-J447Y
Windows 11 Pro Education N YVWGF-BXNMC-HTQYQ-CPQ99-66QFC

Windows 10

Operating system edition KMS Client Setup Key
Windows 10 Professional W269N-WFGWX-YVC9B-4J6C9-T83GX
Windows 10 Professional N MH37W-N47XK-V7XM9-C7227-GCQG9
Windows 10 Enterprise NPPR9-FWDCX-D2C8J-H872K-2YT43
Windows 10 Enterprise N DPH2V-TTNVB-4X9Q3-TJR4H-KHJW4
Windows 10 Education NW6C2-QMPVW-D7KKK-3GKT6-VCFB2
Windows 10 Education N 2WH4N-8QGBV-H22JP-CT43Q-MDWWJ
Windows 10 Enterprise 2015 LTSB WNMTR-4C88C-JK8YV-HQ7T2-76DF9
Windows 10 Enterprise 2015 LTSB N 2F77B-TNFGY-69QQF-B8YKP-D69TJ
Windows 10 Enterprise 2016 LTSB DCPHK-NFMTC-H88MJ-PFHPY-QJ4BJ
Windows 10 Enterprise 2016 LTSB N QFFDN-GRT3P-VKWWX-X7T3R-8B639

Windows Server 2012 R2 and Windows 8.1

Operating system edition KMS Client Setup Key
Windows 8.1 Professional GCRJD-8NW9H-F2CDX-CCM8D-9D6T9
Windows 8.1 Professional N HMCNV-VVBFX-7HMBH-CTY9B-B4FXY
Windows 8.1 Enterprise MHF9N-XY6XB-WVXMC-BTDCT-MKKG7
Windows 8.1 Enterprise N TT4HM-HN7YT-62K67-RGRQJ-JFFXW
Windows Server 2012 R2 Server Standard D2N9P-3P6X9-2R39C-7RTCD-MDVJX
Windows Server 2012 R2 Datacenter W3GGN-FT8W3-Y4M27-J84CP-Q3VJ9
Windows Server 2012 R2 Essentials KNC87-3J2TX-XB4WP-VCPJV-M4FWM

Windows Server 2012 and Windows 8

Operating system edition KMS Client Setup Key
Windows 8 Professional NG4HW-VH26C-733KW-K6F98-J8CK4
Windows 8 Professional N XCVCF-2NXM9-723PB-MHCB7-2RYQQ
Windows 8 Enterprise 32JNW-9KQ84-P47T8-D8GGY-CWCK7
Windows 8 Enterprise N JMNMF-RHW7P-DMY6X-RF3DR-X2BQT
Windows Server 2012 BN3D2-R7TKB-3YPBD-8DRP2-27GG4
Windows Server 2012 N 8N2M2-HWPGY-7PGT9-HGDD8-GVGGY
Windows Server 2012 Single Language 2WN2H-YGCQR-KFX6K-CD6TF-84YXQ
Windows Server 2012 Country Specific 4K36P-JN4VD-GDC6V-KDT89-DYFKP
Windows Server 2012 Server Standard XC9B7-NBPP2-83J2H-RHMBY-92BT4
Windows Server 2012 MultiPoint Standard HM7DN-YVMH3-46JC3-XYTG7-CYQJJ
Windows Server 2012 MultiPoint Premium XNH6W-2V9GX-RGJ4K-Y8X6F-QGJ2G
Windows Server 2012 Datacenter 48HP8-DN98B-MYWDG-T2DCC-8W83P

Windows 7 and Windows Server 2008 R2

Operating system edition KMS Client Setup Key
Windows 7 Professional FJ82H-XT6CR-J8D7P-XQJJ2-GPDD4
Windows 7 Professional N MRPKT-YTG23-K7D7T-X2JMM-QY7MG
Windows 7 Professional E W82YF-2Q76Y-63HXB-FGJG9-GF7QX
Windows 7 Enterprise 33PXH-7Y6KF-2VJC9-XBBR8-HVTHH
Windows 7 Enterprise N YDRBP-3D83W-TY26F-D46B2-XCKRJ
Windows 7 Enterprise E C29WB-22CC8-VJ326-GHFJW-H9DH4
Windows Server 2008 R2 Web 6TPJF-RBVHG-WBW2R-86QPH-6RTM4
Windows Server 2008 R2 HPC edition TT8MH-CG224-D3D7Q-498W2-9QCTX
Windows Server 2008 R2 Standard YC6KT-GKW9T-YTKYR-T4X34-R7VHC
Windows Server 2008 R2 Enterprise 489J6-VHDMP-X63PK-3K798-CPX3Y
Windows Server 2008 R2 Datacenter 74YFP-3QFB3-KQT8W-PMXWJ-7M648
Windows Server 2008 R2 for Itanium-based Systems GT63C-RJFQ3-4GMB6-BRFB9-CB83V

Windows Vista and Windows Server 2008

Operating system edition KMS Client Setup Key
Windows Vista Business YFKBB-PQJJV-G996G-VWGXY-2V3X8
Windows Vista Business N HMBQG-8H2RH-C77VX-27R82-VMQBT
Windows Vista Enterprise VKK3X-68KWM-X2YGT-QR4M6-4BWMV
Windows Vista Enterprise N VTC42-BM838-43QHV-84HX6-XJXKV
Windows Web Server 2008 WYR28-R7TFJ-3X2YQ-YCY4H-M249D
Windows Server 2008 Standard TM24T-X9RMF-VWXK6-X8JC9-BFGM2
Windows Server 2008 Standard without Hyper-V W7VD6-7JFBR-RX26B-YKQ3Y-6FFFJ
Windows Server 2008 Enterprise YQGMW-MPWTJ-34KDK-48M3W-X4Q6V
Windows Server 2008 Enterprise without Hyper-V 39BXF-X8Q23-P2WWT-38T2F-G3FPG
Windows Server 2008 HPC RCTX3-KWVHP-BR6TB-RB6DM-6X7HP
Windows Server 2008 Datacenter 7M67G-PC374-GR742-YH8V4-TCBY3
Windows Server 2008 Datacenter without Hyper-V 22XQ2-VRXRG-P8D42-K34TD-G3QQC
Windows Server 2008 for Itanium-Based Systems 4DWFP-JF3DJ-B7DTH-78FJB-PDRHK

The “upgrade key”

If you enter a VLK key for Windows 10 Pro on Windows 10 Home, it will not be accepted. What you can do is enter the Windows 10 Pro upgrade key, VK7JG-NPHTM-C97JM-9MPGT-3V66T, let it upgrade, and then enter the VLK.

Unable to upgrade with the “upgrade key”

If you get a message saying you’re unable to upgrade because of error 0xC03F6506 or 0xC004F069, see this post.

Activating with a KMS server

If you’re about to use a VLK, you are probably going to be needing these commands.

cd %windir%\system32
cscript slmgr.vbs /ipk <kms client setup key>
cscript slmgr.vbs /skms kms.server.here
cscript slmgr.vbs /ato

Changing the Windows Server version from Evaluation to the Full release using VLK

# what do we have?
dism.exe /online /get-currentedition

# where can we go?
dism.exe /online /get-targeteditions

# convert to datacenter from datacenter eval (when shown as possible target above)
dism.exe /online /set-edition:serverdatacenter /productkey:WX4NM-KYWYW-QJJR4-XV3QB-6VM33 /accepteula

Test activation of Remote Desktop licenses (not for production use!)

See this guide on pastebin.com (backup)

Activating Office 2016

IMPORTANT: To do this, make sure you set the kms server first (see the “/skms” line above)

cd \"Program Files"\"Microsoft Office"\Office16
cscript ospp.vbs /act

For office VLK keys, see this post.

Installing Windows XP on the Fujitsu Siemens Esprimo u9200 in 2017

I recently picked up a brand new vintage 2009 business targeted netbook, sealed in box – the Fujitsu Siemens Esprimo u9200 (fact sheet) (review => archive). At just short of 2KG (4.37 pounds) it’s rather bulky compared to today’s netbooks, but as a rather disposable piece of equipment for travel, which I’d be perfectly fine with leaving at a customs office or having stolen (same thing, I guess), it’s great.

This netbook is from the era during which companies were offering “downgrades” from the included Windows Vista to Windows XP, as loads of people preferred that, and like many cheapass economical machines at the time, it wasn’t really capable of running its included operating system at a satisfying speed. With Windows XP, however, it’s a different story. In fact, using SpeedswitchXP, it can even be permanently underclocked, which makes the fan shut up, and the operating system still performs adequately.

Disclaimer
Windows XP was never is no longer safe for daily use. It’s old, technically outdated, insecure, and many modern browsers no longer support it. When used carefully, as a machine to remote into other things, and when routing all outbound traffic through a VPN, I believe it’s usable, but I wouldn’t recommend it to anyone.

Drivers

Windows XP, even with SP3 preinstalled on the CD, does not contain the drivers for the SATA controller in the u9200. While these can be loaded by pressing F6 during the installation, with a USB floppy drive connected, it’s much more elegant to burn a custom Windows XP install CD with the drivers included, using a process known as slipstreaming. For this, a program called nLite can be used. Wayne Zimmerman has an excellent writeup on how to do this over here (archive).

As for the drivers required for the u9200, I couldn’t find them on the Fujitsu support page, but the one for the Asian market still had them. I stuffed them all in this zip file: u9200_drivers.zip

While the bulk of the drivers are awesome to slipstream onto the CD, giving you full screen resolution, networking, etc. from the get-go, the SATA driver is unfortunately not the correct kind for loading as a plug-in storage driver during the install. For this you need the special “f6 floppy”, which you can get directly from Intel. Or here: STOR_all32_f6flpy_9.5.0.1037_PV.zip

IMPORTANT: When slipstreaming the “f6flpy” driver, DO NOT add it as a “Regular PNP driver” (do this with the rest). You want to add it as a Textmode driver (this is the kind available during text mode install, and thus when selecting the install partition), and you want to specifically select the “Intel(R) ICH8M-E/M SATA AHCI Controller“. If you do not do this, your install CD will still not find the drive.

Selecting the driver should look something like this:

All ready to go:

And that’s it! The Windows XP installer should now recognize your drive (I replaced mine with a cheap SSD, and it still worked). Enjoy the Windows XPerience.

Some useful registry tweaks for XP

Themes

Finally, some useful programs

..and for if you decide you want Windows 7 instead, installed from USB

How to remove the “Favorites” button from Internet Explorer 8 on Windows XP

Reinstalling Windows XP on an ancient (well, vintage 2009) laptop recently, I suddenly remembered how much I hated the “Favorites” button that’s stuck on the favorites bar and shows you your favorites when you click it, just as the bar already does.

This thing:

While the rest of the crap, such as the favorites, the “command bar”, and other things, can easily be turned off via the menus, the Favorites button is not going away so easily. However, there’s a registry setting for that!

In short, you can go into regedit and navigate to HKEY_CURRENT_USER\Software\Policies\Microsoft\Internet Explorer\Toolbars\Restrictions (create any missing keys along the way – mine didn’t have a “Toolbars”, nor a “Restrictions” key). Then make a new DWORD named “NoCommandBar”, and set it to 0x00000001.

..or you could simply import this registry file.

Voila! A nice, clean Internet Explorer:

Next step: Install a better browser 🙂