For personal reference: MNL-1566.pdf
Original source here.
Finding the most expensive recent SQL queries on SQL Server
Mostly a note to self, original source here.
SELECT TOP 10 SUBSTRING(qt.TEXT, (qs.statement_start_offset/2)+1,
((CASE qs.statement_end_offset
WHEN -1 THEN DATALENGTH(qt.TEXT)
ELSE qs.statement_end_offset
END - qs.statement_start_offset)/2)+1),
qs.execution_count,
qs.total_logical_reads, qs.last_logical_reads,
qs.total_logical_writes, qs.last_logical_writes,
qs.total_worker_time,
qs.last_worker_time,
qs.total_elapsed_time/1000000 total_elapsed_time_in_S,
qs.last_elapsed_time/1000000 last_elapsed_time_in_S,
qs.last_execution_time,
qp.query_plan
FROM sys.dm_exec_query_stats qs
CROSS APPLY sys.dm_exec_sql_text(qs.sql_handle) qt
CROSS APPLY sys.dm_exec_query_plan(qs.plan_handle) qp
ORDER BY qs.total_logical_reads DESC -- logical reads
-- ORDER BY qs.total_logical_writes DESC -- logical writes
-- ORDER BY qs.total_worker_time DESC -- CPU time
Creating a local Certificate Authority using OpenSSL
I was recently tasked with creating a local CA for a project, where we needed to verify custom client certificates, have the ability to revoke them at will, and we wanted to add additional custom fields to the certificates. Cool.
The first stop after searching a bit was this excellent howto by Jamie Nguyen. There’s a local mirror here.
Frankly, the only thing Jamie doesn’t go into detail about is how to add custom properties to, in my case, client certificates. Dustin Oprea has a write-up on this here (mirror).
Shrinking a Raspbian installation and re-enabling auto expanding for distribution of customized images
UPDATE: See the automated script at https://blog.dhampir.no/content/script-for-creating-a-compressed-image-file-from-a-raspbian-sd-card
Raspbian, by default, expands to fill the SD card it finds itself on, the first time it boots. After having customized an image to your liking it would be favourable to avoid copying 16 gigabytes of data, or however large your chosen SD card is, each time you want to duplicate your setup. So let’s go through some simple steps to reduce the size of the resulting image file.
The Works
- Prepare the Raspbian image by re-enabling auto expanding
- Edit /boot/cmdline.txt and append init=/usr/lib/raspi-config/init_resize.sh
In my case, this meant replacingdwc_otg.lpm_enable=0 console=serial0,115200 console=tty1 root=PARTUUID=1ba1cea3-02 rootfstype=ext4 elevator=deadline fsck.repair=yes rootwait logo.nologo net.ifnames=0
With
dwc_otg.lpm_enable=0 console=serial0,115200 console=tty1 root=PARTUUID=1ba1cea3-02 rootfstype=ext4 elevator=deadline fsck.repair=yes rootwait logo.nologo net.ifnames=0 init=/usr/lib/raspi-config/init_resize.sh
This takes care of resizing the partition, but not the file system.
- Grab the resize2fs_once script from git (or from my archive copy here) and enable it
$ sudo wget -O /etc/init.d/resize2fs_once https://github.com/RPi-Distro/pi-gen/raw/dev/stage2/01-sys-tweaks/files/resize2fs_once
$ sudo chmod +x /etc/init.d/resize2fs_once
$ sudo systemctl enable resize2fs_once
This will expand the file system to match the resized partition on the first boot.
- Edit /boot/cmdline.txt and append init=/usr/lib/raspi-config/init_resize.sh
- Cleanly shut down the Raspberry Pi
- Put the SD card in a card reader on a Linux machine. The machine can be your Raspberry Pi, as long as you’re booting from another SD card.
The following steps assume you are not currently booting from the SD card you want to modify.
- Confirm the device name with dmesg
$ dmesg
...
[1314286.573659] mmc0: new ultra high speed SDR50 SDHC card at address 59b4
[1314286.574319] mmcblk0: mmc0:59b4 USDU1 14.7 GiB
[1314286.575783] mmcblk0: p1 p2
- Launch gparted, or a CLI tool if you prefer, and shrink the EXT4 file system and partition. I usually leave a hundred megs or so of free space to avoid issues with programs that write stuff on the first boot.
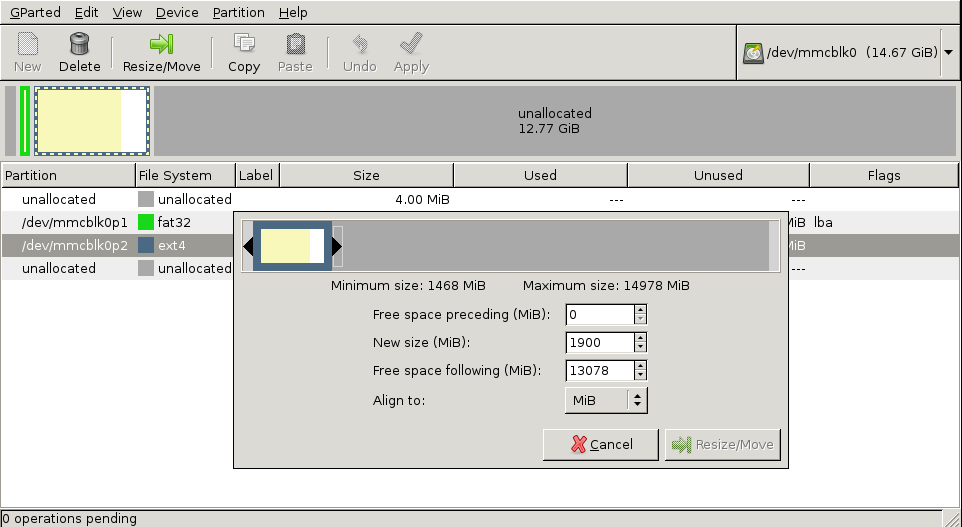
Close gparted. - Optional extra #1: You don’t have to do this step. Skip ahead if you want.
If you want, this would be the time to defragment the file system, as any fragmentation will be written as is to the next card.$ mkdir /tmp/sd_root $ sudo mount /dev/mmcblk0p2 /tmp/sd_root $ sudo e4defrag /dev/mmcblk0p2 ext4 defragmentation for device(/dev/mmcblk0p2) [7/51184]/tmp/sd_root/etc/dhcp/debug: 100% [OK] [14/51184]/tmp/sd_root/sbin/mntctl: 100% [OK] [310/51184]/tmp/sd_root/sbin/killall5: 100% [OK] ............ Success: [ 40336/51184 ] Failure: [ 10848/51184 ] $ sudo umount /tmp/sd_root $ sudo rmdir /tmp/sd_rootNote that some failures are expected. This is normal.
- Optional extra #2: You don’t have to do this step. Skip ahead if you want.
If you want your image to compress extremely well, you can at this point mount the image and zero fill the free space you left. Large chunks of zeros are exceptionally easy to compress.$ mkdir /tmp/sd_root $ sudo mount /dev/mmcblk0p2 /tmp/sd_root $ sudo dd if=/dev/zero of=/tmp/sd_root/delete.me dd: writing to '/tmp/sd_root/delete.me': No space left on device 41110+0 records in 41109+0 records out 21047808 bytes (21 MB, 20 MiB) copied, 0.437186 s, 48.1 MB/s $ sudo rm /tmp/sd_root/delete.me $ sudo umount /tmp/sd_root $ sudo rmdir /tmp/sd_root
- Use fdisk -l or a similar command to find the end of the resized partition
$ sudo fdisk -l /dev/mmcblk0
Disk /dev/mmcblk0: 14.7 GiB, 15753805824 bytes, 30769152 sectors
Units: sectors of 1 * 512 = 512 bytes
Sector size (logical/physical): 512 bytes / 512 bytes
I/O size (minimum/optimal): 512 bytes / 512 bytes
Disklabel type: dos
Disk identifier: 0x44b1ee6a

Device Boot Start End Sectors Size Id Type
/dev/mmcblk0p1 8192 93486 85295 41.7M c W95 FAT32 (LBA)
/dev/mmcblk0p2 94208 3985407 3891200 1.9G 83 Linux
This partition ends at block 3985407, and the block size is 512 bytes. We’ll need these numbers.
- Use dd to copy the image to where you want it. Here we use the values from the previous step, but add 1 to the number of blocks, as blocks are 0-indexed. To clarify, the first block is block 0, so if the last partition ended at block 5, the full image would be 6 blocks long.
$ sudo dd if=/dev/mmcblk0 of=/tmp/my_raspbian.img bs=512 count=3985408
- Compress the image with gzip, zip, 7z, or whatever tool you fancy, put it somewhere and tell your friends 🙂
Handling multiple overlapping VPN client networks with pfSense and a reflector VM
Following up on my recent post about making a minimal VPN routing virtual machine to isolate obnoxious VPN clients, another problem you’ll run into if you have the need to connect to a whole lot of client networks is that the networks of different companies tend to overlap, either with your own or with eachother. Most companies I deal with use the 10.0.0.0/8 or the 172.16.0.0/12 networks, as specified in RFC1918, or some combination thereof. 192.168.0.0/16 seems to be really unpopular for some reason, even in small networks.
The problems arise when one client’s network fully or partially overlaps that of another client, or that of the company you’re at. If there’s a 10.10.1.50 host in your network, and 10.10.1.50 is also inside the client’s 10.10.0.0/16 network, pfSense would have no idea where to route you. We could make a rule to route single computers to the remote site, but then they could never access the local machine with that IP. What we need is remapping, translation, dirty outbound NAT hacks and a bit of black magic.
A picture says a thousand words
This diagram attempts to show the address translation accomplished by pfSense and the reflector VM. The idea is to map the machines we’re trying to access at the remote site to an address range that is unused in the local network. Currently, we do this on an IP by IP basis, but it could easily be extended to translate entire address ranges if desired.
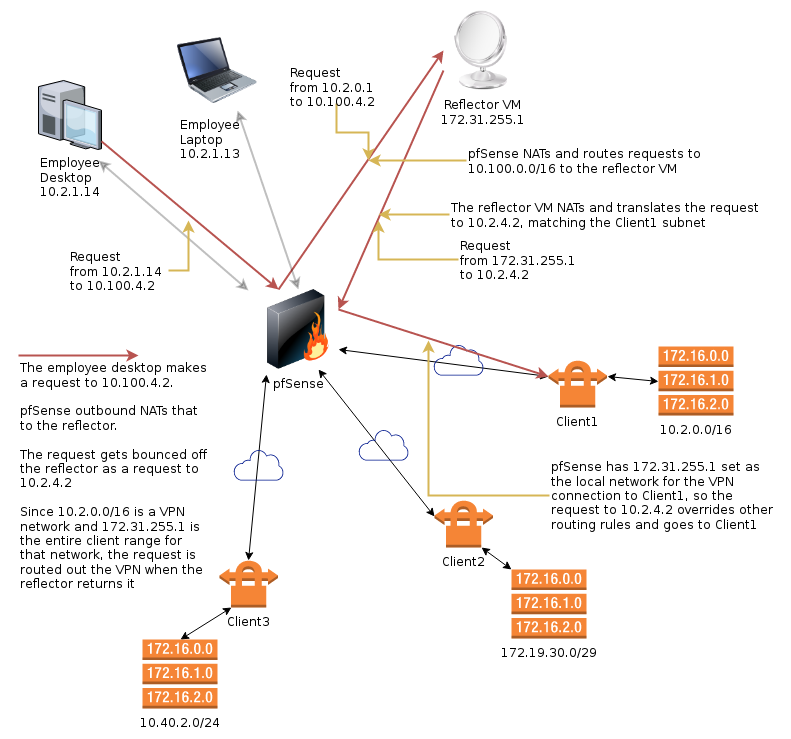
Image created with draw.io (XML).
Actually, that image didn’t explain a thing…
The idea here is that we have a client network that overlaps our own. We use an internally unused network, 10.100.0.0/16 and connect to that instead. We exploit the fact that the routing table of an IPSec connection trumps the internal routing table in pfSense. A connection proceeds as such:
- The PC at 10.2.1.14 attempts to connect to 10.100.4.2
- pfSense will outbound NAT this request and route it to the reflector VM at 172.31.255.1
The reflector VM didn’t need an IP address this odd, but it has yet to collide with a client, so that’s nice. - The request is now coming from the pfSense box, and arrives at the reflector as a connection attempt from pfSense to 10.100.4.2
- The reflector will also reverse NAT the request and route it back to pfSense as if it was making the request itself, but it will additionally translate the target IP from 10.100.4.2 to 10.2.4.2
- pfSense receives the connection request from 172.31.255.1 to 10.2.4.2, knows that 172.31.255.1/32 is the local IP range for the VPN connection to Client1 and routes the connection over there.
Here are a few facts about this setup, to answer questions you may have at this point:
- 172.31.255.1/32 is set as the local IP range for the VPN connection, 10.2.0.0/16 is set as the remote range
- Computers in the local network, even those in other VLAN’s, such as the 10.3.0.0 network, can thus not connect directly through the VPN, as their requests to 10.2.0.0/16 IP’s would be routed as usual to the local 10.2 subnet. They all have to use 10.100.0.0/16 to traverse the VPN’s
- Computers at Client1 can’t possibly get back through this insane setup to reach local machines by IP
However, they could make requests to the IP address we expose as the local part of our network in the NAT/BINAT configuration of IPSec, which is actually set up in a few cases, and the reflector can distribute those based on the port number and remote IP - The reflector VM can’t actually connect to internal machines with IP adresses overlapping the VPN networks, as its requests would be routed to clients
..but why would you want to use the reflector to connect to anything local? - If client networks overlap each other, you need more than one reflector
That’s completely insane!
I agree.
So how do we do it?
Glad you asked. Keep reading.
pfSense configuration
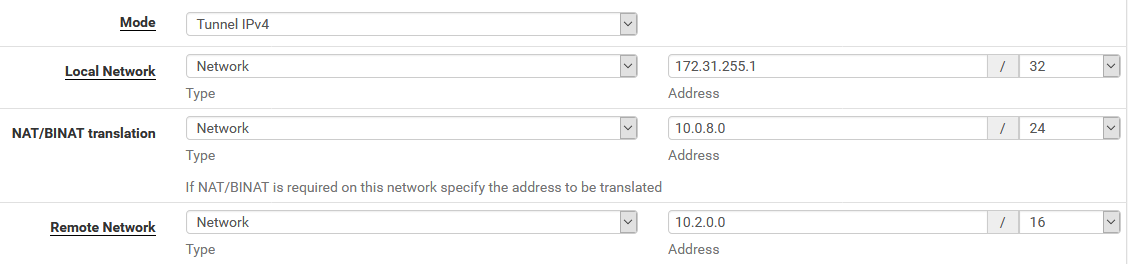
Firstly, we configure the VPN connection in pfSense as usual. Let’s assume it’s IPsec to make it easy. We set the local network to 172.31.255.1/32, and use NAT/BINAT translation to set the address to anything not in the client’s network, which will work just fine. The screenshot shows the IPSec Phase 2 configuration.
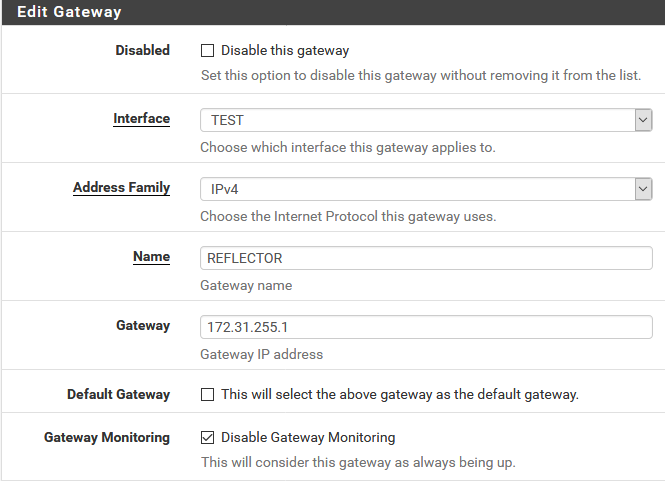
Next, we add the Reflector VM as a router on our internal network.
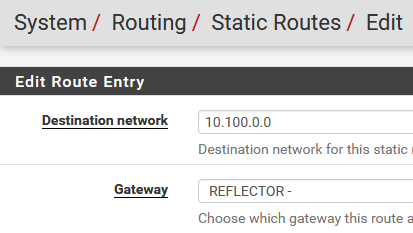
We also need to add a static route to send everything going to the 10.100.0.0/16 network to the router we just created.
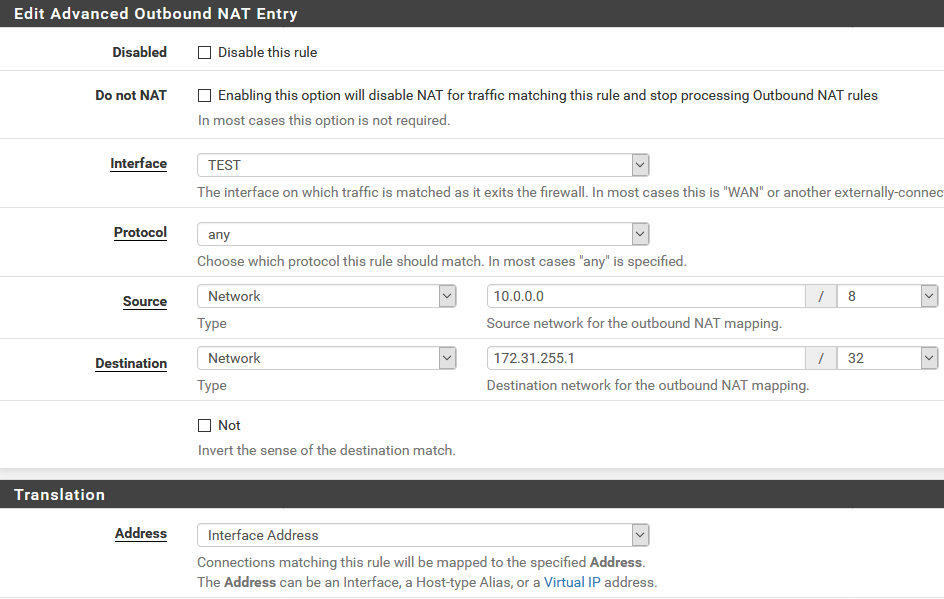
Then there’s the outbound NAT that translates requests going to the reflector as coming from pfSense. What we’re saying here is that connection requests going out of the TEST interface from any internal IP (I made this /8 just so I don’t have to touch it again) and heading to 172.31.255.1 should be NAT’ed to the interface IP of pfSense.
Then we add the firewall rules. We need two of these. The first one allows the Reflector VM to connect to all networks, which includes all the remote clients. The second (not shown, but you’ll figure it out) allows the local machines to connect to the 10.100.0.0/16 network.


This concludes the pfSense side of things.
Reflector VM
The reflector is a minimal install of Debian Linux with Shorewall installed. I’m familiar with both, so that makes it an obvious and time saving choice for me.
First, there’s the interfaces file. Just the single network interfaces in here. Not much to see, but the routeback option is needed to allow traffic to ingress and egress the same interface.
# ZONE INTERFACE BROADCAST OPTIONS
net eth0 detect dhcp,logmartians=1,nosmurfs,routefilter,tcpflags,routeback
The zones file is equally dull.
# ZONE TYPE
fw firewall
net ipv4
At the policy file, it gets a bit more interesting, as we allow any traffic to bounce off of us, going from net to net.
# SOURCE DEST POLICY LOG_LEVEL
$FW net ACCEPT
net net ACCEPT
all all REJECT info
As we want to NAT any traffic that bounces off us, we’ll need a masq file:
#INTERFACE:DEST SOURCE ADDRESS PROTO PORT(S) IPSEC MARK USER/ SWITCH ORIGINAL
#                                                       GROUP        DEST
eth0           10.0.0.0/8,172.16.0.0/12,192.168.0.0/16
In shorewall.conf, I change a single line to ensure IP_FORWARDING is enabled
IP_FORWARDING=Yes
Then come the rules. This is where we do the mapping. These are mock entries to preserve company privacy. Note the single reverse connection too, which allows companies at the remote end to reach a local webserver.
#ACTION SOURCE DEST PROTO DEST    SOURCE ORIGINAL RATE  USER/ MARK CONNLIMIT TIME HEADERS SWITCH HELPER
#                   PORT  PORT(S)        DEST     LIMIT GROUP
#?SECTION ALL
#?SECTION ESTABLISHED
#?SECTION RELATED
#?SECTION INVALID
#?SECTION UNTRACKED
?SECTION NEW

# we want to SSH in here
SSH(ACCEPT+) net $FW

# client1
DNAT any+ net:10.2.4.2 - - - 10.100.4.2
DNAT any+ net:10.2.4.6 - - - 10.100.4.6
DNAT any+ net:10.2.4.7 - - - 10.100.4.7

# client2
DNAT any+ net:172.19.30.4 - - - 10.100.30.4
DNAT any+ net:172.19.30.5 - - - 10.100.30.5
DNAT any+ net:172.19.30.6 - - - 10.100.30.6

# client3
DNAT any+ net:10.40.2.60 - - - 10.100.19.60
DNAT any+ net:10.40.2.61 - - - 10.100.19.61
DNAT any+ net:10.40.2.68 - - - 10.100.19.68

# reverse connections
DNAT any+ net:10.5.3.30:80 TCP 80

# PING
ACCEPT $FW net icmp
ACCEPT net $FW icmp
With our IP addresses re-mapped for the clients, everything should, amazingly, work. It’s not pretty. Far from it. But it does the job, it’s stable, and all I need to change to accommodate a new client is adding the map in the rules file after setting up the VPN.
The addresses in the 10.100.0.0/16 range are completely arbitrary. I usually make the last 8 bits match the client’s machines, but you don’t have to do that.
DNS
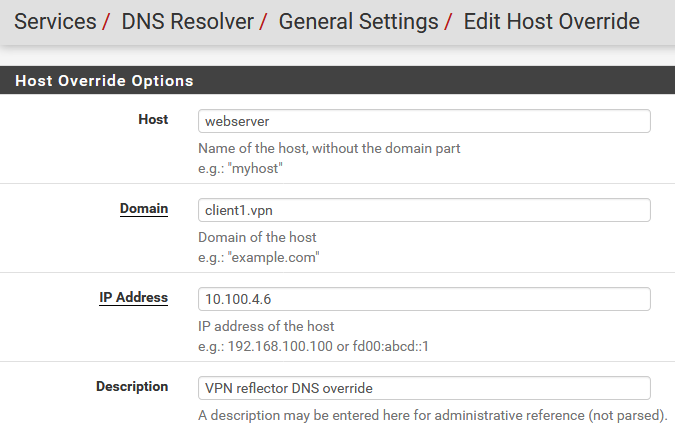
Finally back to pfSense again, I also have some DNS host overrides so employees don’t have to remember the remapped, or the original, IP addresses. Note that if you’re dealing with HTTPS and want certificates to function correctly, the host.domain names need to match the certificates on the remote servers. These overrides are trivial to set up, but here’s an example anyway.
So what happens when two clients overlap with each other?
The above solution applies when clients partially or fully overlap your internal network. However, if they overlap with each other, pfSense would again not know where to route a given connection from the reflector. The solution then is another reflector VM. They’re very cheap to run anyway, so it’s not a big issue.
Final words
If you ever attempt to do this, you will no doubt have questions. Feel free to leave them here, and I’ll try to get back to you. Make sure you enter your e-mail correctly. It will not be published, but I need it if you want me to reply 🙂
Making a minimal VPN routing virtual machine to isolate obnoxious VPN clients
After it was requested multiple times on my post about using pfSense as a Cisco AnyConnect VPN Client, I finally found some time to document the setup I ended up with as a replacement, the purpose of which was to not clutter up the pfSense box. pfSense, after all, acts as the main company router and is integral to the operation of the business network. I don’t want to modify it beyond what some future software update would be able to handle.
The solution to this issue, and several others that have popped up since then, is a set of very small virtual machines. I run each of these, one for each non-pfSense supported client VPN solution (there are quite a few unusual ones out there), with 64 megs of RAM and a mere 3GB of harddrive space.
VM Setup
The virtual machines I use run Debian, as that’s what I’m most familiar with and when setting up things like these, I want them to consume as little of my time as possible. The OpenConnect VPN client is readily available in the Debian package repositories. No mucking about with the apt sources. I also use shorewall to do the routing and firewall rules for me. Thus:
- Debian (minimal install)
- OpenConnect (from repositories)
- Shorewall
- A cup of coffee
Scripts
The script I use to keep it all going is pretty much copy-pasted from the post about using pfSense to do this, but here it is in its current form:
#!/bin/sh

# settings
user="user_name"
pass="secret_password"
host="vpn.remote.company.com"
test="nc -v -w 10 -z 172.16.30.2 3389"
tmpif="tun69"
iface="tun69"
pidfile="/tmp/${iface}.pid"
script="/usr/share/vpnc-scripts/vpnc-script"

# env
openconnect="/usr/sbin/openconnect"
ifconfig="/sbin/ifconfig"

# func
ifkill()
{
    $ifconfig "$1" down 2>/dev/null || :
    $ifconfig "$1" destroy 2>/dev/null || :
}

# check if we're already running
if [ -n "$test" ] && $test 2>/dev/null; then
    echo "Connection is already up"
    exit 0
fi

# scream
echo "Connection is not up! Attempting restart..." >&2

# clean up previous instance, if any
if [ -e "$pidfile" ]; then
    read pid <"$pidfile"
    echo "Killing previous pid: $pid"
    kill -TERM "$pid"
    rm "$pidfile"
fi
ifkill "$tmpif"
ifkill "$iface"

# open vpn connection
echo "$pass" |\
$openconnect \
    --background \
    --pid-file="$pidfile" \
    --interface="$tmpif" \
    --user="$user" \
    --passwd-on-stdin \
    --script="$script" \
    "$host"

# rename the interface
if [ "$iface" != "$tmpif" ]; then
    echo "Renaming $tmpif to $iface"
    $ifconfig "$tmpif" name "$iface"
fi
I run the above script every minute using the following line in root’s crontab:
* * * * * /root/bin/cron/vpnscript >/dev/null
Shorewall
To do the routing and firewall, there are a few files in /etc/shorewall that are essential for this setup. The first is the interfaces file, in which I define the virtual machine’s regular network interface and the “tun69” interface created by the VPN connection.
# ZONE INTERFACE BROADCAST OPTIONS
net eth0 detect dhcp,logmartians=1,nosmurfs,routefilter,tcpflags,routeback
vpn tun69 detect dhcp,logmartians=1,nosmurfs,routefilter,tcpflags
Then there’s the zones file. This is pretty basic, but matches the interfaces.
# ZONE TYPE
fw firewall
net ipv4
vpn ipv4
For the policy file, we want to allow traffic to flow from the net zone to the vpn zone.
# SOURCE DEST POLICY LOG_LEVEL
$FW vpn ACCEPT
$FW net ACCEPT
net vpn ACCEPT
all all REJECT info
The rules file allows SSH to control the VPN VM from the net zone, which is still in the company’s internal network, mind you.
#ACTION SOURCE DEST PROTO DEST    SOURCE ORIGINAL RATE  USER/ MARK CONNLIMIT TIME HEADERS SWITCH HELPER
#                   PORT  PORT(S)        DEST     LIMIT GROUP
#?SECTION ALL
#?SECTION ESTABLISHED
#?SECTION RELATED
#?SECTION INVALID
#?SECTION UNTRACKED
?SECTION NEW
SSH(ACCEPT+) net $FW
We need a bit of magic to do outbound NAT, with the masq file. This makes the connections the policy file allows to flow from the net zone to the vpn zone masquerade as whatever IP address the VPN client got for its tun69 interface. Without this, the connections would get relayed using their original IP, which the VPN client network probably wouldn’t appreciate. This simply covers all RFC1918 IPv4 addresses, so it doesn’t rely in any way on the rest of the company’s network.
#INTERFACE:DEST SOURCE ADDRESS PROTO PORT(S) IPSEC MARK USER/ SWITCH ORIGINAL
#                                                       GROUP        DEST
tun69           10.0.0.0/8,172.16.0.0/12,192.168.0.0/16
Finally, in shorewall.conf, I change a single line to ensure IP_FORWARDING is enabled
IP_FORWARDING=Yes
pfSense setup
Now we have a VPN routing machine, which in my case is situated on a dedicated VLAN to isolate it from the rest of the company network. You don’t have to do this, but if you don’t, anyone on the internal network can configure a route through the VPN machine and access whatever is on the other end.
In pfSense, I add a static IP for the OpenConnect client, then add a Gateway in System=>Routing=>Gateways. The interface should be the one the OpenConnect client is at, the IP should be the static IP of the client. Then, on the “Static Routes” page, add a route to the network at the end of the VPN and set the gateway to be the one you just created with the OpenConnect client IP. Now it’s up to your rules which machines you want to allow.
Any questions?
If you have any questions about this setup, let me know 🙂
BashDB, a single dynamic database table for bash scripts
I write shell scripts. A lot of them. I automate everything with scripts. Many of these scripts need to have some notion of a state. The state needs to be persistent. How do we do that? And could we draw some retro flashback line character table borders while we’re at it?
The problem
If I have some sort of a watchdog running every 5 minutes, I may not want to get an email about it until it has failed 12 times, or continuously for 60 minutes. I could run my script continuously and just sleep, or I could store the “fail count” in some file and read it back in on the next iteration. I often opt for the latter, and I used to find myself re-implementing pretty much the same tab separated, line separated, or null separated storage algorithms over and over.
Then come the lists. Say I have a script that’s supposed to verify that a couple of URL’s are online. Where do I store those? One per line in a file? I name it script.conf and put it somewhere? That’s fine, but what if I want to also store the last time each URL failed, so I can include more information in a report? Tab separated “columns”? A different file for the dates? Should I use a simple database, such as SQLite? That seems like a bit of an overkill, and it might not be installed where the script is supposed to be running.
Solution
Enter BashDB, written in the car going to and from a weekend trip at the cottage. It stores a single table, with a simple Key=>Value structure, or named columns. It dynamically adds new columns as requested, supports list values in any column, supports binary data, and it’s all written in Bash with very few external dependencies.
It can be downloaded –> HERE
View the manual –> HERE (or run db_help after sourcing the library)
Reference
To use bashdb, simply source it in the top of your script and use the provided db_* functions:
| db_help | The equivalent of running each function, in turn, with the -? option. Shows the help 🙂 |
|---|---|
| db_columns | Lists the columns currently in the table |
| db_copy_row | Copies a row with a given key to another row, optionally overwriting it if it exists |
| db_delete | Deletes a row with a given key |
| db_delete_column | Deletes one column of data from all rows |
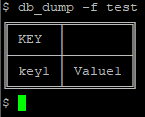
| db_dump | Provides a somewhat pretty display of the data currently in the table |
| db_get | Gets a single value from the table |
| db_has_key | Returns whether or not a given key exists |
| db_has_column | Returns whether or not a given column exists |
| db_keys | Lists the keys in currently in the table |
| db_rename | Changes the key of a row |
| db_rename_column | Renames a column |
| db_search | Lists keys or dumps data matching a search regex in a given column |
| db_selftest | Runs a unit test of most features |
| db_set | Sets a value on a key |
| db_testdb | Generates a small test database |
| db_trim | Removes any empty columns |
Examples
To try out the functionality, one can also use the script from the console, as such:
$ source ./bashdb
$ ls test
ls: cannot access test: No such file or directory
$ # we don't have a "test" yet :)
Adding a key and a value:
$ db_set
Error: db_set: Missing parameter: -f <file>
$ db_set -f test
Error: db_set: Missing parameter: -k <key>
$ db_set -f test -k Key1 -v Value1
Adding some more keys, and changing the value for key1:
$ db_set -f test -k "Norwegian Characters" -v "Ææ" -v "Øø" -v "Åå"
$ db_set -f test -k key1 -v "Value2"
$ db_set -f test -k key9 -v "Day[9]"
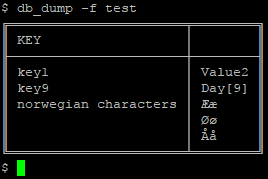
The “Norwegian Characters” is an example of storing a list. Lists can be read back out, either “human readable” -h, or null byte (\0) separated:
$ db_get -f test -k "norwegian characters"
ÆæØøÅå$ db_get -f test -k "norwegian characters" -h
Ææ
Øø
Åå
$ db_get -f test -k "norwegian characters" -h | while read -r c; do echo "--> $c <--"; done
--> Ææ <--
--> Øø <--
--> Åå <--
We can unset values by setting a value to an empty string, “”, or by simply not including the -v switch at all, when calling db_set. A row will be removed entirely if all its values are unset.
Lists (which are actually any value at all), support the -m switch, followed by “add” or “remove” to modify the list:
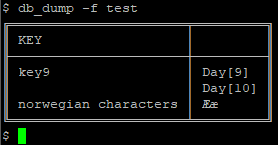
$ db_set -f test -k key1
$ db_set -f test -k "norwegian characters" -v "Øø" -v "Åå" -m remove
$ db_set -f test -k key9 -m add -v "Day[10]"
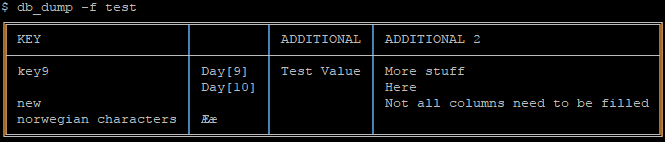
Without specifying -c, a default unnamed column is used for the data. However, columns can be added dynamically to include more information about each key:
$ db_set -f test -k key9 -c "Additional" -v "Test Value"
$ db_set -f test -k key9 -c "Additional 2" -v "More stuff" -v "Here"
$ db_set -f test -k new -c "Additional 2" -v "Not all columns need to be filled"
Column data can be requested by using -c on db_get. Also showing an example of -d, giving a default value if none is set, as for key=>new, column=>additional:
$ db_get -f test -k key9 -c "additional 2" -h
More stuff
Here
$ db_get -f test -k new -c "additional" -h -d "This is the default"
This is the default
$
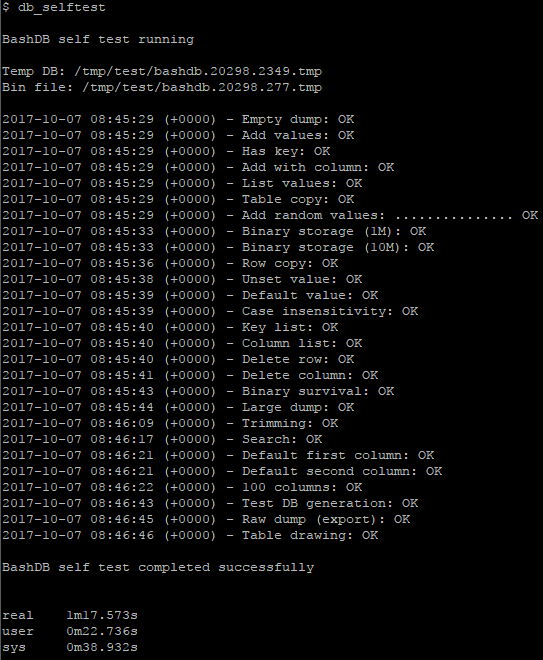
Taking a short break to run the unit tests:
We can easily delete a row, or an entire column:
$ db_delete -f test -k new
$ db_delete_column -f test -c additional
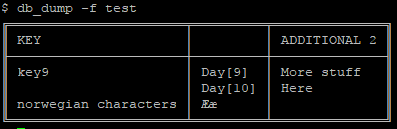
Listing keys and columns, also with the -h option, since we’re showing it here.
The default column shows as an empty line.
$ db_keys -f test -h
norwegian characters
key9
$ db_columns -f test -h

additional 2
We can also store values from stdin, for instance a web server response. This even works with binaries, though I wouldn’t recommend trying db_dump on tables containing those. Not that it breaks, it just looks like crap.
$ curl "https://google.com/" | db_set -f test -k "Response from google.com" -i % Total % Received % Xferd Average Speed Time Time Time Current Dload Upload Total Spent Left Speed 100 269 100 269 0 0 5458 0 --:--:-- --:--:-- --:--:-- 5489 $ db_get -f test -k "response from google.com" <HTML><HEAD><meta http-equiv="content-type" content="text/html;charset=utf-8"> <TITLE>302 Moved</TITLE></HEAD><BODY> <H1>302 Moved</H1> The document has moved <A HREF="https://www.google.no/?gfe_rd=cr&dcr=0&ei=ej7bWYqlOuLk8AfSmqqoDg">here</A>. </BODY></HTML>
When dumping a table for display, values are truncated. Please note that if you’re storing binary data, the displayed length by db_dump will only include the printable characters, and will not accurately reflect the length of the binary that would be retrieved by db_get.

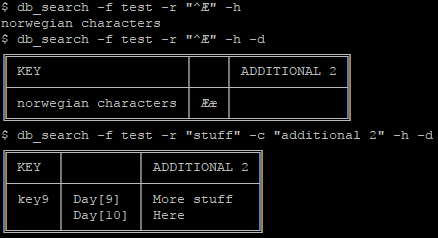
Searching is done using a regex on a given column, optionally running db_dump on the results instead of listing the keys:
If you decide to use this for your own projects, and you’re having issues, please read the output of db_help first, or run the function you’re having issues with using the -? switch. Or simply ask me here.
Have fun 🙂
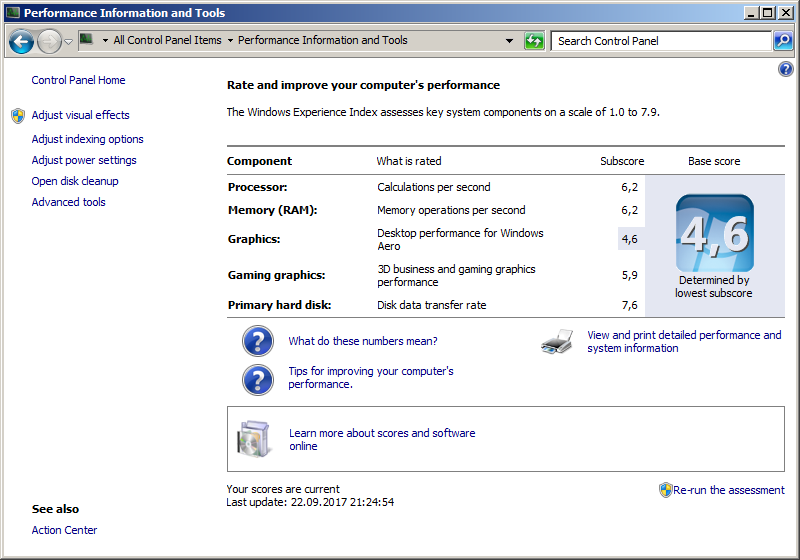
Upgrading the Vostro 1700 to beyond maximum specs
WARNING: This post is very specific to an old laptop, probably only interesting to anyone looking to upgrade such a machine. I warned you.
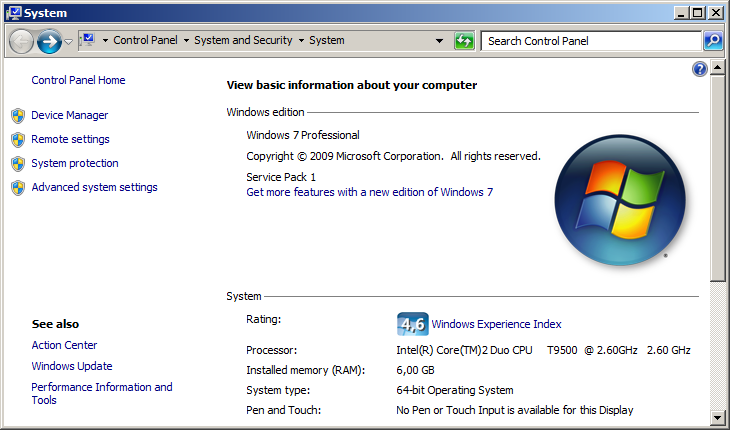
I have an unhealthy obsession with “maxing out” machines, especially older ones. It was time for the chunky old Vostro 1700 that now runs Windows 7 instead of the version of Windows XP I installed previously. From various forums I gathered that the laptop’s beefiest configuration from the factory was a Core 2 Duo T9300 CPU and 4 gigs of RAM, available towards the end of its production run.
The Vostro 1700 features an excellent keyboard (for my taste), and a clear and bright full HD matte finish 17″ LCD screen, which is the reason I keep it around. It does Steam in-home streaming reasonably well, and remote desktop to more powerful machines is of course flawless.
Anyway, not going to settle for the factory maximum, I decided to get hold of some memory and a C2D CPU from eBay. The result was a C2D T9500 CPU, which is a tad faster than the T9300, but with similar power requirements, as well as two sticks of Samsung 4GB DDR2 SODIMM ram, which would have been stupid expensive back in the day. These guys estimate well over a hundred dollars, even from eBay, which this machine frankly isn’t worth, but today it’s a mere fraction of that.
Annoyingly, it turns out that even with the most recent BIOS, version A07, 8GB RAM makes the machine hang during initialization. I was, however, able to get 4+2GB to run, after it spent around 10 minutes thinking about it at first boot. For some reason the thing takes ages to boot the first time after a change in the amount of system RAM.
Now for some before and after shots of the Vostro 1700, first with 4 gigs of ram and a T8300 CPU, and then with 6 gigs and the T9500.
Before:

After:
How to set the default location for new computers in Active Directory
Just a short note to self here, as the process is fully documented at Microsoft’s website (local archive here).
The command to use is:
C:\windows\system32> redircmp ou=mycomputers,DC=contoso,dc=com
Of course you have to customize the location to fit your domain.
Figuring out which session is blocking a query on Microsoft SQL Server (query suspended)
I was recently debugging a case where a customer’s installation was hanging due to a database lock. The issue turned out to be that the database was not set to a default transaction level of READ COMMITTED SNAPSHOT, which the product expects. Regardless, while troubleshooting the issue, I stumbled upon a very useful SQL query that I needed to save somewhere, so here goes.
The following query lists which SQL session is blocked by which other session:
SELECT
db.name DBName,
tl.request_session_id,
wt.blocking_session_id,
OBJECT_NAME(p.OBJECT_ID) BlockedObjectName,
tl.resource_type,
h1.TEXT AS RequestingText,
h2.TEXT AS BlockingTest,
tl.request_mode
FROM sys.dm_tran_locks AS tl
INNER JOIN sys.databases db ON db.database_id = tl.resource_database_id
INNER JOIN sys.dm_os_waiting_tasks AS wt ON tl.lock_owner_address = wt.resource_address
INNER JOIN sys.partitions AS p ON p.hobt_id = tl.resource_associated_entity_id
INNER JOIN sys.dm_exec_connections ec1 ON ec1.session_id = tl.request_session_id
INNER JOIN sys.dm_exec_connections ec2 ON ec2.session_id = wt.blocking_session_id
CROSS APPLY sys.dm_exec_sql_text(ec1.most_recent_sql_handle) AS h1
CROSS APPLY sys.dm_exec_sql_text(ec2.most_recent_sql_handle) AS h2
ORDER BY tl.request_session_id
GO
…and by following the tree (X blocked by Y, blocked by Z, etc..) one can see which session is responsible for the mess.
Other interesting queries:
| sp_who2 | Shows sessions connected to the database, how much time they’ve spent, as well as several other stats |
| select cmd,* from sys.sysprocesses where blocked > 0 |
Shows currently blocked queries |