From a .deb file:
dpkg -i --force-confmiss <package>.deb
Or with apt-get:
apt-get install --reinstall -o Dpkg::Options::="--force-confmiss" <package>
From a .deb file:
dpkg -i --force-confmiss <package>.deb
Or with apt-get:
apt-get install --reinstall -o Dpkg::Options::="--force-confmiss" <package>
This is basically the same procedure as installing Windows XP on the Fujitsu Siemens Esprimo u9200, in that it needs custom SATA drivers to find the harddisk during install, as well as a bunch of other ones.

For this install, I decided to actually create a driver disk, and use a real floppy drive. I use a very capable ESYNIC USB floppy drive, which I’d highly recommend. Mostly because it works, and reads all the disks I’ve tried. This should be something one could take for granted, but I’ve had two other USB floppy drives before this one and they’ve both had problems.
Anyway, here’s the files to stuff onto a floppy drive for the Vostro 1700: f6floppy.zip
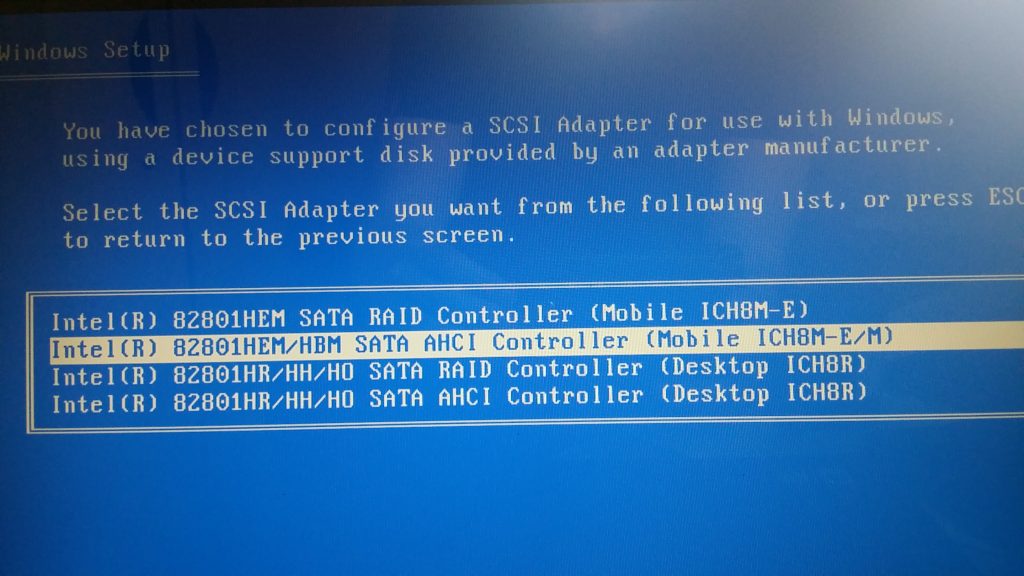
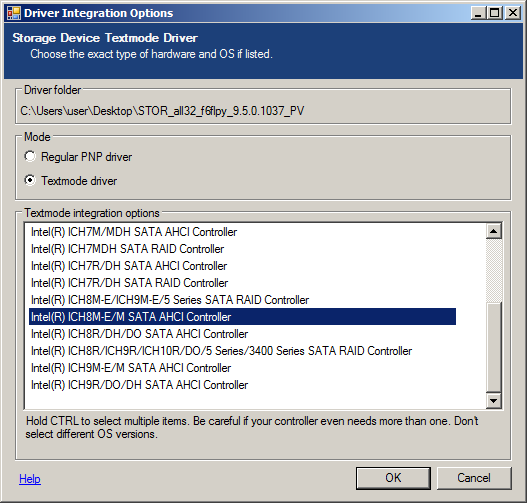
Select the ICH8M-E-M drivers during the install:
I couldn’t get the video drivers to install, as the nVidia installer would tell me it found no supported hardware. However, the installer leaves the driver files extracted in C:\dell\drivers\R190066, and pointing the device manager at this directory I was able to install those drivers anyway.
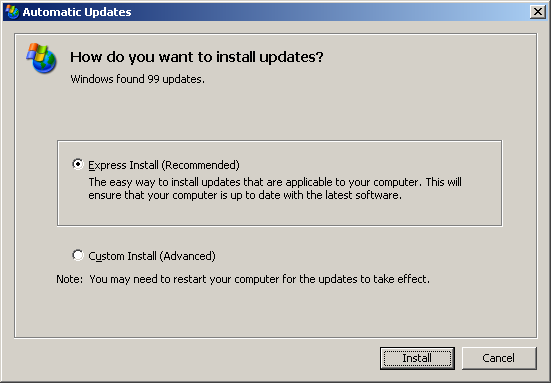
I got 99 updates, but a video driver ain’t one?
As this forum thread reveals, the the Vostro 1700 was designed with Windows Vista in mind, so not all the drivers were released for Windows XP. The drivers for the Vostro 1500 can, however, fill in the gaps. I collected all the drivers I used in my install in this zip file: Vostro 1700 WinXP Drivers.zip
Oh, and finally a small rant…
They literally had to take this…
..and replace it with this..
..why would I want that?!
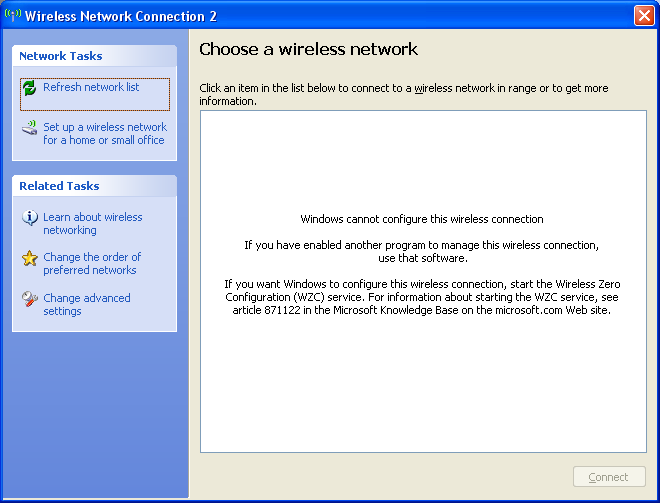
And of course they leave the default tool inoperable:
I keep having to look these up, especially the “Upgrade Key” at the bottom. So I stored them here.
| Operating system edition | KMS Client Setup Key |
|---|---|
| Windows Server 2022 Datacenter | WX4NM-KYWYW-QJJR4-XV3QB-6VM33 |
| Windows Server 2022 Standard | VDYBN-27WPP-V4HQT-9VMD4-VMK7H |
| Operating system edition | KMS Client Setup Key |
|---|---|
| Windows Server 2019 Datacenter | WMDGN-G9PQG-XVVXX-R3X43-63DFG |
| Windows Server 2019 Standard | N69G4-B89J2-4G8F4-WWYCC-J464C |
| Windows Server 2019 Essentials | WVDHN-86M7X-466P6-VHXV7-YY726 |
| Operating system edition | KMS Client Setup Key |
|---|---|
| Windows Server 2016 Datacenter | CB7KF-BWN84-R7R2Y-793K2-8XDDG |
| Windows Server 2016 Standard | WC2BQ-8NRM3-FDDYY-2BFGV-KHKQY |
| Windows Server 2016 Essentials | JCKRF-N37P4-C2D82-9YXRT-4M63B |
| Operating system edition | KMS Client Setup Key |
|---|---|
| Windows 11 Professional | W269N-WFGWX-YVC9B-4J6C9-T83GX |
| Windows 11 Professional N | MH37W-N47XK-V7XM9-C7227-GCQG9 |
| Windows 11 Enterprise | NPPR9-FWDCX-D2C8J-H872K-2YT43 |
| Windows 11 Enterprise N | DPH2V-TTNVB-4X9Q3-TJR4H-KHJW4 |
| Windows 11 Education | NW6C2-QMPVW-D7KKK-3GKT6-VCFB2 |
| Windows 11 Education N | 2WH4N-8QGBV-H22JP-CT43Q-MDWWJ |
| Windows 11 Pro for Workstations | NRG8B-VKK3Q-CXVCJ-9G2XF-6Q84J |
| Windows 11 Pro for Workstations N | 9FNHH-K3HBT-3W4TD-6383H-6XYWF |
| Windows 11 Pro Education | 6TP4R-GNPTD-KYYHQ-7B7DP-J447Y |
| Windows 11 Pro Education N | YVWGF-BXNMC-HTQYQ-CPQ99-66QFC |
| Operating system edition | KMS Client Setup Key |
|---|---|
| Windows 10 Professional | W269N-WFGWX-YVC9B-4J6C9-T83GX |
| Windows 10 Professional N | MH37W-N47XK-V7XM9-C7227-GCQG9 |
| Windows 10 Enterprise | NPPR9-FWDCX-D2C8J-H872K-2YT43 |
| Windows 10 Enterprise N | DPH2V-TTNVB-4X9Q3-TJR4H-KHJW4 |
| Windows 10 Education | NW6C2-QMPVW-D7KKK-3GKT6-VCFB2 |
| Windows 10 Education N | 2WH4N-8QGBV-H22JP-CT43Q-MDWWJ |
| Windows 10 Enterprise 2015 LTSB | WNMTR-4C88C-JK8YV-HQ7T2-76DF9 |
| Windows 10 Enterprise 2015 LTSB N | 2F77B-TNFGY-69QQF-B8YKP-D69TJ |
| Windows 10 Enterprise 2016 LTSB | DCPHK-NFMTC-H88MJ-PFHPY-QJ4BJ |
| Windows 10 Enterprise 2016 LTSB N | QFFDN-GRT3P-VKWWX-X7T3R-8B639 |
| Operating system edition | KMS Client Setup Key |
|---|---|
| Windows 8.1 Professional | GCRJD-8NW9H-F2CDX-CCM8D-9D6T9 |
| Windows 8.1 Professional N | HMCNV-VVBFX-7HMBH-CTY9B-B4FXY |
| Windows 8.1 Enterprise | MHF9N-XY6XB-WVXMC-BTDCT-MKKG7 |
| Windows 8.1 Enterprise N | TT4HM-HN7YT-62K67-RGRQJ-JFFXW |
| Windows Server 2012 R2 Server Standard | D2N9P-3P6X9-2R39C-7RTCD-MDVJX |
| Windows Server 2012 R2 Datacenter | W3GGN-FT8W3-Y4M27-J84CP-Q3VJ9 |
| Windows Server 2012 R2 Essentials | KNC87-3J2TX-XB4WP-VCPJV-M4FWM |
| Operating system edition | KMS Client Setup Key |
|---|---|
| Windows 8 Professional | NG4HW-VH26C-733KW-K6F98-J8CK4 |
| Windows 8 Professional N | XCVCF-2NXM9-723PB-MHCB7-2RYQQ |
| Windows 8 Enterprise | 32JNW-9KQ84-P47T8-D8GGY-CWCK7 |
| Windows 8 Enterprise N | JMNMF-RHW7P-DMY6X-RF3DR-X2BQT |
| Windows Server 2012 | BN3D2-R7TKB-3YPBD-8DRP2-27GG4 |
| Windows Server 2012 N | 8N2M2-HWPGY-7PGT9-HGDD8-GVGGY |
| Windows Server 2012 Single Language | 2WN2H-YGCQR-KFX6K-CD6TF-84YXQ |
| Windows Server 2012 Country Specific | 4K36P-JN4VD-GDC6V-KDT89-DYFKP |
| Windows Server 2012 Server Standard | XC9B7-NBPP2-83J2H-RHMBY-92BT4 |
| Windows Server 2012 MultiPoint Standard | HM7DN-YVMH3-46JC3-XYTG7-CYQJJ |
| Windows Server 2012 MultiPoint Premium | XNH6W-2V9GX-RGJ4K-Y8X6F-QGJ2G |
| Windows Server 2012 Datacenter | 48HP8-DN98B-MYWDG-T2DCC-8W83P |
| Operating system edition | KMS Client Setup Key |
|---|---|
| Windows 7 Professional | FJ82H-XT6CR-J8D7P-XQJJ2-GPDD4 |
| Windows 7 Professional N | MRPKT-YTG23-K7D7T-X2JMM-QY7MG |
| Windows 7 Professional E | W82YF-2Q76Y-63HXB-FGJG9-GF7QX |
| Windows 7 Enterprise | 33PXH-7Y6KF-2VJC9-XBBR8-HVTHH |
| Windows 7 Enterprise N | YDRBP-3D83W-TY26F-D46B2-XCKRJ |
| Windows 7 Enterprise E | C29WB-22CC8-VJ326-GHFJW-H9DH4 |
| Windows Server 2008 R2 Web | 6TPJF-RBVHG-WBW2R-86QPH-6RTM4 |
| Windows Server 2008 R2 HPC edition | TT8MH-CG224-D3D7Q-498W2-9QCTX |
| Windows Server 2008 R2 Standard | YC6KT-GKW9T-YTKYR-T4X34-R7VHC |
| Windows Server 2008 R2 Enterprise | 489J6-VHDMP-X63PK-3K798-CPX3Y |
| Windows Server 2008 R2 Datacenter | 74YFP-3QFB3-KQT8W-PMXWJ-7M648 |
| Windows Server 2008 R2 for Itanium-based Systems | GT63C-RJFQ3-4GMB6-BRFB9-CB83V |
| Operating system edition | KMS Client Setup Key |
|---|---|
| Windows Vista Business | YFKBB-PQJJV-G996G-VWGXY-2V3X8 |
| Windows Vista Business N | HMBQG-8H2RH-C77VX-27R82-VMQBT |
| Windows Vista Enterprise | VKK3X-68KWM-X2YGT-QR4M6-4BWMV |
| Windows Vista Enterprise N | VTC42-BM838-43QHV-84HX6-XJXKV |
| Windows Web Server 2008 | WYR28-R7TFJ-3X2YQ-YCY4H-M249D |
| Windows Server 2008 Standard | TM24T-X9RMF-VWXK6-X8JC9-BFGM2 |
| Windows Server 2008 Standard without Hyper-V | W7VD6-7JFBR-RX26B-YKQ3Y-6FFFJ |
| Windows Server 2008 Enterprise | YQGMW-MPWTJ-34KDK-48M3W-X4Q6V |
| Windows Server 2008 Enterprise without Hyper-V | 39BXF-X8Q23-P2WWT-38T2F-G3FPG |
| Windows Server 2008 HPC | RCTX3-KWVHP-BR6TB-RB6DM-6X7HP |
| Windows Server 2008 Datacenter | 7M67G-PC374-GR742-YH8V4-TCBY3 |
| Windows Server 2008 Datacenter without Hyper-V | 22XQ2-VRXRG-P8D42-K34TD-G3QQC |
| Windows Server 2008 for Itanium-Based Systems | 4DWFP-JF3DJ-B7DTH-78FJB-PDRHK |
If you enter a VLK key for Windows 10 Pro on Windows 10 Home, it will not be accepted. What you can do is enter the Windows 10 Pro upgrade key, VK7JG-NPHTM-C97JM-9MPGT-3V66T, let it upgrade, and then enter the VLK.
If you get a message saying you’re unable to upgrade because of error 0xC03F6506 or 0xC004F069, see this post.
If you’re about to use a VLK, you are probably going to be needing these commands.
cd %windir%\system32
cscript slmgr.vbs /ipk <kms client setup key>
cscript slmgr.vbs /skms kms.server.here
cscript slmgr.vbs /ato
# what do we have?
dism.exe /online /get-currentedition

# where can we go?
dism.exe /online /get-targeteditions

# convert to datacenter from datacenter eval (when shown as possible target above)
dism.exe /online /set-edition:serverdatacenter /productkey:WX4NM-KYWYW-QJJR4-XV3QB-6VM33 /accepteula
See this guide on pastebin.com (backup)
IMPORTANT: To do this, make sure you set the kms server first (see the “/skms” line above)
cd \"Program Files"\"Microsoft Office"\Office16
cscript ospp.vbs /act
For office VLK keys, see this post.
 I recently picked up a brand new vintage 2009 business targeted netbook, sealed in box – the Fujitsu Siemens Esprimo u9200 (fact sheet) (review => archive). At just short of 2KG (4.37 pounds) it’s rather bulky compared to today’s netbooks, but as a rather disposable piece of equipment for travel, which I’d be perfectly fine with leaving at a customs office or having stolen (same thing, I guess), it’s great.
This netbook is from the era during which companies were offering “downgrades” from the included Windows Vista to Windows XP, as loads of people preferred that, and like many cheapass economical machines at the time, it wasn’t really capable of running its included operating system at a satisfying speed. With Windows XP, however, it’s a different story. In fact, using SpeedswitchXP, it can even be permanently underclocked, which makes the fan shut up, and the operating system still performs adequately.
Disclaimer
Windows XP was never is no longer safe for daily use. It’s old, technically outdated, insecure, and many modern browsers no longer support it. When used carefully, as a machine to remote into other things, and when routing all outbound traffic through a VPN, I believe it’s usable, but I wouldn’t recommend it to anyone.
Windows XP, even with SP3 preinstalled on the CD, does not contain the drivers for the SATA controller in the u9200. While these can be loaded by pressing F6 during the installation, with a USB floppy drive connected, it’s much more elegant to burn a custom Windows XP install CD with the drivers included, using a process known as slipstreaming. For this, a program called nLite can be used. Wayne Zimmerman has an excellent writeup on how to do this over here (archive).
As for the drivers required for the u9200, I couldn’t find them on the Fujitsu support page, but the one for the Asian market still had them. I stuffed them all in this zip file: u9200_drivers.zip
While the bulk of the drivers are awesome to slipstream onto the CD, giving you full screen resolution, networking, etc. from the get-go, the SATA driver is unfortunately not the correct kind for loading as a plug-in storage driver during the install. For this you need the special “f6 floppy”, which you can get directly from Intel. Or here: STOR_all32_f6flpy_9.5.0.1037_PV.zip
IMPORTANT: When slipstreaming the “f6flpy” driver, DO NOT add it as a “Regular PNP driver” (do this with the rest). You want to add it as a Textmode driver (this is the kind available during text mode install, and thus when selecting the install partition), and you want to specifically select the “Intel(R) ICH8M-E/M SATA AHCI Controller“. If you do not do this, your install CD will still not find the drive.
Selecting the driver should look something like this:
All ready to go:
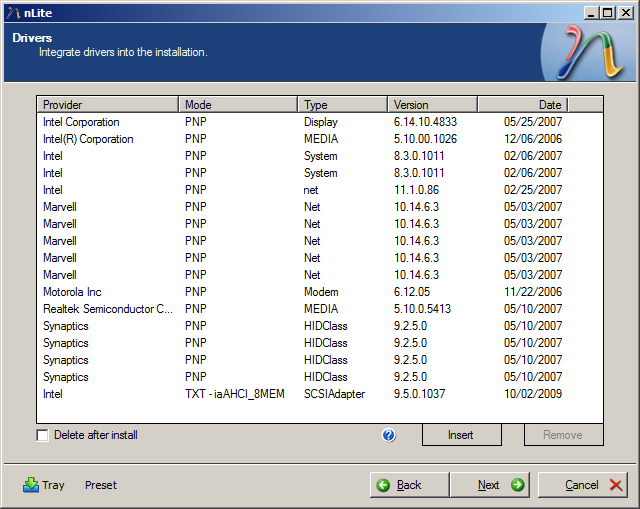
And that’s it! The Windows XP installer should now recognize your drive (I replaced mine with a cheap SSD, and it still worked). Enjoy the Windows XPerience.
Reinstalling Windows XP on an ancient (well, vintage 2009) laptop recently, I suddenly remembered how much I hated the “Favorites” button that’s stuck on the favorites bar and shows you your favorites when you click it, just as the bar already does.
This thing:

While the rest of the crap, such as the favorites, the “command bar”, and other things, can easily be turned off via the menus, the Favorites button is not going away so easily. However, there’s a registry setting for that!
In short, you can go into regedit and navigate to HKEY_CURRENT_USER\Software\Policies\Microsoft\Internet Explorer\Toolbars\Restrictions (create any missing keys along the way – mine didn’t have a “Toolbars”, nor a “Restrictions” key). Then make a new DWORD named “NoCommandBar”, and set it to 0x00000001.
..or you could simply import this registry file.
Voila! A nice, clean Internet Explorer:
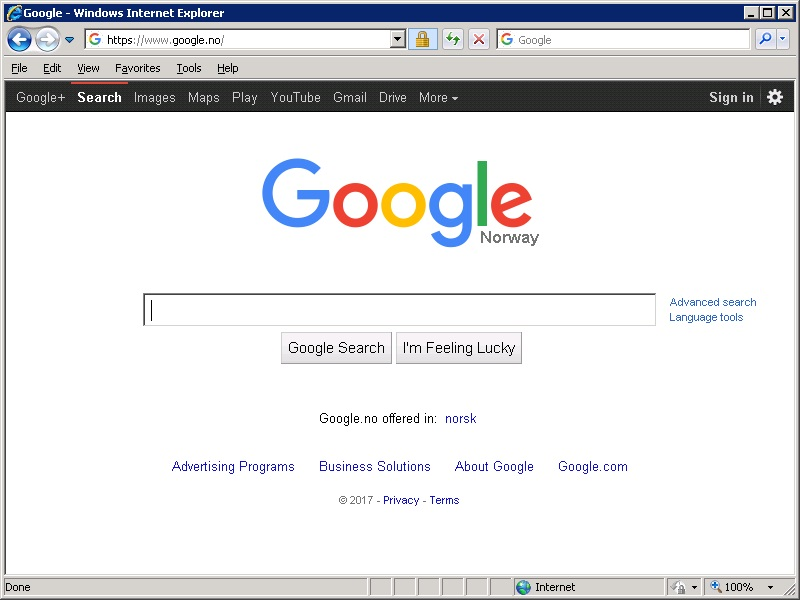
Next step: Install a better browser 🙂
These are apparently slowly disappearing from the intertubes. This is my attempt at archiving them.
-> DOWNLOAD HERE <-
Included PowerToys:
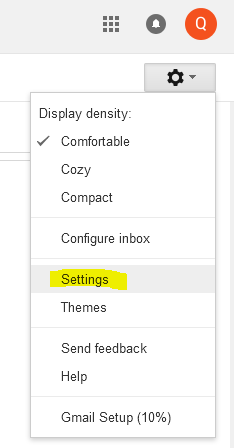
No introduction here. Let’s get to it.
Go to settings
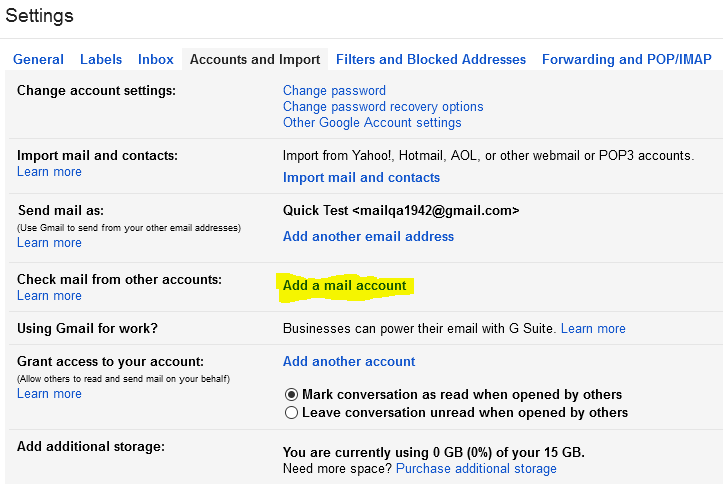
Add an external account
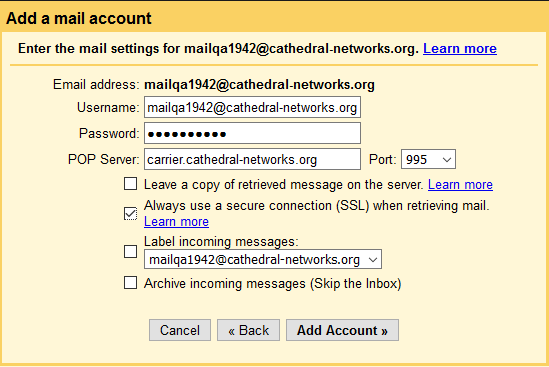
Enter your existing external email address, e.g. “you@otherdomain.com”

Select POP3

Enter your existing credentials
The settings shown are for the Cathedral mail server – yours may be different.
Contact your provider if you’re not sure.
Choose to treat it as an alias

Want to send mail?

If so, enter your SMTP credentials
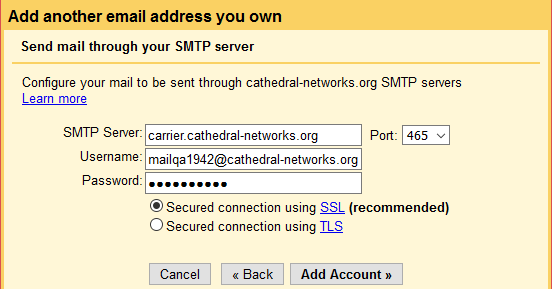
At this point, Gmail will send a verification code to your GMail address.

After either entering the code into the verification field, or clicking the link in the email they sent you, you’re good to go!
When setting up jails, I commonly end up with structures like this in my /etc/fstab:
/dev /jail/test/dev auto bind 0 0
/dev/pts /jail/test/dev/pts auto bind 0 0
/dev/shm /jail/test/dev/shm auto bind 0 0
/proc /jail/test/proc auto bind 0 0
/sys /jail/test/sys auto bind 0 0

/dev /jail/test2/dev auto bind 0 0
/dev/pts /jail/test2/dev/pts auto bind 0 0
/dev/shm /jail/test2/dev/shm auto bind 0 0
/proc /jail/test2/proc auto bind 0 0
/sys /jail/test2/sys auto bind 0 0
Now, if you take a bind mount and attempt to mount it while it’s already mounted, your system will most likely let you…
# findmnt /jail/test/dev
TARGET            SOURCE FSTYPE   OPTIONS
/jail/test/dev udev   devtmpfs rw,relatime,size=10240k,nr_inodes=1012462,mode=755
# mount /jail/test/dev
# findmnt /jail/test/dev
TARGET            SOURCE FSTYPE   OPTIONS
/jail/test/dev udev   devtmpfs rw,relatime,size=10240k,nr_inodes=1012462,mode=755
/jail/test/dev udev   devtmpfs rw,relatime,size=10240k,nr_inodes=1012462,mode=755
That’s just an effect of how bind mounts happen to work. However, I found that as soon as I had several of these jails, all bind mounting /dev and various paths in it into the jails, I began seeing duplicates. Lots of duplicates.
# findmnt /jail | wc -l
5172
…that’s bad
Turns out it’s caused by the mount propagation feature, in which a bind mount is supposed to receive additional binds if something is mounted in its parent. Here from man mount (8):
Since Linux 2.6.15 it is possible to mark a mount and its submounts
as shared, private, slave or unbindable. A shared mount provides the
ability to create mirrors of that mount such that mounts and unmounts
within any of the mirrors propagate to the other mirror. A slave
mount receives propagation from its master, but not vice versa. A
private mount carries no propagation abilities. An unbindable mount
is a private mount which cannot be cloned through a bind operation.
The detailed semantics are documented in
Documentation/filesystems/sharedsubtree.txt file in the kernel source
tree.
What happens is that the default “shared” propagation causes any bind below /jail/test/dev, such as /jail/test/dev/pts get propagated up to /dev. It gets even worse when there are many jails, as the propagation down to /dev continues back up to any previously mounted jails:
# mount | grep "type dev"
udev on /dev type devtmpfs (rw,relatime,size=10240k,nr_inodes=61165,mode=755)
devpts on /dev/pts type devpts (rw,nosuid,noexec,relatime,gid=5,mode=620,ptmxmode=000)
# mount /jail/test/dev && mount | grep "type dev" && echo "so far so good..."
udev on /dev type devtmpfs (rw,relatime,size=10240k,nr_inodes=61165,mode=755)
devpts on /dev/pts type devpts (rw,nosuid,noexec,relatime,gid=5,mode=620,ptmxmode=000)
udev on /jail/test/dev type devtmpfs (rw,relatime,size=10240k,nr_inodes=61165,mode=755)
so far so good...

# mount /jail/test/dev/pts && mount | grep "type dev" && echo "wait, wtf?"
udev on /dev type devtmpfs (rw,relatime,size=10240k,nr_inodes=61165,mode=755)
devpts on /dev/pts type devpts (rw,nosuid,noexec,relatime,gid=5,mode=620,ptmxmode=000)
udev on /jail/test/dev type devtmpfs (rw,relatime,size=10240k,nr_inodes=61165,mode=755)
devpts on /jail/test/dev/pts type devpts (rw,nosuid,noexec,relatime,gid=5,mode=620,ptmxmode=000)
devpts on /dev/pts type devpts (rw,nosuid,noexec,relatime,gid=5,mode=620,ptmxmode=000)
wait, wtf?

# mount /jail/test2/dev && mount /jail/test2/dev/pts && mount | grep "type dev"
udev on /dev type devtmpfs (rw,relatime,size=10240k,nr_inodes=61165,mode=755)
devpts on /dev/pts type devpts (rw,nosuid,noexec,relatime,gid=5,mode=620,ptmxmode=000)
udev on /jail/test/dev type devtmpfs (rw,relatime,size=10240k,nr_inodes=61165,mode=755)
devpts on /jail/test/dev/pts type devpts (rw,nosuid,noexec,relatime,gid=5,mode=620,ptmxmode=000)
devpts on /dev/pts type devpts (rw,nosuid,noexec,relatime,gid=5,mode=620,ptmxmode=000)
udev on /jail/test2/dev type devtmpfs (rw,relatime,size=10240k,nr_inodes=61165,mode=755)
devpts on /jail/test2/dev/pts type devpts (rw,nosuid,noexec,relatime,gid=5,mode=620,ptmxmode=000)
devpts on /dev/pts type devpts (rw,nosuid,noexec,relatime,gid=5,mode=620,ptmxmode=000)
devpts on /jail/test/dev/pts type devpts (rw,nosuid,noexec,relatime,gid=5,mode=620,ptmxmode=000)
As seen in the documentation, a private mount “carries no propagation abilities”. Thus, all I had to do was make all my jail bind mounts private, as so:
/dev /jail/test/dev auto bind,private 0 0
/dev/pts /jail/test/dev/pts auto bind,private 0 0
/dev/shm /jail/test/dev/shm auto bind,private 0 0
/proc /jail/test/proc auto bind,private 0 0
/sys /jail/test/sys auto bind,private 0 0

/dev /jail/test2/dev auto bind,private 0 0
/dev/pts /jail/test2/dev/pts auto bind,private 0 0
/dev/shm /jail/test2/dev/shm auto bind,private 0 0
/proc /jail/test2/proc auto bind,private 0 0
/sys /jail/test2/sys auto bind,private 0 0
And, after a while…
# findmnt /jail | wc -l
27
That’s better 🙂
Now, I could probably make mount propagation work for me and not manually specify binds for pts and shm and such, but I didn’t feel like spending the time to work out the implications of that.
Sometimes, you just want things brutally simple and stupid. I was searching for how to do this, and stumbled upon this post on SQL Server Central.
Turns out the query listed there doesn’t handle databases with weird names, containing version numbers with “.” in them, for instance.
Thus, I modified it slightly, adding brackets and such, and came up with the following:
USE MASTER
DECLARE
@isql varchar(2000),
@dbname varchar(64),
@logfile varchar(128)

DECLARE c1 CURSOR FOR
    SELECT  d.name, mf.name as logfile--, physical_name AS current_file_location, size
    FROM sys.master_files mf
    INNER JOIN sys.databases d
    ON mf.database_id = d.database_id
    WHERE recovery_model_desc <> 'SIMPLE'
    AND d.name NOT IN ('master','model','msdb','tempdb')
    AND mf.type_desc = 'LOG'
OPEN c1
FETCH NEXT FROM c1 INTO @dbname, @logfile
WHILE @@fetch_status <> -1
    BEGIN
    SELECT @isql = 'ALTER DATABASE [' + @dbname + '] SET RECOVERY SIMPLE'
    PRINT @isql
    --EXEC(@isql)
    SELECT @isql='USE [' + @dbname + '] checkpoint'
    PRINT @isql
    --EXEC(@isql)
    SELECT @isql='USE [' + @dbname + '] DBCC SHRINKFILE ([' + @logfile + '], 0)'
    PRINT @isql
    --EXEC(@isql)

    FETCH NEXT FROM c1 INTO @dbname, @logfile
    END
CLOSE c1
DEALLOCATE c1
NOTE: The “EXEC()” statements are commented out, so you can inspect what’s going to happen before adding them back in.
To enable timing of your query:
SET STATISTICS TIME ON
Time statistics provides output like this in the “Messages” tab of SSMS after running a query:
(127 row(s) affected)

 SQL Server Execution Times:
   CPU time = 0 ms,  elapsed time = 42 ms.
To show IO statistics:
SET STATISTICS IO ON
..which provides stuff like this:
(74394 row(s) affected)
Table 'Audit'. Scan count 1, logical reads 284, physical reads 0, read-ahead reads 0, lob logical reads 0, lob physical reads 0, lob read-ahead reads 0.
Table 'Users'. Scan count 1, logical reads 27, physical reads 0, read-ahead reads 0, lob logical reads 0, lob physical reads 0, lob read-ahead reads 0.
This shows you things like logical and physical reads (memory vs. disk reads). As you can see, my current query runs entirely in memory, but we can change that…
To completely flush the disk cache, query cache, and whatever other cache and start with a clean slate
DBCC FREESYSTEMCACHE ('All')
DBCC FREESESSIONCACHE
DBCC FREEPROCCACHE
CHECKPOINT
DBCC DROPCLEANBUFFERS
Lastly, I’d like to point in the general direction of Erland Sommarskog‘s excellent article with a very long title:
“Slow in the Application, Fast in SSMS? – Understanding Performance Mysteries” – archived here.
Happy debugging!