Introducing a new Cathedral Networks service. The console friendly pastebin that supports binary files. We needed one, so now it exists.
Take a look at https://paste.c-net.org/
Introducing a new Cathedral Networks service. The console friendly pastebin that supports binary files. We needed one, so now it exists.
Take a look at https://paste.c-net.org/
Tasked with recovering files you don’t have access to through the web interface, you can always find these through the file system if you’re the operator. You could, of course, give yourself access, but let’s save that for another time. Right now we want the files our users removed and/or can’t find.
We start by looking for them in Owncloud’s data directory.
# find /mnt/data/owncloud/ -name "AWOL Excel file.xlsm*"
/mnt/data/owncloud/files/user/files_versions/Important/Stuff/AWOL Excel file.xlsm.v1542980717
/mnt/data/owncloud/files/user/files_versions/Important/Stuff/AWOL Excel file.xlsm.v1542029758
/mnt/data/owncloud/files/user/files_versions/Important/Stuff/AWOL Excel file.xlsm.v1542303810
/mnt/data/owncloud/files/user/files_versions/Important/Stuff/AWOL Excel file.xlsm.v1542631862
/mnt/data/owncloud/files/user/files_versions/Important/Stuff/AWOL Excel file.xlsm.v1541686827
/mnt/data/owncloud/files/user/files_versions/Important/Stuff/AWOL Excel file.xlsm.v1543226434
/mnt/data/owncloud/files/user/files_versions/Important/Stuff/AWOL Excel file.xlsm.v1542889051
/mnt/data/owncloud/files/user/files_versions/Important/Stuff/AWOL Excel file.xlsm.v1541775363
/mnt/data/owncloud/files/user/files_versions/Important/Stuff/AWOL Excel file.xlsm.v1542722172
/mnt/data/owncloud/files/user/files_versions/Important/Stuff/AWOL Excel file.xlsm.v1541922874
Oh hey, there they are!
So, now we could simply copy them and ship them to our user, but let’s be a bit more fancy, since we can.
# FILE_SUFFIX=".xlsm"
# find /mnt/data/owncloud/ -name "AWOL Excel file.xlsm*" |
>   grep -E "\.v[0-9]+(\.d[0-9]+)?$" |
>   while read -r file; do
>       ts="${file##*.v}"; ts="${ts%.*}";
>       date=$(date --date="@${ts}" +"%Y%m%dT%H%M%S")
>       base="$(basename "${file%.v*}")"
>       name="${base%${FILE_SUFFIX:-}}"
>       echo "${name}-${date}${FILE_SUFFIX:-}"
>   done
AWOL Excel file-20181123T134517.xlsm
AWOL Excel file-20181112T133558.xlsm
AWOL Excel file-20181115T174330.xlsm
AWOL Excel file-20181119T125102.xlsm
AWOL Excel file-20181108T142027.xlsm
AWOL Excel file-20181126T100034.xlsm
AWOL Excel file-20181122T121731.xlsm
AWOL Excel file-20181109T145603.xlsm
AWOL Excel file-20181120T135612.xlsm
AWOL Excel file-20181111T075434.xlsm
So that’s the list of our files, with all the names neatly timestamped (translated from the UNIX timestamp at the end of Owncloud’s file names).
Not setting the $FILE_SUFFIX variable will work fine too, but you will end up with names such as “AWOL Excel file.xlsm-20181126T100034”
Now, let’s copy the files to their new names in our current directory.
# FILE_SUFFIX=".xlsm"
# find /mnt/data/owncloud/ -name "AWOL Excel file.xlsm*" |
>   grep -E "\.v[0-9]+(\.d[0-9]+)?$" |
>   while read -r file; do
>       ts="${file##*.v}"; ts="${ts%.*}";
>       date=$(date --date="@${ts}" +"%Y%m%dT%H%M%S")
>       base="$(basename "${file%.v*}")"
>       name="${base%${FILE_SUFFIX:-}}"
>       cp -v "$file" "${name}-${date}${FILE_SUFFIX:-}"
>   done
'/mnt/data/owncloud/files/user/files_versions/Important/Stuff/AWOL Excel file.xlsm.v1542980717' -> 'AWOL Excel file-20181123T134517.xlsm'
'/mnt/data/owncloud/files/user/files_versions/Important/Stuff/AWOL Excel file.xlsm.v1542029758' -> 'AWOL Excel file-20181112T133558.xlsm'
[... and so on ... ]
Cool.
Here it is as a one-liner, which your browser might add a line break to anyway, in case you’re interested:
FILE_SUFFIX=".xlsm"; find /mnt/data/owncloud/ -name "AWOL Excel file.xlsm*" | grep -E "\.v[0-9]+(\.d[0-9]+)?$" | while read -r file; do ts="${file##*.v}"; ts="${ts%.*}"; date=$(date --date="@${ts}" +"%Y%m%dT%H%M%S"); base="$(basename "${file%.v*}")"; name="${base%${FILE_SUFFIX:-}}"; cp -v "$file" "${name}-${date}${FILE_SUFFIX:-}"; done
Classic whodunit – the file is gone. Who deleted it?

Well, unless you’ve already prepared for this, Windows has no log for you. Sorry.
The good news is that this is an excellent time to prepare for the next time. So let’s do that.
Netwrix has documented the procedure for this. The relevant steps for us are:
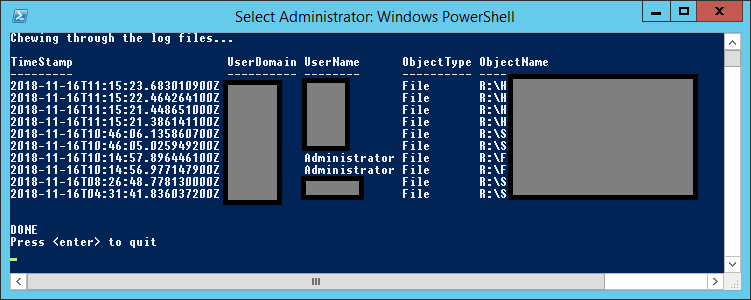
I wrote a short PowerShell script to do this. It’s not very efficient, but it does the job, and is relatively readable 🙂
"Chewing through the log files..."
Get-WinEvent -LogName "Security" | Where-Object { $_.Id -eq 4656 } | ForEach-Object { [xml]($_.ToXml()) } | Select -ExpandProperty "Event" | Where-Object `
{
    ( $_.EventData.Data | Where-Object { $_.Name -eq "AccessList" -and $_."#text" -like "*%%1537*" } ) -and `
    ( $_.EventData.Data | Where-Object { $_.Name -eq "ObjectName" -and $_."#text" -like "R:\*" } )
} | ForEach-Object `
{
    New-Object PSObject -Property (@{
        "TimeStamp"  = ($_.System.TimeCreated.SystemTime)
        "UserName"   = ($_.EventData.Data | Where-Object { $_.Name -eq "SubjectUserName" } | Select -ExpandProperty "#text")
        "UserDomain" = ($_.EventData.Data | Where-Object { $_.Name -eq "SubjectDomainName" } | Select -ExpandProperty "#text")
        "ObjectType" = ($_.EventData.Data | Where-Object { $_.Name -eq "ObjectType" } | Select -ExpandProperty "#text")
	"ObjectName" = ($_.EventData.Data | Where-Object { $_.Name -eq "ObjectName" } | Select -ExpandProperty "#text")
    })
} | Format-Table TimeStamp,UserDomain,UserName,ObjectType,ObjectName -AutoSize
"DONE"
"Press <enter> to quit"
Read-Host | Out-Null
Pro tip: For faster printout (line by line) but worse formatting, remove the -AutoSize parameter to Format-Table
This script specifically looks for files on R:\, but you can change this to whatever you want, or remove that condition all together.

And there you go! 🙂
I wrote this tool today, as I was annoyed having to do a bunch of changes to a configuration file on a client site through a restrictive remote tool that doesn’t let you paste or transfer any files for “security reasons” (read: BOFH)
It pastes text, files and entire directory structures by simulating keyboard input. I found some tools that do stuff like this, but all of them were somewhat shady and closed source. I thought someone else might enjoy this, so here it is.
This is a reference for the commands to enable the firewall rules necessary to remotely manage Windows Server Core and Hyper-V Core.
I keep having to look these up…
You also have to run one of them on the computer you intend to manager it from. Yes, the client.
Woop!

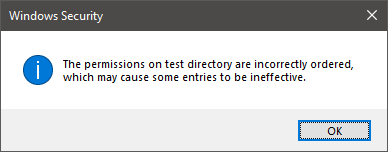
If you use Cygwin to mainly manipulate files in your regular Windows filesystem, under /cygdrive/…, you have probably seen this message more than a few times:

“The permissions on <node> are incorrectly ordered, which may cause some entries to be ineffective”
You have also likely seen “NULL SID” as the top entry in permission lists.

The Cygwin website has a page about filemodes, which explains why this happens.
In short, you have to edit /etc/fstab in Cygwin, and add “noacl” to the mount options for /cygdrive. Here is my /etc/fstab, for reference:
# /etc/fstab
#
#    This file is read once by the first process in a Cygwin process tree.
#    To pick up changes, restart all Cygwin processes.  For a description
#    see https://cygwin.com/cygwin-ug-net/using.html#mount-table

# This is default anyway:
#none /cygdrive cygdrive binary,posix=0,user 0 0
none /cygdrive cygdrive binary,noacl,posix=0,user 0 0
After editing this option, you have to stop every single Cygwin process for it to take effect. The easy way out is to reboot your system.
Microsoft has apparently messed up their integration of the Hyper-V Manager on Windows 10 with Hyper-V Server hosts, resulting in the above error message showing up on the “Security” tab of virtual machines.

So now what do you do if you want to disable Secure Boot to load some Linux distribution that doesn’t support it?
Well, we use PowerShell, remote into the Hyper-V Core Server, and disable secure boot from the CLI instead:
> Enter-PSSession <hyperHost>
> Set-VMFirmware <vm> -EnableSecureBoot off
And done! Changes take effect immediately. You can now boot your Linux goodness.
I’ve previously presented a manual process for doing this, but lately I’ve had to do it more often, and I figured it was about time for automation.
This script will:
Required runtime tools include:
This script is intended for Raspbian SD card images only, and may not work as intended with other distributions.
The script is currently hosted on github, and of course, there’s a local copy.
BONUS: A more general script for shrinking the last partition of existing image files. You might be able to draw inspiration from this.
In this example, we’ll be using a wildcard certificate from Let’s Encrypt, obtained through their recently released wildcard certificate offering.
The use case is that we want, for one reason or another, to use this certificate in an environment that does not have unrestricted internet access, such as a health institution or an office dealing with sensitive data. As we’ll soon discover, this presents some challenges for clients trying to verify the authenticity of the certificates the internal servers present to them.
When a client, such as a web browser, connects to a web server using SSL, that server presents a certificate to the client, including any intermediate certificates between the server certificate and the root certification authority. The client is expected to have, and trust, the root certificate. On Debian Linux and derivatives, the root certificates are provided in the ca-certificates package. On Windows they’re provided through Windows Update.
Contained within the properties of the provided certificate, and any intermediates, there’s most likely going to be one or more URL’s to Certificate Revocation List (CRL) distribution points and/or Online Certificate Status Protocol (OCSP) endpoints. Before it will trust the certificate provided by the server, any well implemented client will want to visit one of these services to ensure that none of the certificates in the chain have been revoked by their respective authorities.
We’ll do this initially on Linux, using OpenSSL on our PEM encoded certificate. For an example on Windows using a .pfx/.p12 encoded certificate, see below. See the Wikipedia article on X.509 certificates for a reference on commonly used certificate formats.
Our example certificate, provided by Let’s Encrypt and retrieved using certbot, is stored in four base64 encoded files:
| cert.pem | The public part of the certificate, which is passed on to clients by SSL/TLS servers on authentication |
| chain.pem | The public part of the certificates for any intermediate certificate authorities in the chain |
| fullchain.pem | This is simply the public certificate, followed by the chain. cert.pem and chain.pem in one file. Some configurations warrants this input. |
| privkey.pem | The private part of the certificate, not to be given to anyone, ever. This is your key to the public part of the certificate. |
To extract the CRL and OCSP URL’s we need to access for verification, we must investigate the contents of the cert.pem and chain.pem files. The OpenSSL tool, probably available in your package manager on Linux, is appropriate for the job.
$ openssl x509 -text -in cert.pem
Certificate:
    Data:
        Version: 3 (0x2)
        Serial Number:
            03:e9:e2:ae:d1:91:4d:bc:1e:c0:b6:65:c6:61:70:72:a2:cc
    Signature Algorithm: sha256WithRSAEncryption
        Issuer: C = US, O = Let's Encrypt, CN = Let's Encrypt Authority X3
        Validity
            Not Before: Apr 25 10:30:02 2018 GMT
            Not After : Jul 24 10:30:02 2018 GMT
        Subject: CN = *.example.com
------ snip -----
            Authority Information Access:
                OCSP - URI:http://ocsp.int-x3.letsencrypt.org
                CA Issuers - URI:http://cert.int-x3.letsencrypt.org/
------ snip -----
Here we see the OCSP address for our certificate. An old client that doesn’t support OCSP will not be able to check this and should always assume the certificate is not invalidated by the authority. Clients that are up to date will use OCSP here. Since CLR requires distribution of a complete list of invalidated certificates, it is not a practical solution for Let’s Encrypt due to the sheer volume of certificates and the relatively short lifetime (1 month in the example) of the issued certificates.
If we take a look at the intermediate certificate instead, we’ll see both a CRL URL, as well as one for OCSP:
$ openssl x509 -text -in chain.pem
Certificate:
    Data:
        Version: 3 (0x2)
        Serial Number:
            0a:01:41:42:00:00:01:53:85:73:6a:0b:85:ec:a7:08
    Signature Algorithm: sha256WithRSAEncryption
        Issuer: O = Digital Signature Trust Co., CN = DST Root CA X3
        Validity
            Not Before: Mar 17 16:40:46 2016 GMT
            Not After : Mar 17 16:40:46 2021 GMT
        Subject: C = US, O = Let's Encrypt, CN = Let's Encrypt Authority X3
------ snip -----
            Authority Information Access:
                OCSP - URI:http://isrg.trustid.ocsp.identrust.com
                CA Issuers - URI:http://apps.identrust.com/roots/dstrootcax3.p7c

            X509v3 Authority Key Identifier:
                keyid:C4:A7:B1:A4:7B:2C:71:FA:DB:E1:4B:90:75:FF:C4:15:60:85:89:10

            X509v3 Certificate Policies:
                Policy: 2.23.140.1.2.1
                Policy: 1.3.6.1.4.1.44947.1.1.1
                  CPS: http://cps.root-x1.letsencrypt.org

            X509v3 CRL Distribution Points:

                Full Name:
                  URI:http://crl.identrust.com/DSTROOTCAX3CRL.crl
------ snip -----
So, to validate the intermediate certificate, the client will access either of the following CRL’s:
Let’s do the same using common Windows tools.
On Windows, we’ll use certutil.exe to dump information about our .pfx file:
PS C:\howto> certutil -v -dump .\cert.pfx
Enter PFX password:
================ Certificate 0 ================
================ Begin Nesting Level 1 ================
Element 0:
X509 Certificate:
Version: 3
Serial Number: 0a0141420000015385736a0b85eca708
------ snip -----
    1.3.6.1.5.5.7.1.1: Flags = 0, Length = 73
    Authority Information Access
        [1]Authority Info Access
             Access Method=On-line Certificate Status Protocol (1.3.6.1.5.5.7.48.1)
             Alternative Name:
                  URL=http://isrg.trustid.ocsp.identrust.com
------ snip -----
    2.5.29.31: Flags = 0, Length = 35
    CRL Distribution Points
        [1]CRL Distribution Point
             Distribution Point Name:
                  Full Name:
                       URL=http://crl.identrust.com/DSTROOTCAX3CRL.crl
------ snip -----
================ Certificate 1 ================
================ Begin Nesting Level 1 ================
------ snip -----
    1.3.6.1.5.5.7.1.1: Flags = 0, Length = 63
    Authority Information Access
        [1]Authority Info Access
             Access Method=On-line Certificate Status Protocol (1.3.6.1.5.5.7.48.1)
             Alternative Name:
                  URL=http://ocsp.int-x3.letsencrypt.org
------ snip -----
We see we get the exact same URL’s from the certutil command, that’s run on a .pfx with both the server certificate (certificate 1) and the intermediate certificate (certificate 0) in it.
So, from the above, we know our clients (and probably our servers, too) will attempt to access the following URL’s:
Now we need to make some holes. Unless you’re planning on grabbing the external CRL’s on a regular basis, overriding your internal DNS, in this case for crl.identrust.com, and then hosting them on an internal webserver, your machines are simply going to have to access the outside through small pinholes in order to perform certificate verification.
Since all the URL’s use “http” and don’t specify a port number, we’ll be allowing traffic to port 80, the default port for http.
If you have a egress filtering proxy, transparent or opaque, and your closed environment definitely should, it should be trivial to allow access to .identrust.com and .letsencrypt.org, which happens to be the squid notation for anything ending with those two domain names. This notation does not limit wildcard matching to the first subdomain, unlike what *.example.com does for certificates.
The less attractive alternative is to regularly resolve crl.identrust.com, isrg.trustid.ocsp.identrust.com, and ocsp.int-x3.letsencrypt.org and then allowing connections to those.
Your first, and perhaps easiest, clue is a web browser, if applicable. Enter the URL of your internal server in a browser and look for the usual green padlock and lack of scary warning messages, indicating that an encrypted connection was successfully established. Then consider that your browser (and Windows itself) will cache OCSP and CRL results. There are some instructions on how to clear your OCSP and CRL cache here, and I’ll include them for reference:
PS C:\howto> certutil -urlcache * delete
------ lots of spam here ------
WinHttp Cache entries deleted: 175
Now for some debugging commands. The provided ones use PowerShell, but equivalents do of course exist for Linux.
All your devices need to be able to resolve the CRL/OCSP domains:
PS C:\howto> Resolve-DnsName crl.identrust.com

Name                           Type   TTL   Section    NameHost
----                           ----   ---   -------    --------
crl.identrust.com              CNAME  60    Answer     apps.digsigtrust.com

Name       : apps.digsigtrust.com
QueryType  : A
TTL        : 60
Section    : Answer
IP4Address : 192.35.177.64

Name                   : digsigtrust.com
QueryType              : SOA
TTL                    : 60
Section                : Authority
NameAdministrator      : sys-ops.identrust.com
SerialNumber           : 2016062800
TimeToZoneRefresh      : 300
TimeToZoneFailureRetry : 3600
TimeToExpiration       : 604800
DefaultTTL             : 60
So far, so good. We also need to be able to connect to it:
PS C:\howto> Test-NetConnection -ComputerName crl.identrust.com -Port 80

ComputerName     : crl.identrust.com
RemoteAddress    : 192.35.177.64
RemotePort       : 80
InterfaceAlias   : Wi-Fi
SourceAddress    : 10.1.2.3
TcpTestSucceeded : True
The important part above is that TcpTestSucceeded returns “True”.
Finally, let’s verify that we can actually run Verify() on our certificate, since we have it.
PS C:\howto> $cert = Get-PfxCertificate .\cert.pfx
Enter password: ****

PS C:\howto> $cert.Verify()
True
If this returns “False”, there’s trouble somewhere along the line.
In short, you are going to need to figure out which servers your chosen certificate authority requires that you connect to, and allow all of the involved computers, phones, and other devices to connect to these servers. If you want to avoid this, you’ll have to deal with an internal, homebrew certificate authority, and getting that installed on all your devices opens a whole new can of worms. Let’s not go there today.
Mostly notes to myself, but hey, maybe it helps you too!
I installed using re4son’s modified image from here.
/etc/default/grub
GRUB_TIMEOUT=0
GRUB_BACKGROUND=""
By default, Kali on the GPD Pocket will have some weird WiFi power saving mode enabled, which means that an incoming SSH session will feel very laggy unless the GPD is constantly sending data. The result is that an SSH session feels much smoother if you’re transferring a huge file at the same time, which is rather silly. A tool called “tlp” can disable the WiFi power saving.
apt-get install -y tlp
systemctl enable tlp
vim /etc/default/tlp

Firstly, disable WiFi power saving:
--------------
WIFI_PWR_ON_AC=off
WIFI_PWR_ON_BAT=off
--------------

Speed up the disk:
--------------
DISK_DEVICES="mmcblk0"
DISK_IOSCHED="deadline"
--------------

Less problems with USB devices that don't take well to being suspended:
--------------
USB_AUTOSUSPEND=0
--------------

I like to have the machine run cool even while on AC power:
--------------
CPU_HWP_ON_AC=balance_power
SCHED_POWERSAVE_ON_AC=1
SCHED_POWERSAVE_ON_BAT=1
ENERGY_PERF_POLICY_ON_AC=power
--------------
If the laptop is not set to sleep, the screen on mine didn’t shut off when closing the lid, and if I shut it off with a script, it would randomly turn back on due to magnetic interference from the magnets on the case, or on my bag, or on whatever else. I wrote a script to take care of this, with an autostart file to go along with it:
/root/bin/gpd-screen-watcher
/root/.config/autostart/gpd-screen-watcher.desktop
This is public domain.
gpd-screen-watcher needs to be executable 🙂
This is from the page about running Arch Linux on the GPD Pocket:
/etc/X11/xorg.conf.d/30-monitor.conf
Section "Monitor"
    Identifier "DSI-1"
    Option "Rotate" "right"
EndSection
/etc/X11/xorg.conf.d/50-trackpoint.conf
Section "InputClass"
    Identifier "GPD trackpoint"
    MatchProduct "SINO WEALTH Gaming Keyboard"
    MatchIsPointer "on"
    Driver "libinput"
    Option "Emulate3Buttons" "True"
    Option "MiddleEmulation" "True"
EndSection
EDIT: The last two lines of InputClass, Emulate3Buttons and MiddleEmulation, were added here on 2018-08-13, and allow clicking both mouse buttons to simulate a middle click, for pasting and such.
Have fun with Kali 😀