Checking for required packages on a Debian (or derivative) system

Tasked with cleaning up an installation script, I noticed it was calling dpkg dozens of times to verify that the required packages were in place. On a Raspberry Pi, or similar low powered device, this takes ages. I replaced it with the following:

c=0
while read -r pkg; do
    printf 'Missing package: %s\n' "$pkg" >&2
    (( ++c ))
done < <(dpkg-query -W -f='${binary:Package}\n' | cut -d ':' -f 1 | sort | comm -13 - <(sort <<-EOF
    libc-ares2
    libssl1.0.0
    zliblg
    mosquitto
    gdb
    tcpdump
    vim
EOF
))
printf 'Total missing packages: %d\n' "$c" >&2

In short:

  • We query dpkg once, listing every installed package, cut off any version numbers and sort the list
  • We sort a list of manually specified required packages (libc-ares2 … vim)
  • We compare the sorted lists (sorting is a requirement for comm), specifying that we want to not display columns 1 and 3, which are lines unique to the left side (installed ones), and lines that appear on both sides (installed and required), respectively. This leaves colum 2, the ones unique to the right side, which are the required packages missing from dpkg’s list.

Sample output:

$ ./check
Missing package: gdb
Missing package: mosquitto
Missing package: zliblg
Total missing packages: 3

Archived here for future reference, and in case it’s useful to anyone 🙂

Avoid having Visual Studio put all its floating windows on top

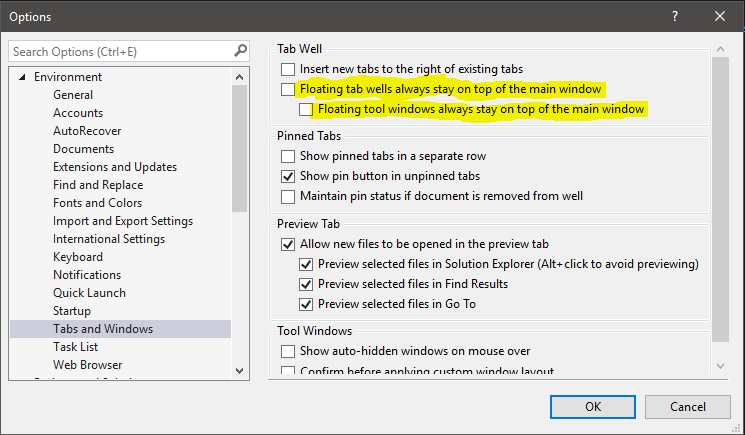
Working with multiple screens, I often use several windows in Visual Studio. For a while now, I’ve been annoyed by all the miscellaneous windows forcing themselves on top so I couldn’t open a browser on one screen and switch to the code on another screen without the window on the browser’s screen popping up to obscure the browser.

I finally took the time to figure this one out, and the answer is right there in the options menu. Deactivate both of the highlighted options and your windows are free to move around as you wish. They even get their own icon on the task bar, if you have a task bar on all your screens!

Sleeping without a subprocess in Bash, and how to sleep forever

No subprocess, no sleep command, no coproc, no nothing? Yes.

Sleeping in bash script is traditionally done with the sleep (1) command, which is external to bash, the command /bin/sleep. However, if you have a bunch of scripts running that all sleep this way, the output of ps looks like a mess, pstree looks like a bigger mess, and every OCD sensor in my brain goes off.

Sample output of pstree:

$ sudo pstree -ps 2828
systemd(1)───urxvt(2826)───bash(2828)───bash(14252)───sleep(14255)

Here, my terminal (urxvt) runs a shell (bash, 2828), that runs a test script (bash, 14252), that runs sleep (14255).

Several bad ideas

This post on Stack Exchange contains plenty of horrible proposed solutions, but does also point out that several distributions of Linux ship a package with loadable bash modules. Among them is an internal sleep command. I didn’t want to rely on that, however.

Stack Overflow has a post on how to sleep forever. Again there are several horrendous ideas, but the answer by Tino is rather clever:

bash -c 'coproc { exec >&-; read; }; eval exec "${COPROC[0]}<&-"; wait'

coproc is a relatively new feature, however, and it uses eval, which, as wooledge.org points out, is a common misspelling of “evil”. We can do better.

Finally asleep

Waiting to read a file descriptor that will never output anything is a clever solution, but we can achieve that without using coproc. instead opting for good old fashioned process substitution.

So I wrote the following function:

snore()
{
    local IFS
    [[ -n "${_snore_fd:-}" ]] || { exec {_snore_fd}<> <(:) && read -r -t 0 -u $_snore_fd; } 2>/dev/null ||
    {
# workaround for MacOS and similar systems local fifo
fifo=$(mktemp -u) mkfifo -m 700 "$fifo" exec {_snore_fd}<>"$fifo" rm "$fifo" } read ${1:+-t "$1"} -u $_snore_fd || : }

So what does that do? Well, this:

local IFS Reset IFS in case it’s set to something weird.
[[ -n “${_snore_fd:-}” ]] Checks if the $_snore_fd variable has already been declared. If so, we are good to go. The :- is there to subtitute with an empty string in case you’re using “set -eu”, which would exit with an error if the variable wasn’t set already.
exec {_snore_fd}<> Assigns the next available file descriptor to the “_snore_fd” variable. “_snore_fd” will be a number signifying the assigned file descriptor after this.
<(:) Process substitution: reading from a subshell that simply runs “:”, or “true” if you will, and then exits
read Attempts to read input, though it won’t get any
${1:+-t “$1”} Parameter expansion: If the snore() function was provided a parameter, it will pass it along to read as an argument for -t (timeout).
If no parameters were provided, -t will not be specified, and read will hang forever.
-u $_snore_fd Specifies that read should use the value of $_snore_fd as its input file descriptor
|| : Making sure read returns 0, for coding with -e set. This will run : if read fails, and : always returns 0.

Let’s test it!

Here’s a short script to compare the efficiency of snore() to that of /bin/sleep. It runs each operation 1000 times, for a total of what should be 10 seconds for each.

#!/usr/bin/env bash
set -u
set -e

snore()
{
    local IFS
    [[ -n "${_snore_fd:-}" ]] || exec {_snore_fd}<> <(:)
    read ${1:+-t "$1"} -u $_snore_fd || :
}

time for ((i=0; i<1000; i++)); do snore 0.01; done
time for ((i=0; i<1000; i++)); do sleep 0.01; done

The snore() function runs faster than /bin/sleep, at least on my system. That’s not to say it sleeps too quickly – one second is still one second – but if called in quick succession, one can see that the snoring loop is faster than the sleeping one:

$ /tmp/test </dev/null

real	0m10.226s
user	0m0.144s
sys	0m0.036s

real	0m11.674s
user	0m0.060s
sys	0m0.232s

As you can see, calling snore() 1000 times has a combined overhead of 0.226 seconds, while /bin/sleep measured 1.674 seconds. This is of course utterly insignificant in real world applications, but it’s interesting none the less.

No more sleep processes

Aside from the completely insignificant performance differences, my OCD was satisfied, as a script running snore() has no child process to wait for, and the subshell we spawn (once) disappears immediately. Here’s pstree while I run a script that snores:

$ sudo pstree -ps 2828
systemd(1)───urxvt(2826)───bash(2828)───bash(19247)

So my terminal runs a shell, and that shell runs the script, but there’s no sleep call, and no other subprocess. There’s simply the interactive shell waiting for the script. Excellent.

As an added bonus, there will no longer be any of the usual issues of various sleep processes hanging around after killing processes, or preventing them from being killed in the first place.

Halt and Catch Fire

Going back to the question on stack overflow, you may have noticed the parameter processing of snore() allowing for no parameters to be passed. This means that if you don’t pass any parameters to snore(), -t (timeout) will not be specified for the call to read, and read will hang forever. I don’t know why you’d want this, but now you can.

Update (June 12, 2019)

Added a workaround for MacOS and similar systems, using a short-lived FIFO to read from (only created on the first call to snore()).

Update (July 23, 2023)

Added a workaround for Bash 5.2 (thank you, anonymous commenter, for letting me know about the issue). Bash 5.2 would let the subprocess spawned by <(:) linger until the first read call completed. By using read -r -t 0 on it initially, this subprocess should go away immediately and not clutter up process lists, as intended.

Making Windows keep the system clock in UTC

Some hypervisors for virtual machines do not properly support sending a fake system time to the guest operating system, thus making Windows guests display the wrong time if their timezone is set to anything except UTC. This happens because Windows, by default, keeps the system clock set to the local time. This is stupid.

The same problems can occur on dual-booted computers, for instance where Windows and Linux attempt to co-exist on the same hardware. Linux will, unless told to do otherwise, set the system clock to UTC, and Windows will keep changing it to whatever the local time is. Linux can of course be told to keep the system time in the local time zone, but a less known feature of Windows allows you to do the opposite.

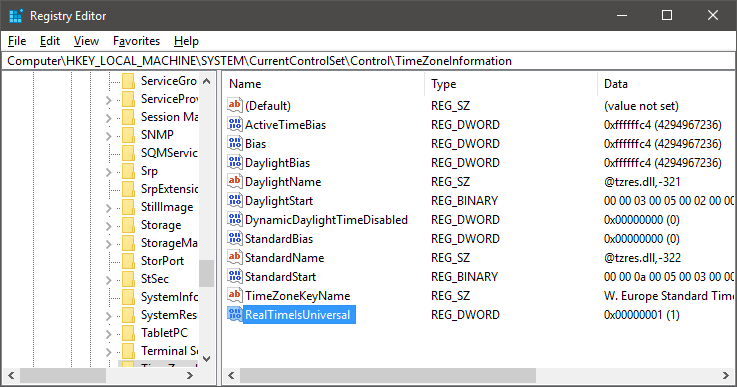
The magic registry key is HKEY_LOCAL_MACHINE\SYSTEM\CurrentControlSet\Control\TimeZoneInformation\RealTimeIsUniversal

Create a new 32-bit DWORD and set it to 1, then reboot.

There’s exhaustive reading material on the subject here (local archive) if you’re interested.

Finding the most expensive recent SQL queries on SQL Server

Mostly a note to self, original source here.

SELECT TOP 10 SUBSTRING(qt.TEXT, (qs.statement_start_offset/2)+1,
((CASE qs.statement_end_offset
WHEN -1 THEN DATALENGTH(qt.TEXT)
ELSE qs.statement_end_offset
END - qs.statement_start_offset)/2)+1),
qs.execution_count,
qs.total_logical_reads, qs.last_logical_reads,
qs.total_logical_writes, qs.last_logical_writes,
qs.total_worker_time,
qs.last_worker_time,
qs.total_elapsed_time/1000000 total_elapsed_time_in_S,
qs.last_elapsed_time/1000000 last_elapsed_time_in_S,
qs.last_execution_time,
qp.query_plan
FROM sys.dm_exec_query_stats qs
CROSS APPLY sys.dm_exec_sql_text(qs.sql_handle) qt
CROSS APPLY sys.dm_exec_query_plan(qs.plan_handle) qp
ORDER BY qs.total_logical_reads DESC -- logical reads
-- ORDER BY qs.total_logical_writes DESC -- logical writes
-- ORDER BY qs.total_worker_time DESC -- CPU time

Creating a local Certificate Authority using OpenSSL

I was recently tasked with creating a local CA for a project, where we needed to verify custom client certificates, have the ability to revoke them at will, and we wanted to add additional custom fields to the certificates. Cool.

The first stop after searching a bit was this excellent howto by Jamie Nguyen. There’s a local mirror here.

Frankly, the only thing Jamie doesn’t go into detail about is how to add custom properties to, in my case, client certificates. Dustin Oprea has a write-up on this here (mirror).

Shrinking a Raspbian installation and re-enabling auto expanding for distribution of customized images

UPDATE: See the automated script at https://blog.dhampir.no/content/script-for-creating-a-compressed-image-file-from-a-raspbian-sd-card

Raspbian, by default, expands to fill the SD card it finds itself on, the first time it boots. After having customized an image to your liking it would be favourable to avoid copying 16 gigabytes of data, or however large your chosen SD card is, each time you want to duplicate your setup. So let’s go through some simple steps to reduce the size of the resulting image file.

The Works

  1. Prepare the Raspbian image by re-enabling auto expanding
    1. Edit /boot/cmdline.txt and append init=/usr/lib/raspi-config/init_resize.sh
      In my case, this meant replacing

      dwc_otg.lpm_enable=0 console=serial0,115200 console=tty1 root=PARTUUID=1ba1cea3-02 rootfstype=ext4 elevator=deadline fsck.repair=yes rootwait logo.nologo net.ifnames=0

      With

      dwc_otg.lpm_enable=0 console=serial0,115200 console=tty1 root=PARTUUID=1ba1cea3-02 rootfstype=ext4 elevator=deadline fsck.repair=yes rootwait logo.nologo net.ifnames=0 init=/usr/lib/raspi-config/init_resize.sh

      This takes care of resizing the partition, but not the file system.

    2. Grab the resize2fs_once script from git (or from my archive copy here) and enable it
      $ sudo wget -O /etc/init.d/resize2fs_once https://github.com/RPi-Distro/pi-gen/raw/dev/stage2/01-sys-tweaks/files/resize2fs_once
      $ sudo chmod +x /etc/init.d/resize2fs_once
      $ sudo systemctl enable resize2fs_once

      This will expand the file system to match the resized partition on the first boot.

  2. Cleanly shut down the Raspberry Pi
  3. Put the SD card in a card reader on a Linux machine. The machine can be your Raspberry Pi, as long as you’re booting from another SD card.
    The following steps assume you are not currently booting from the SD card you want to modify.
  4. Confirm the device name with dmesg
    $ dmesg
    ...
    [1314286.573659] mmc0: new ultra high speed SDR50 SDHC card at address 59b4
    [1314286.574319] mmcblk0: mmc0:59b4 USDU1 14.7 GiB 
    [1314286.575783] mmcblk0: p1 p2
  5. Launch gparted, or a CLI tool if you prefer, and shrink the EXT4 file system and partition. I usually leave a hundred megs or so of free space to avoid issues with programs that write stuff on the first boot.

    Close gparted.
  6. Optional extra #1: You don’t have to do this step. Skip ahead if you want.
    If you want, this would be the time to defragment the file system, as any fragmentation will be written as is to the next card.

    $ mkdir /tmp/sd_root
    $ sudo mount /dev/mmcblk0p2 /tmp/sd_root
    $ sudo e4defrag /dev/mmcblk0p2
    ext4 defragmentation for device(/dev/mmcblk0p2)
    [7/51184]/tmp/sd_root/etc/dhcp/debug:       100%     [OK]
    [14/51184]/tmp/sd_root/sbin/mntctl:         100%     [OK]
    [310/51184]/tmp/sd_root/sbin/killall5:      100%     [OK]
    ............
    
        Success:          [ 40336/51184 ]
        Failure:          [ 10848/51184 ]
    $ sudo umount /tmp/sd_root
    $ sudo rmdir /tmp/sd_root

    Note that some failures are expected. This is normal.

  7. Optional extra #2: You don’t have to do this step. Skip ahead if you want.
    If you want your image to compress extremely well, you can at this point mount the image and zero fill the free space you left. Large chunks of zeros are exceptionally easy to compress.

    $ mkdir /tmp/sd_root
    $ sudo mount /dev/mmcblk0p2 /tmp/sd_root
    $ sudo dd if=/dev/zero of=/tmp/sd_root/delete.me
    dd: writing to '/tmp/sd_root/delete.me': No space left on device
    41110+0 records in
    41109+0 records out
    21047808 bytes (21 MB, 20 MiB) copied, 0.437186 s, 48.1 MB/s
    $ sudo rm /tmp/sd_root/delete.me
    $ sudo umount /tmp/sd_root
    $ sudo rmdir /tmp/sd_root
  8. Use fdisk -l or a similar command to find the end of the resized partition
    $ sudo fdisk -l /dev/mmcblk0
    Disk /dev/mmcblk0: 14.7 GiB, 15753805824 bytes, 30769152 sectors
    Units: sectors of 1 * 512 = 512 bytes
    Sector size (logical/physical): 512 bytes / 512 bytes
    I/O size (minimum/optimal): 512 bytes / 512 bytes
    Disklabel type: dos
    Disk identifier: 0x44b1ee6a
    
    Device Boot Start End Sectors Size Id Type
    /dev/mmcblk0p1 8192 93486 85295 41.7M c W95 FAT32 (LBA)
    /dev/mmcblk0p2 94208 3985407 3891200 1.9G 83 Linux

    This partition ends at block 3985407, and the block size is 512 bytes. We’ll need these numbers.

  9. Use dd to copy the image to where you want it. Here we use the values from the previous step, but add 1 to the number of blocks, as blocks are 0-indexed. To clarify, the first block is block 0, so if the last partition ended at block 5, the full image would be 6 blocks long.
    $ sudo dd if=/dev/mmcblk0 of=/tmp/my_raspbian.img bs=512 count=3985408
  10. Compress the image with gzip, zip, 7z, or whatever tool you fancy, put it somewhere and tell your friends 🙂

Handling multiple overlapping VPN client networks with pfSense and a reflector VM

Following up on my recent post about making a minimal VPN routing virtual machine to isolate obnoxious VPN clients, another problem you’ll run into if you have the need to connect to a whole lot of client networks is that the networks of different companies tend to overlap, either with your own or with eachother. Most companies I deal with use the 10.0.0.0/8 or the 172.16.0.0/12 networks, as specified in RFC1918, or some combination thereof. 192.168.0.0/16 seems to be really unpopular for some reason, even in small networks.

The problems arise when one client’s network fully or partially overlaps that of another client, or that of the company you’re at. If there’s a 10.10.1.50 host in your network, and 10.10.1.50 is also inside the client’s 10.10.0.0/16 network, pfSense would have no idea where to route you. We could make a rule to route single computers to the remote site, but then they could never access the local machine with that IP. What we need is remapping, translation, dirty outbound NAT hacks and a bit of black magic.

A picture says a thousand words

This diagram attempts to show the address translation accomplished by pfSense and the reflector VM. The idea is to map the machines we’re trying to access at the remote site to an address range that is unused in the local network. Currently, we do this on an IP by IP basis, but it could easily be extended to translate entire address ranges if desired.

Image created with draw.io (XML).

Actually, that image didn’t explain a thing…

The idea here is that we have a client network that overlaps our own. We use an internally unused network, 10.100.0.0/16 and connect to that instead. We exploit the fact that the routing table of an IPSec connection trumps the internal routing table in pfSense. A connection proceeds as such:

  1. The PC at 10.2.1.14 attempts to connect to 10.100.4.2
  2. pfSense will outbound NAT this request and route it to the reflector VM at 172.31.255.1
    The reflector VM didn’t need an IP address this odd, but it has yet to collide with a client, so that’s nice.
  3. The request is now coming from the pfSense box, and arrives at the reflector as a connection attempt from pfSense to 10.100.4.2
  4. The reflector will also reverse NAT the request and route it back to pfSense as if it was making the request itself, but it will additionally translate the target IP from 10.100.4.2 to 10.2.4.2
  5. pfSense receives the connection request from 172.31.255.1 to 10.2.4.2, knows that 172.31.255.1/32 is the local IP range for the VPN connection to Client1 and routes the connection over there.

Here are a few facts about this setup, to answer questions you may have at this point:

  • 172.31.255.1/32 is set as the local IP range for the VPN connection, 10.2.0.0/16 is set as the remote range
  • Computers in the local network, even those in other VLAN’s, such as the 10.3.0.0 network, can thus not connect directly through the VPN, as their requests to 10.2.0.0/16 IP’s would be routed as usual to the local 10.2 subnet. They all have to use 10.100.0.0/16 to traverse the VPN’s
  • Computers at Client1 can’t possibly get back through this insane setup to reach local machines by IP
    However, they could make requests to the IP address we expose as the local part of our network in the NAT/BINAT configuration of IPSec, which is actually set up in a few cases, and the reflector can distribute those based on the port number and remote IP
  • The reflector VM can’t actually connect to internal machines with IP adresses overlapping the VPN networks, as its requests would be routed to clients
    ..but why would you want to use the reflector to connect to anything local?
  • If client networks overlap each other, you need more than one reflector

That’s completely insane!

I agree.

So how do we do it?

Glad you asked. Keep reading.

pfSense configuration

Firstly, we configure the VPN connection in pfSense as usual. Let’s assume it’s IPsec to make it easy. We set the local network to 172.31.255.1/32, and use NAT/BINAT translation to set the address to anything not in the client’s network, which will work just fine. The screenshot shows the IPSec Phase 2 configuration.

Next, we add the Reflector VM as a router on our internal network.

We also need to add a static route to send everything going to the 10.100.0.0/16 network to the router we just created.

Then there’s the outbound NAT that translates requests going to the reflector as coming from pfSense. What we’re saying here is that connection requests going out of the TEST interface from any internal IP (I made this /8 just so I don’t have to touch it again) and heading to 172.31.255.1 should be NAT’ed to the interface IP of pfSense.

Then we add the firewall rules. We need two of these. The first one allows the Reflector VM to connect to all networks, which includes all the remote clients. The second (not shown, but you’ll figure it out) allows the local machines to connect to the 10.100.0.0/16 network.

This concludes the pfSense side of things.

Reflector VM

The reflector is a minimal install of Debian Linux with Shorewall installed. I’m familiar with both, so that makes it an obvious and time saving choice for me.

First, there’s the interfaces file. Just the single network interfaces in here. Not much to see, but the routeback option is needed to allow traffic to ingress and egress the same interface.

# ZONE INTERFACE BROADCAST OPTIONS
net eth0 detect dhcp,logmartians=1,nosmurfs,routefilter,tcpflags,routeback

The zones file is equally dull.

# ZONE TYPE
fw firewall
net ipv4

At the policy file, it gets a bit more interesting, as we allow any traffic to bounce off of us, going from net to net.

# SOURCE DEST POLICY LOG_LEVEL
$FW net ACCEPT
net net ACCEPT
all all REJECT info

As we want to NAT any traffic that bounces off us, we’ll need a masq file:

#INTERFACE:DEST SOURCE ADDRESS PROTO PORT(S) IPSEC MARK USER/ SWITCH ORIGINAL
#                                                       GROUP        DEST
eth0           10.0.0.0/8,172.16.0.0/12,192.168.0.0/16

In shorewall.conf, I change a single line to ensure IP_FORWARDING is enabled

IP_FORWARDING=Yes

Then come the rules. This is where we do the mapping. These are mock entries to preserve company privacy. Note the single reverse connection too, which allows companies at the remote end to reach a local webserver.

#ACTION SOURCE DEST PROTO DEST    SOURCE ORIGINAL RATE  USER/ MARK CONNLIMIT TIME HEADERS SWITCH HELPER
#                   PORT  PORT(S)        DEST     LIMIT GROUP
#?SECTION ALL
#?SECTION ESTABLISHED
#?SECTION RELATED
#?SECTION INVALID
#?SECTION UNTRACKED
?SECTION NEW

# we want to SSH in here
SSH(ACCEPT+) net $FW

# client1
DNAT any+ net:10.2.4.2 - - - 10.100.4.2
DNAT any+ net:10.2.4.6 - - - 10.100.4.6
DNAT any+ net:10.2.4.7 - - - 10.100.4.7

# client2
DNAT any+ net:172.19.30.4 - - - 10.100.30.4
DNAT any+ net:172.19.30.5 - - - 10.100.30.5
DNAT any+ net:172.19.30.6 - - - 10.100.30.6

# client3
DNAT any+ net:10.40.2.60 - - - 10.100.19.60
DNAT any+ net:10.40.2.61 - - - 10.100.19.61
DNAT any+ net:10.40.2.68 - - - 10.100.19.68

# reverse connections
DNAT any+ net:10.5.3.30:80 TCP 80

# PING
ACCEPT $FW net icmp
ACCEPT net $FW icmp

With our IP addresses re-mapped for the clients, everything should, amazingly, work. It’s not pretty. Far from it. But it does the job, it’s stable, and all I need to change to accommodate a new client is adding the map in the rules file after setting up the VPN.

The addresses in the 10.100.0.0/16 range are completely arbitrary. I usually make the last 8 bits match the client’s machines, but you don’t have to do that.

DNS

Finally back to pfSense again, I also have some DNS host overrides so employees don’t have to remember the remapped, or the original, IP addresses. Note that if you’re dealing with HTTPS and want certificates to function correctly, the host.domain names need to match the certificates on the remote servers. These overrides are trivial to set up, but here’s an example anyway.

So what happens when two clients overlap with each other?

The above solution applies when clients partially or fully overlap your internal network. However, if they overlap with each other, pfSense would again not know where to route a given connection from the reflector. The solution then is another reflector VM. They’re very cheap to run anyway, so it’s not a big issue.

Final words

If you ever attempt to do this, you will no doubt have questions. Feel free to leave them here, and I’ll try to get back to you. Make sure you enter your e-mail correctly. It will not be published, but I need it if you want me to reply 🙂